DIY Satin Hair Scrunchies | How to Sew a Scrunchie | Great for Curly Hair
I’m back with another DIY video! This time watch to learn how to sew Satin Hair Scrunchies! Step by step I will show you how I make these scrunchies that are so great for curly and thick hair. These are my favorite and I hope you enjoy learning how to make your own!
Satin Face Mask DIY: How to Sew a Satin Lined Face Mask | Face Mask DIY for Acne


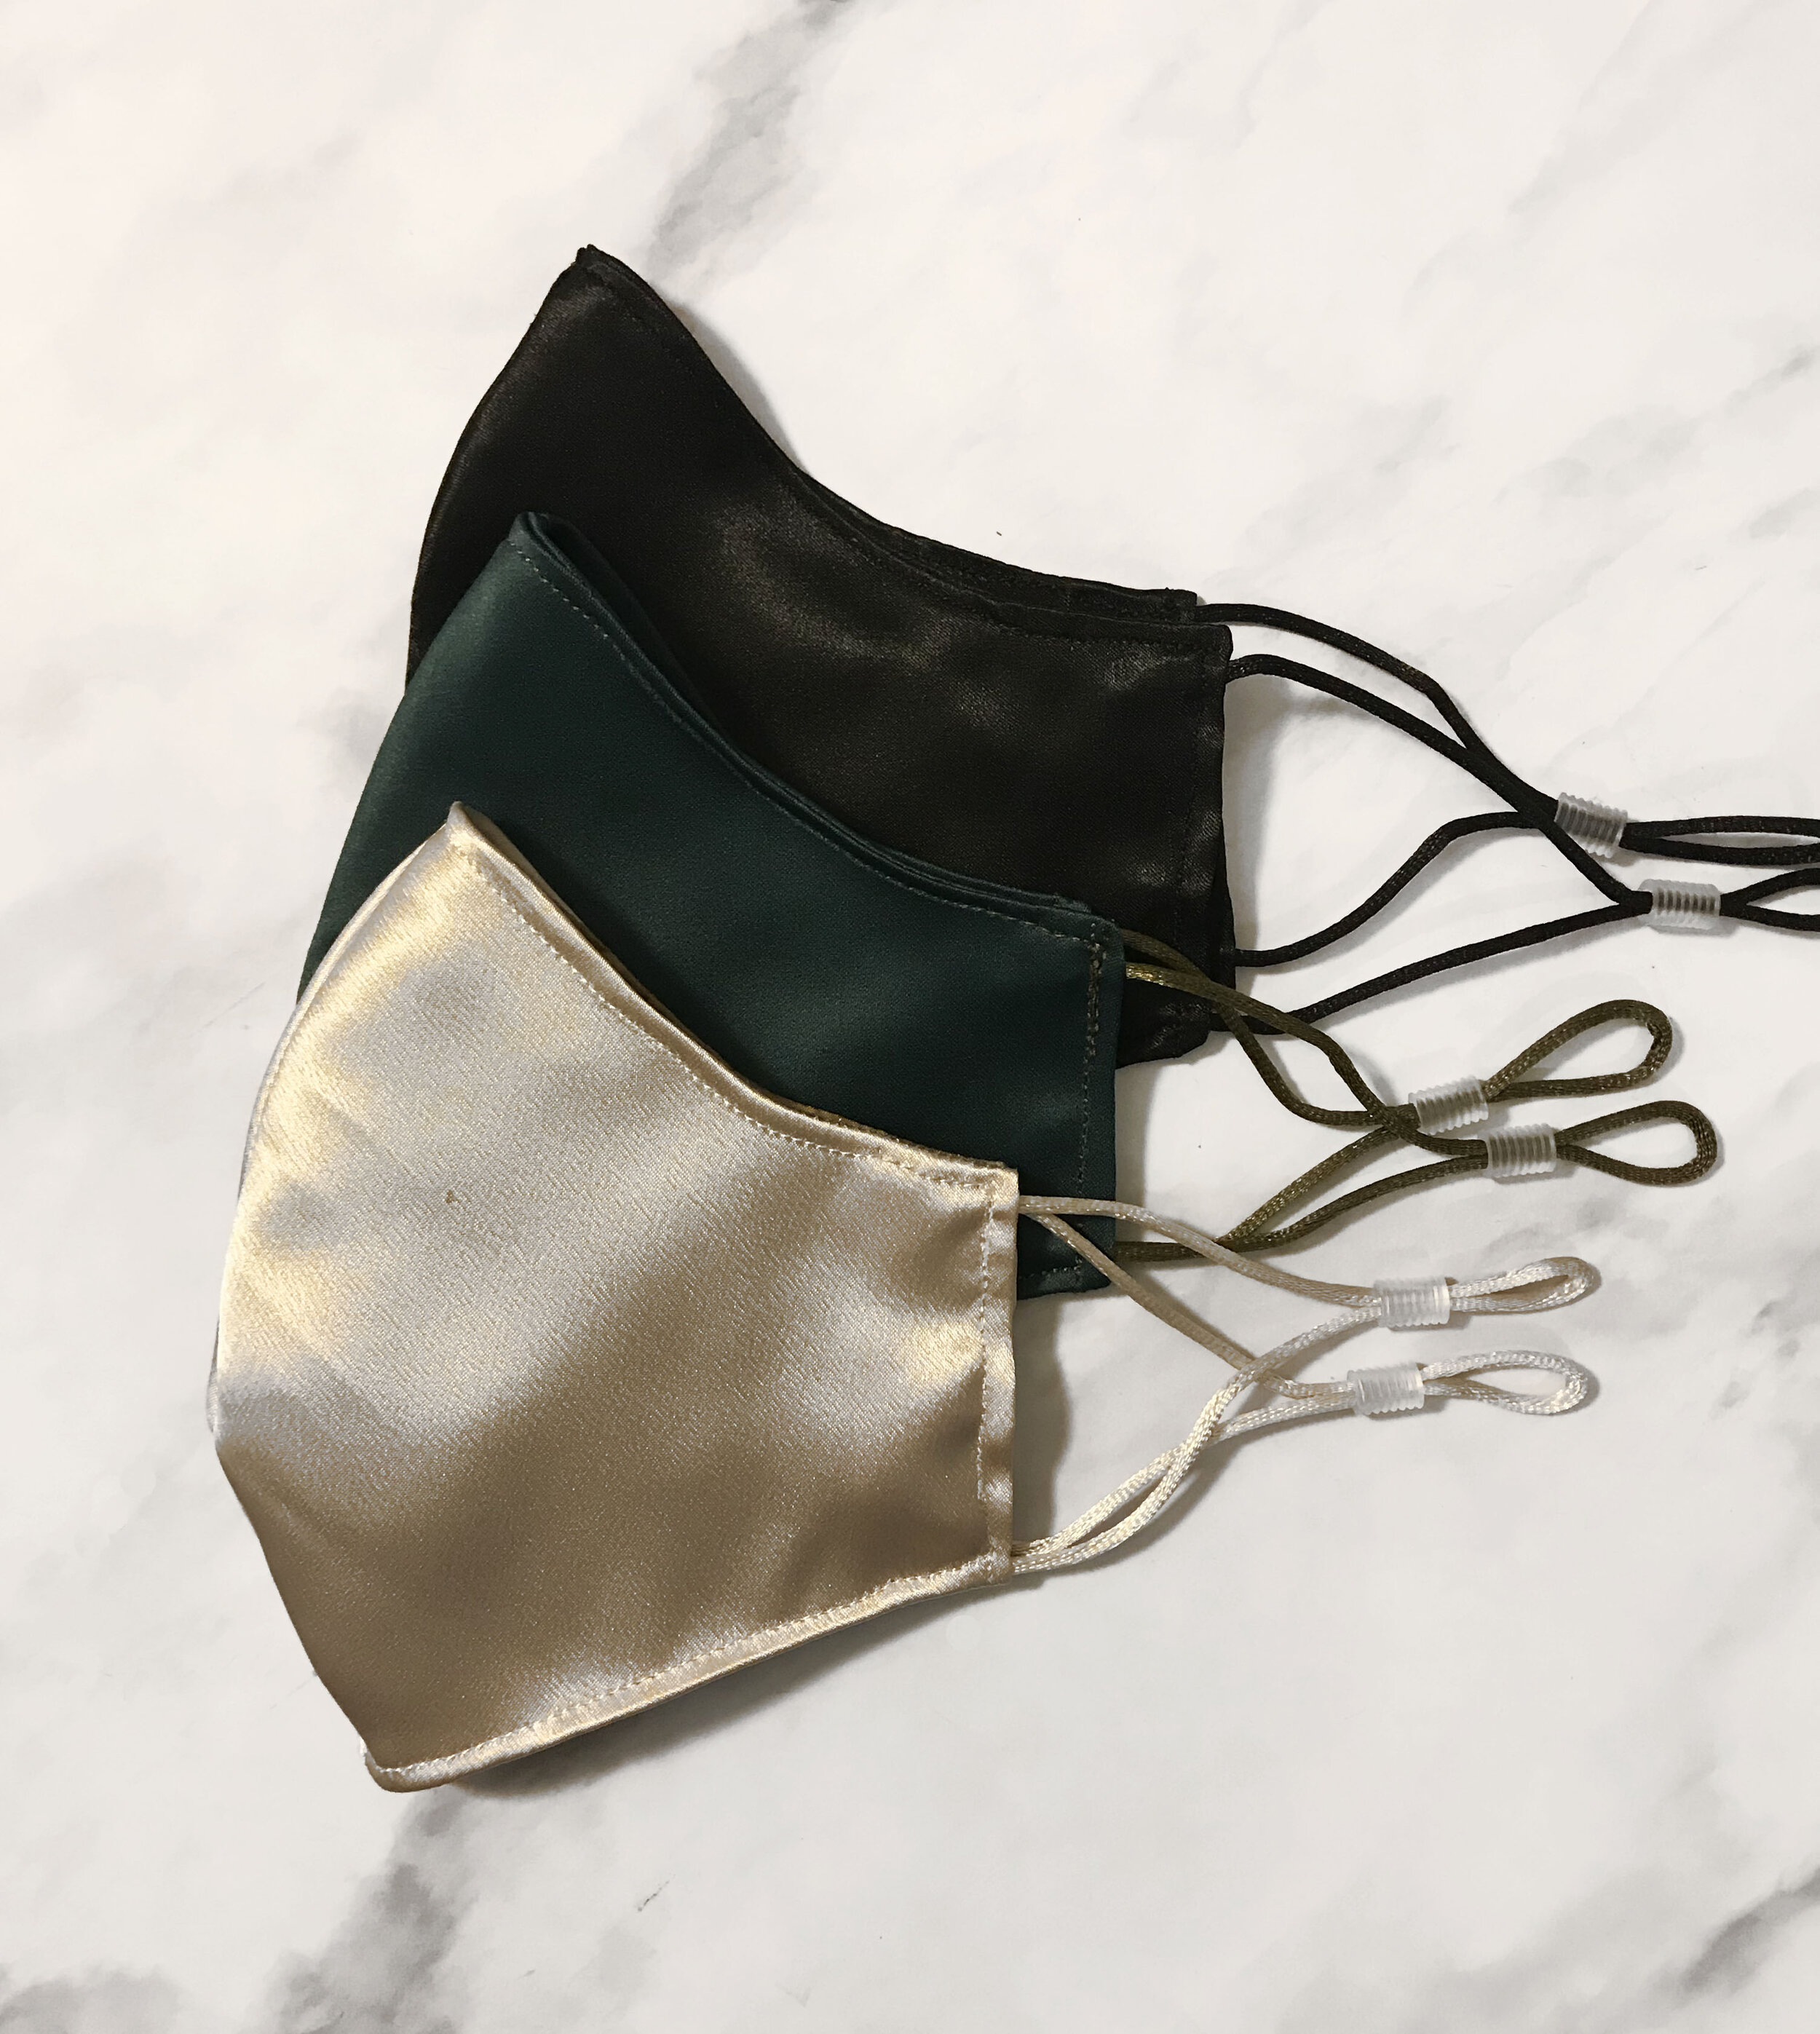
Watch how I sew my own Satin Lined Face Masks! Step by step I will show you how I make these masks that are so much nicer to your skin. This is a great Face Mask DIY for Acne, as satin can help prevent acne.
Enjoy!
Enjoy the videos and music you love, upload original content, and share it all with friends, family, and the world on YouTube.
Tutorial Time!: How to add Textures to Illustrations in Photoshop
Hello! So I decided to share how how color and add texture my illustrations using Adobe Photoshop on my MacBook Pro. Check out this video to learn how and stay tuned for videos to come!
Hi! Check out this video to learn how I add textures and color into an illustration in Photoshop. If you like please check out my other work on my accounts b...
Home Decor DIY Project: Up-cycled Picture Frames
I think it’s fair to assume, given these crazy times, that I am not the only one who has gotten more resourceful and crafty. I mean the less money I can spend, the better!
My mindset is no different when it comes to decorating my home either. Recently I have been particularly bothered with how bare the walls of my condo are. It’s interesting, because when I first moved in, I loved the idea of just well-painted walls to create a clean and chic look. Perhaps because of spending more time at home in the last few months than ever before, I now crave decorating the walls, not only with pictures of my family and friends ( I do have those- I’m not a psycho lol), but also of more abstract art and photography.
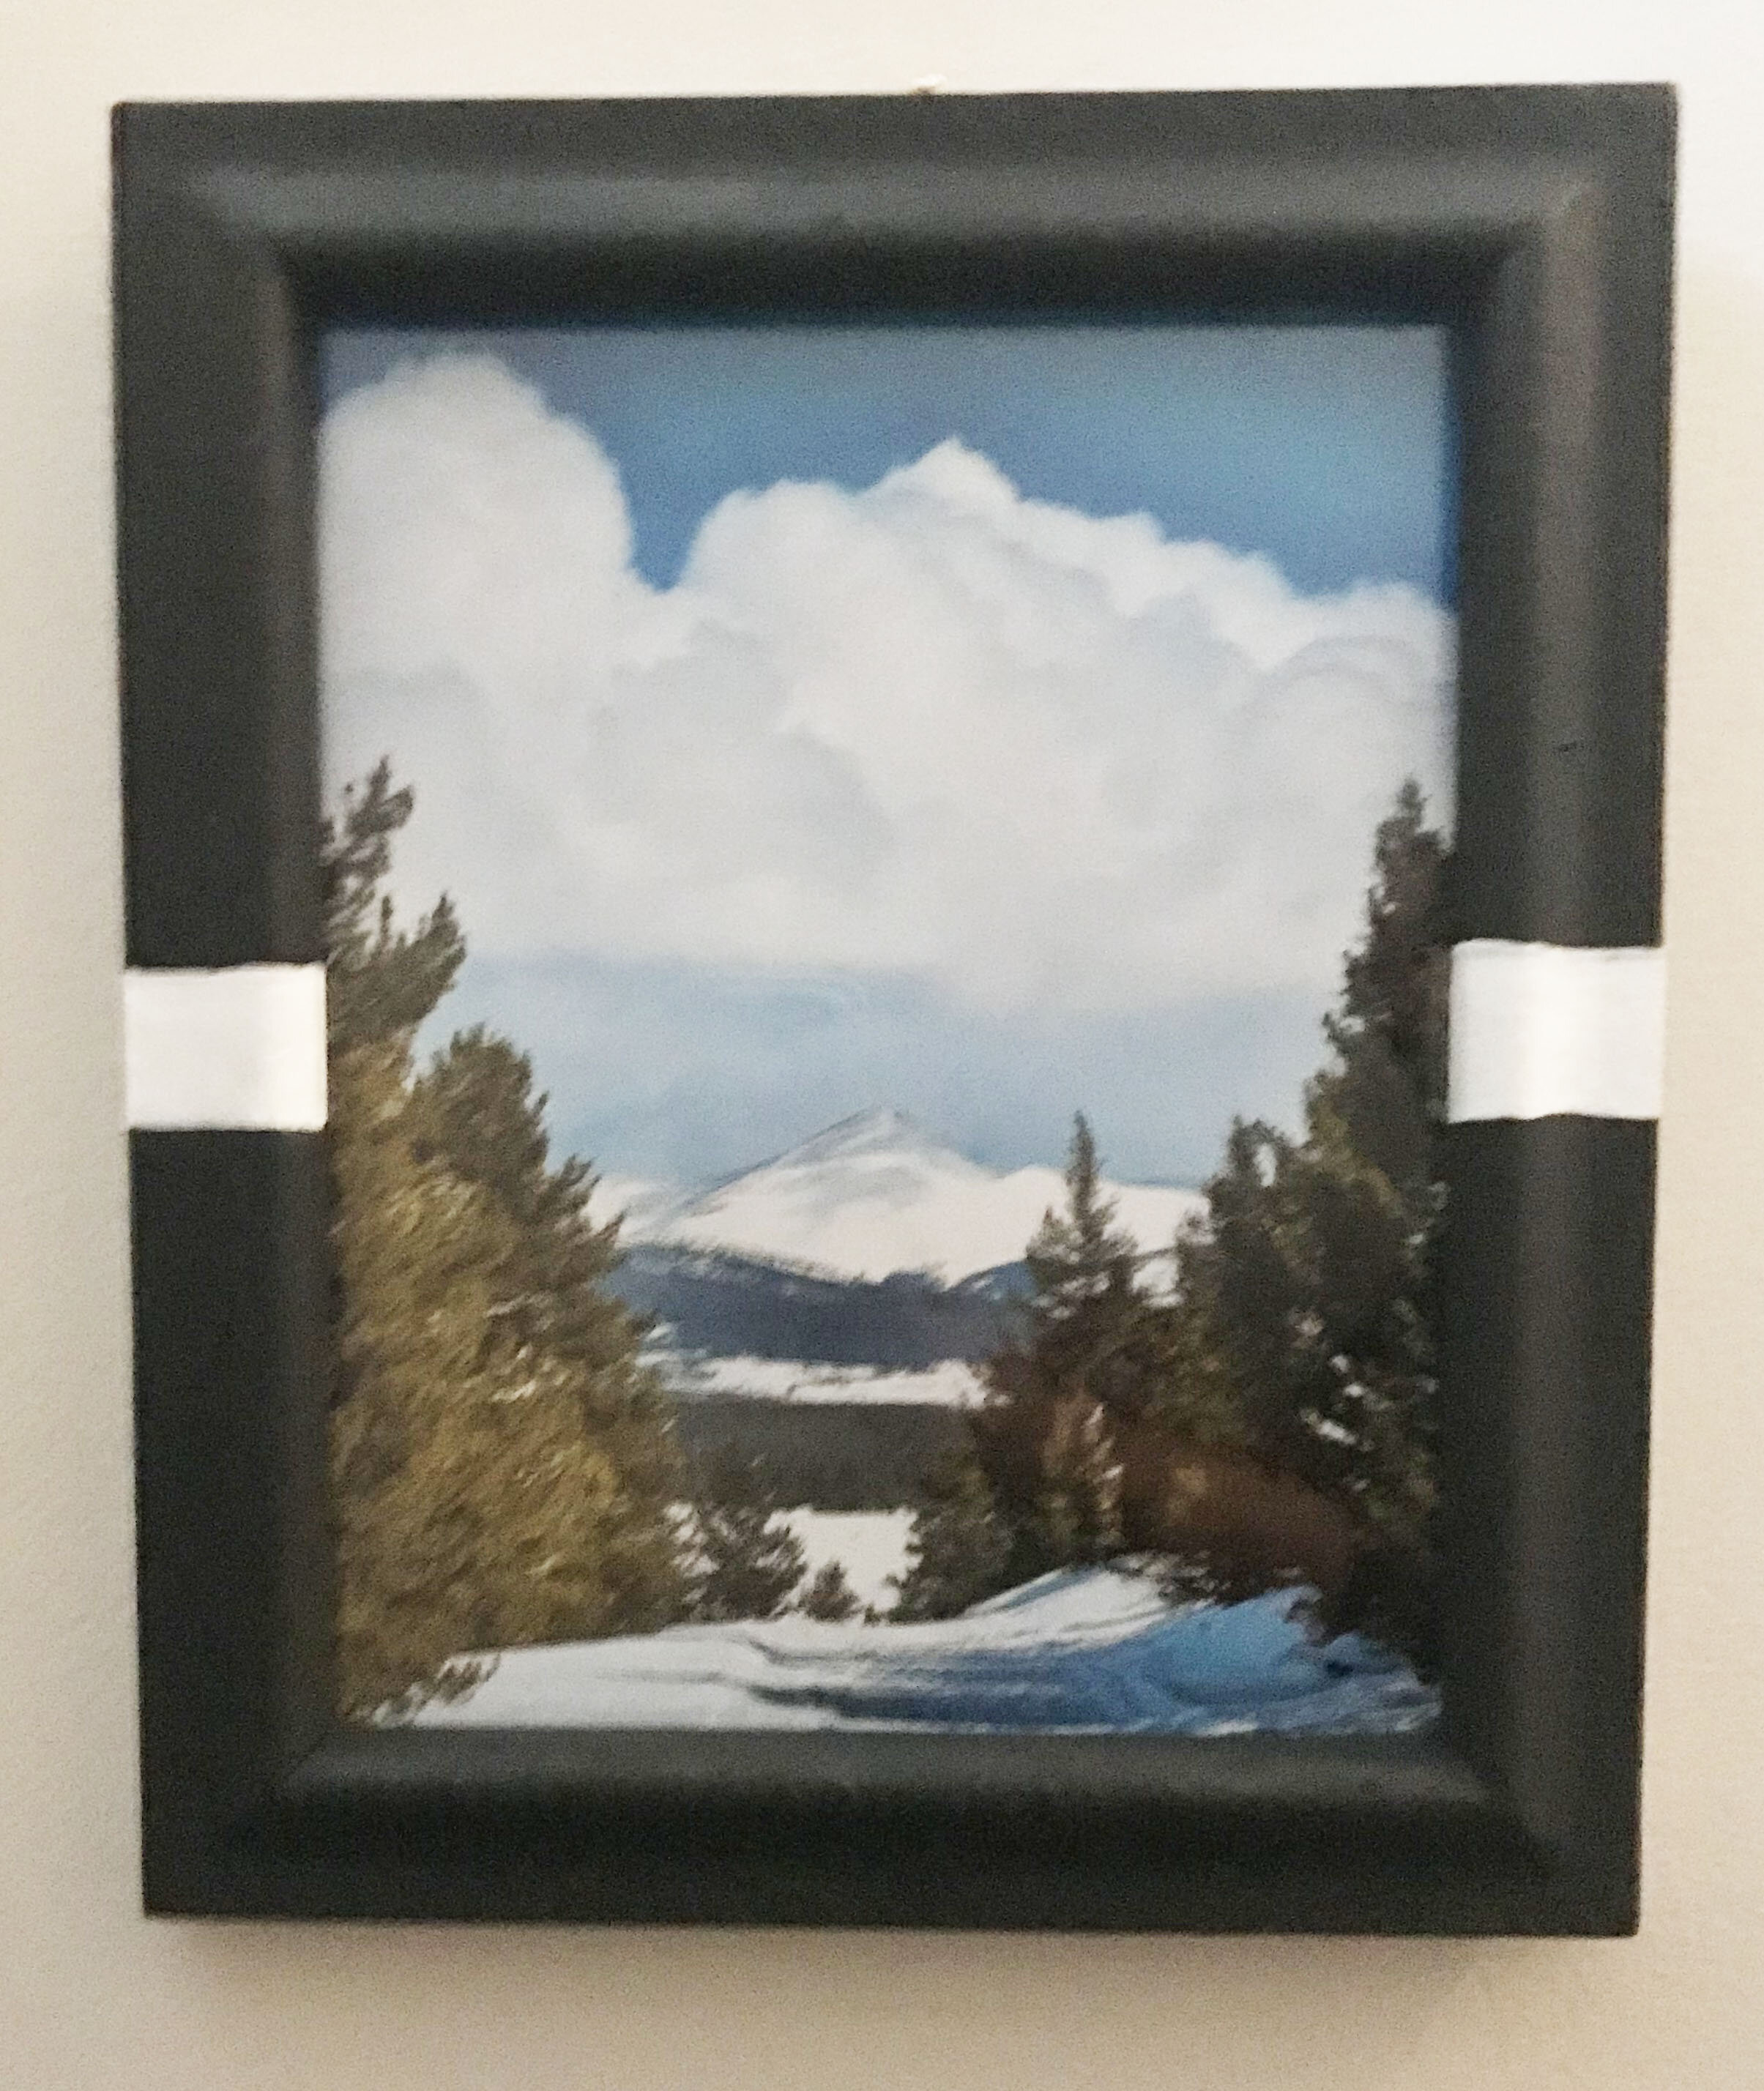
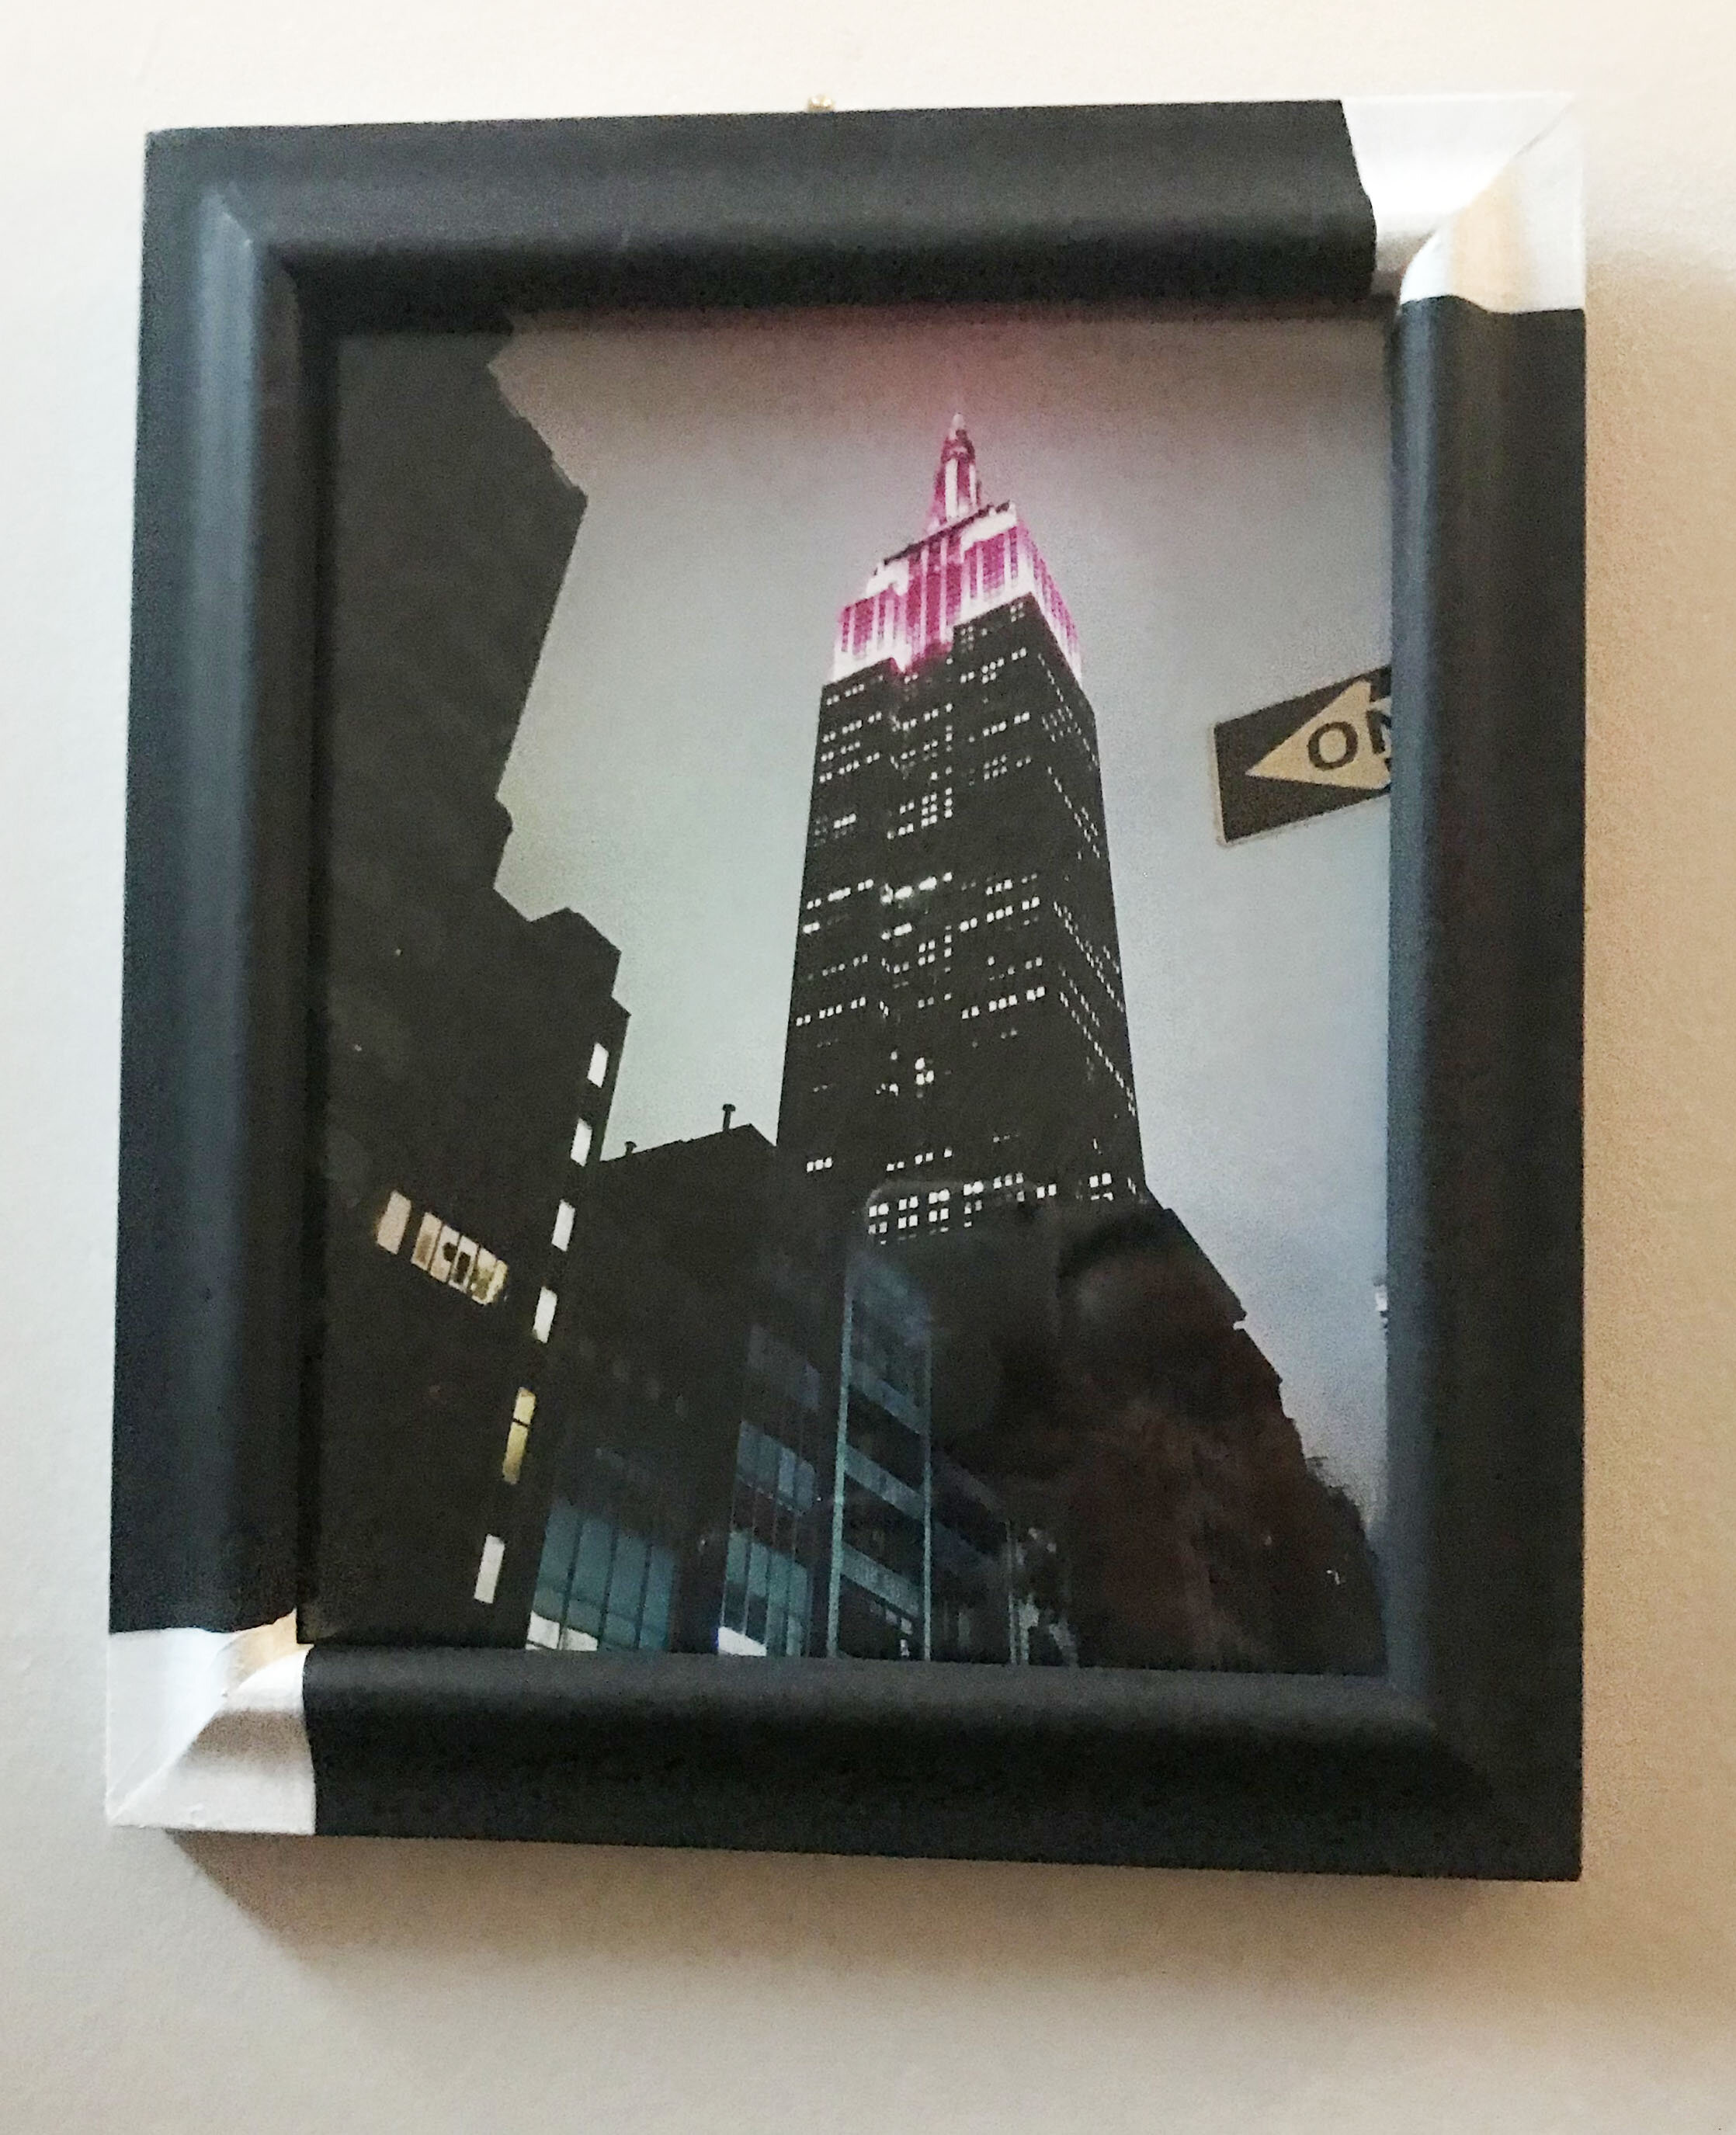
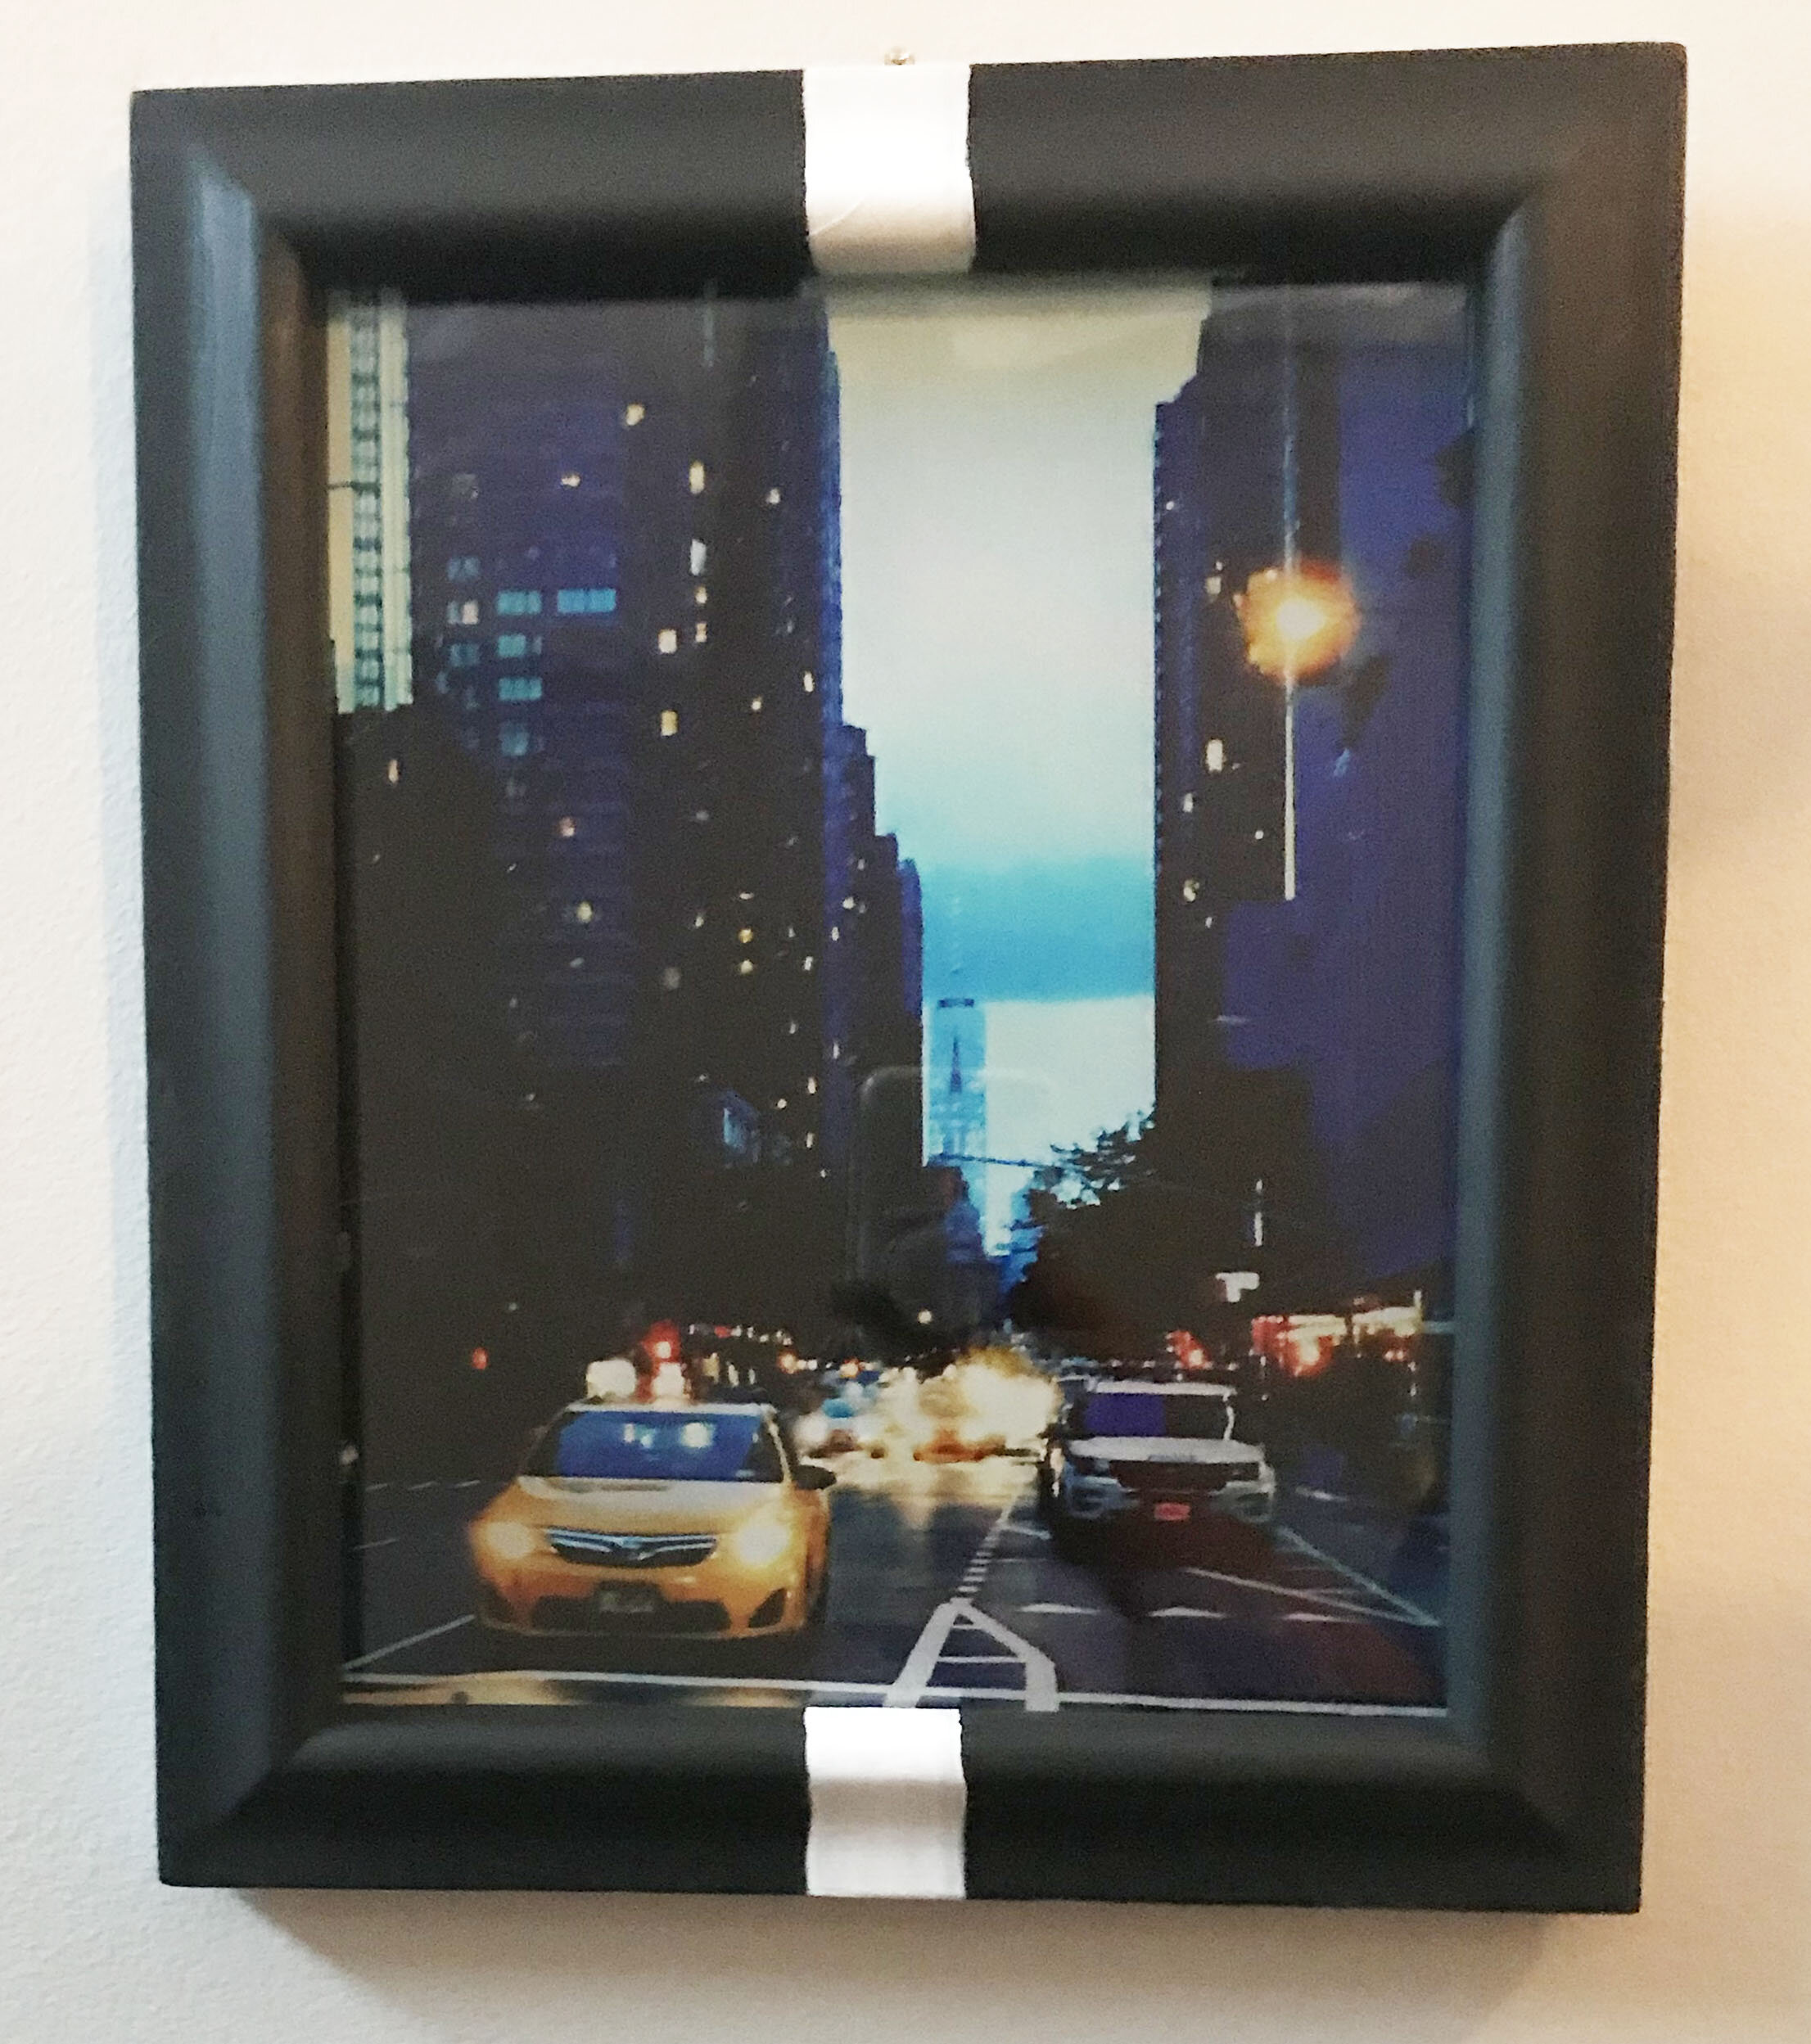
I remembered that I have a collection of photographs that I have taken over the years of landscapes, nature, and architecture. And what would be better than hanging my own photography and artwork in my home, right? So, I chose 3 photographs and got them printed on letter size photo paper. I knew that I wanted these images to tell a story and be hung together in an artistic way. I have stairs in my entry way, so my idea was to hang three photos in progression along the stairs. This was they would be the first pieces of art my guests (or really just me as of late) would see. These photographs are beautiful, but simple and classic in a sense. They each preset a certain feeling from very different perspectives. So I knew the frames they would go in needed to also add to the story.
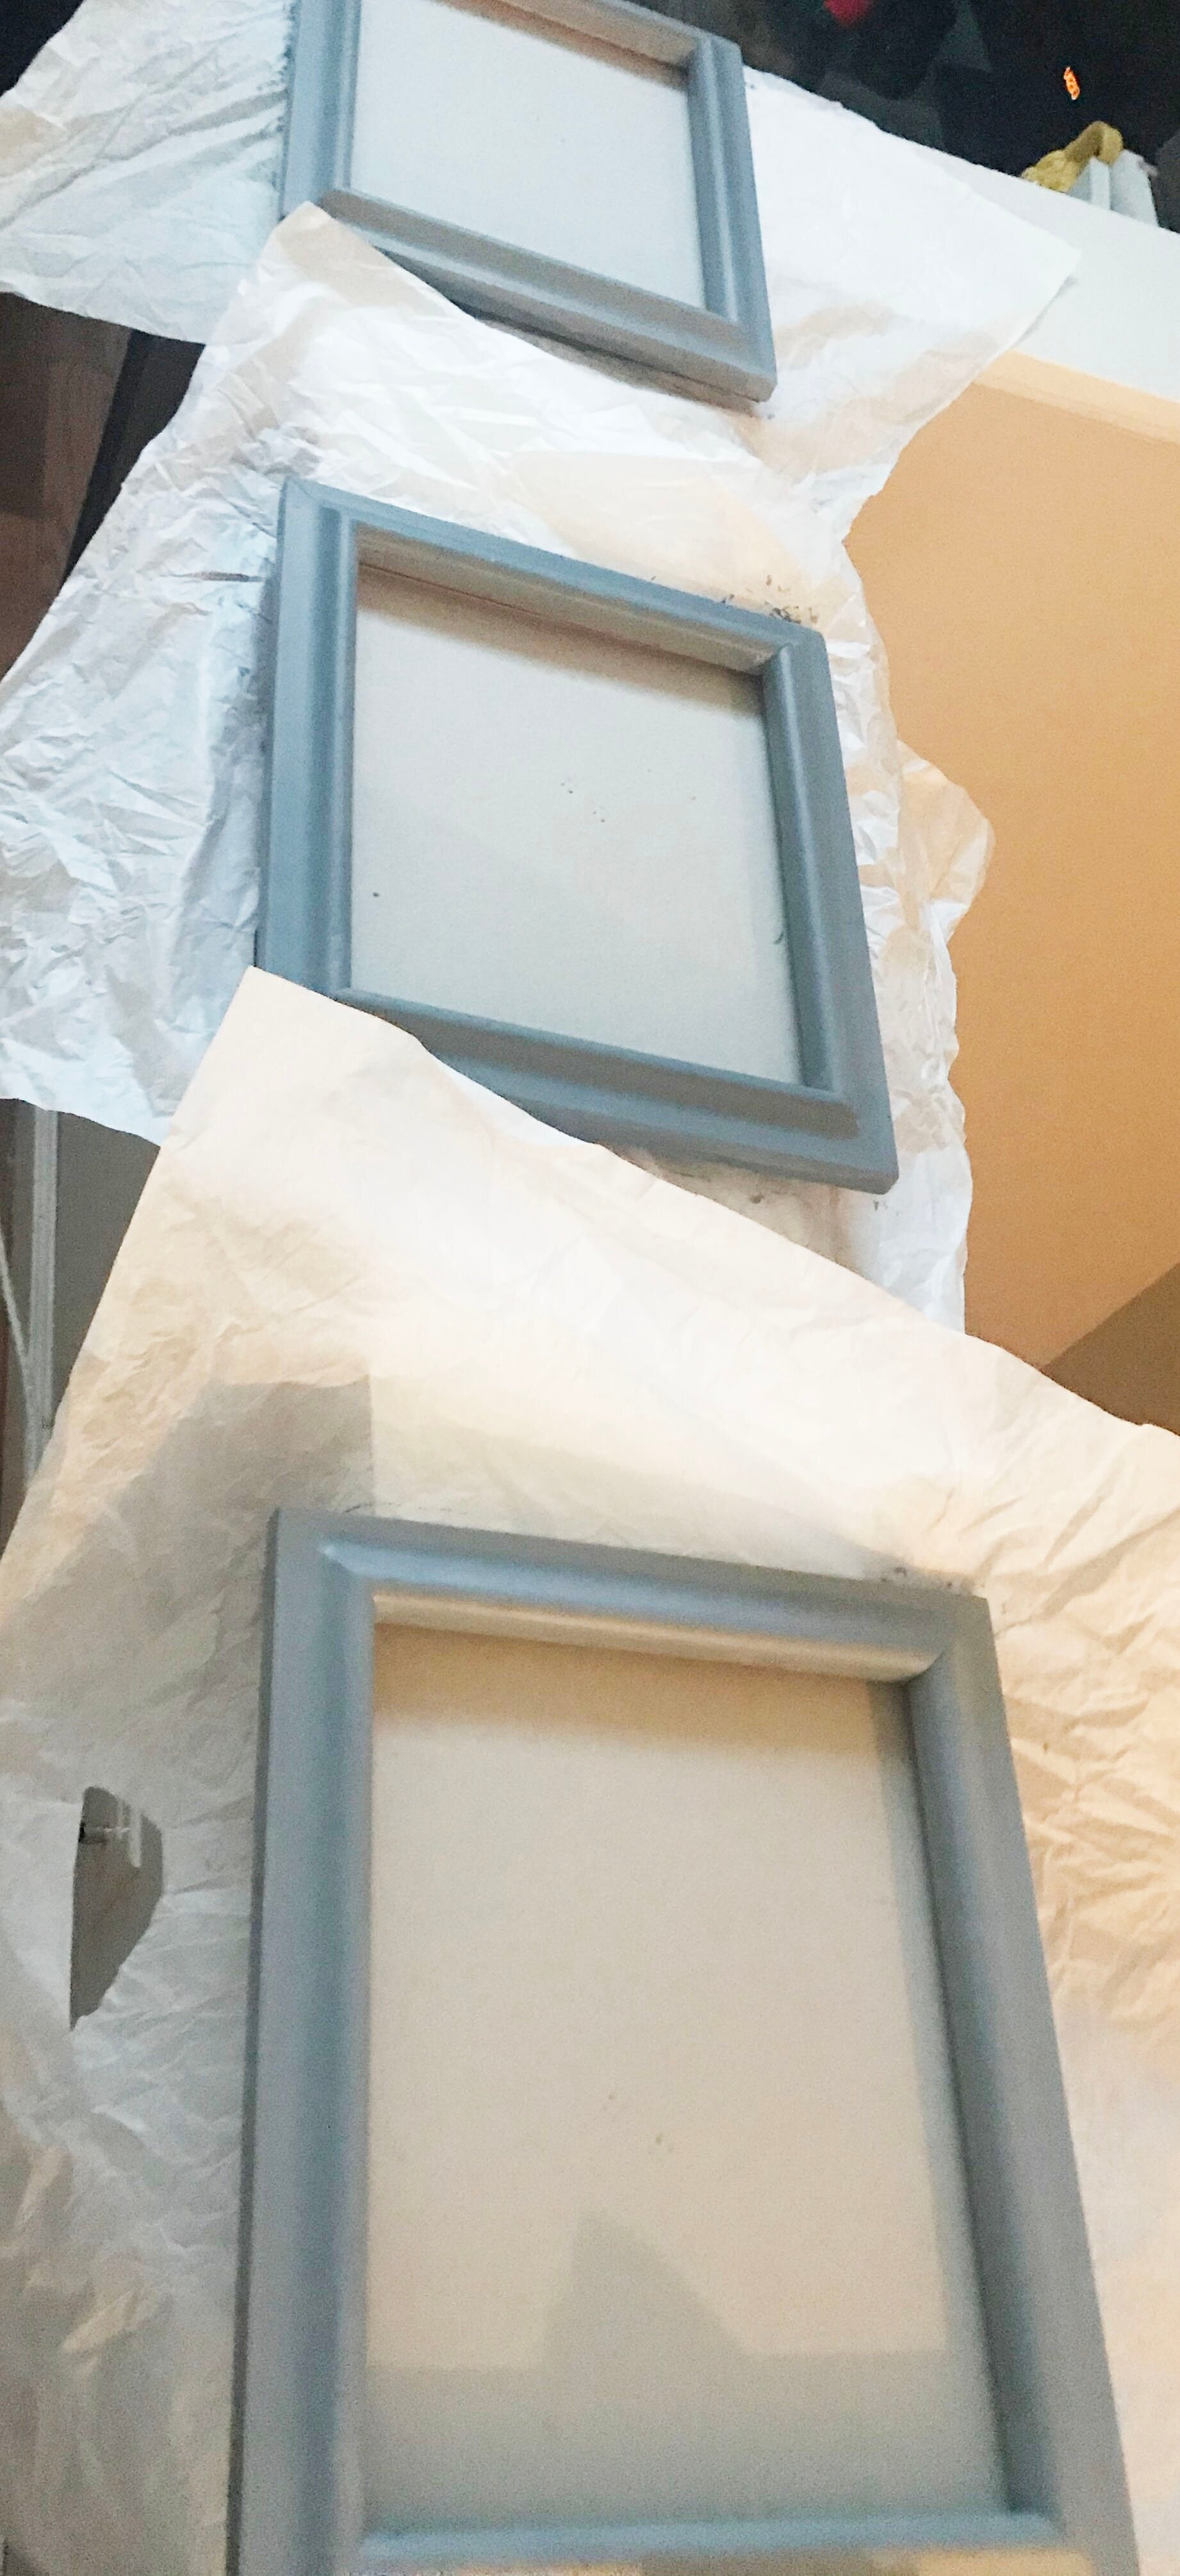
Luckily my mom who like most moms, has framed and hung pretty much every single picture we have ever taken so she had some left over frames she was no longer using. She gave me 3 wooden frames that had notable wear and tear from being in storage and that also were the standing type of frames with no back mount (you know, the one with the kick stand on the back). But as soon as I saw them, I envisioned up-cycling them in my own unique way.
First, I was able to removed the back kick stands which were attached by rivets using a set of pliers and then I brought a picture hanging knit. This kit includes back claw mounts, hooks, and thin nails all in various sizes to cater to whatever weight and size frame you have.
Using a hammer, I was able to fairly simply nail the back mounts to the back of the frames.
Note: please be sure to remove the glass from the frame BEFORE hammering the nails in to ensure the glass with not be at risk of cracking.
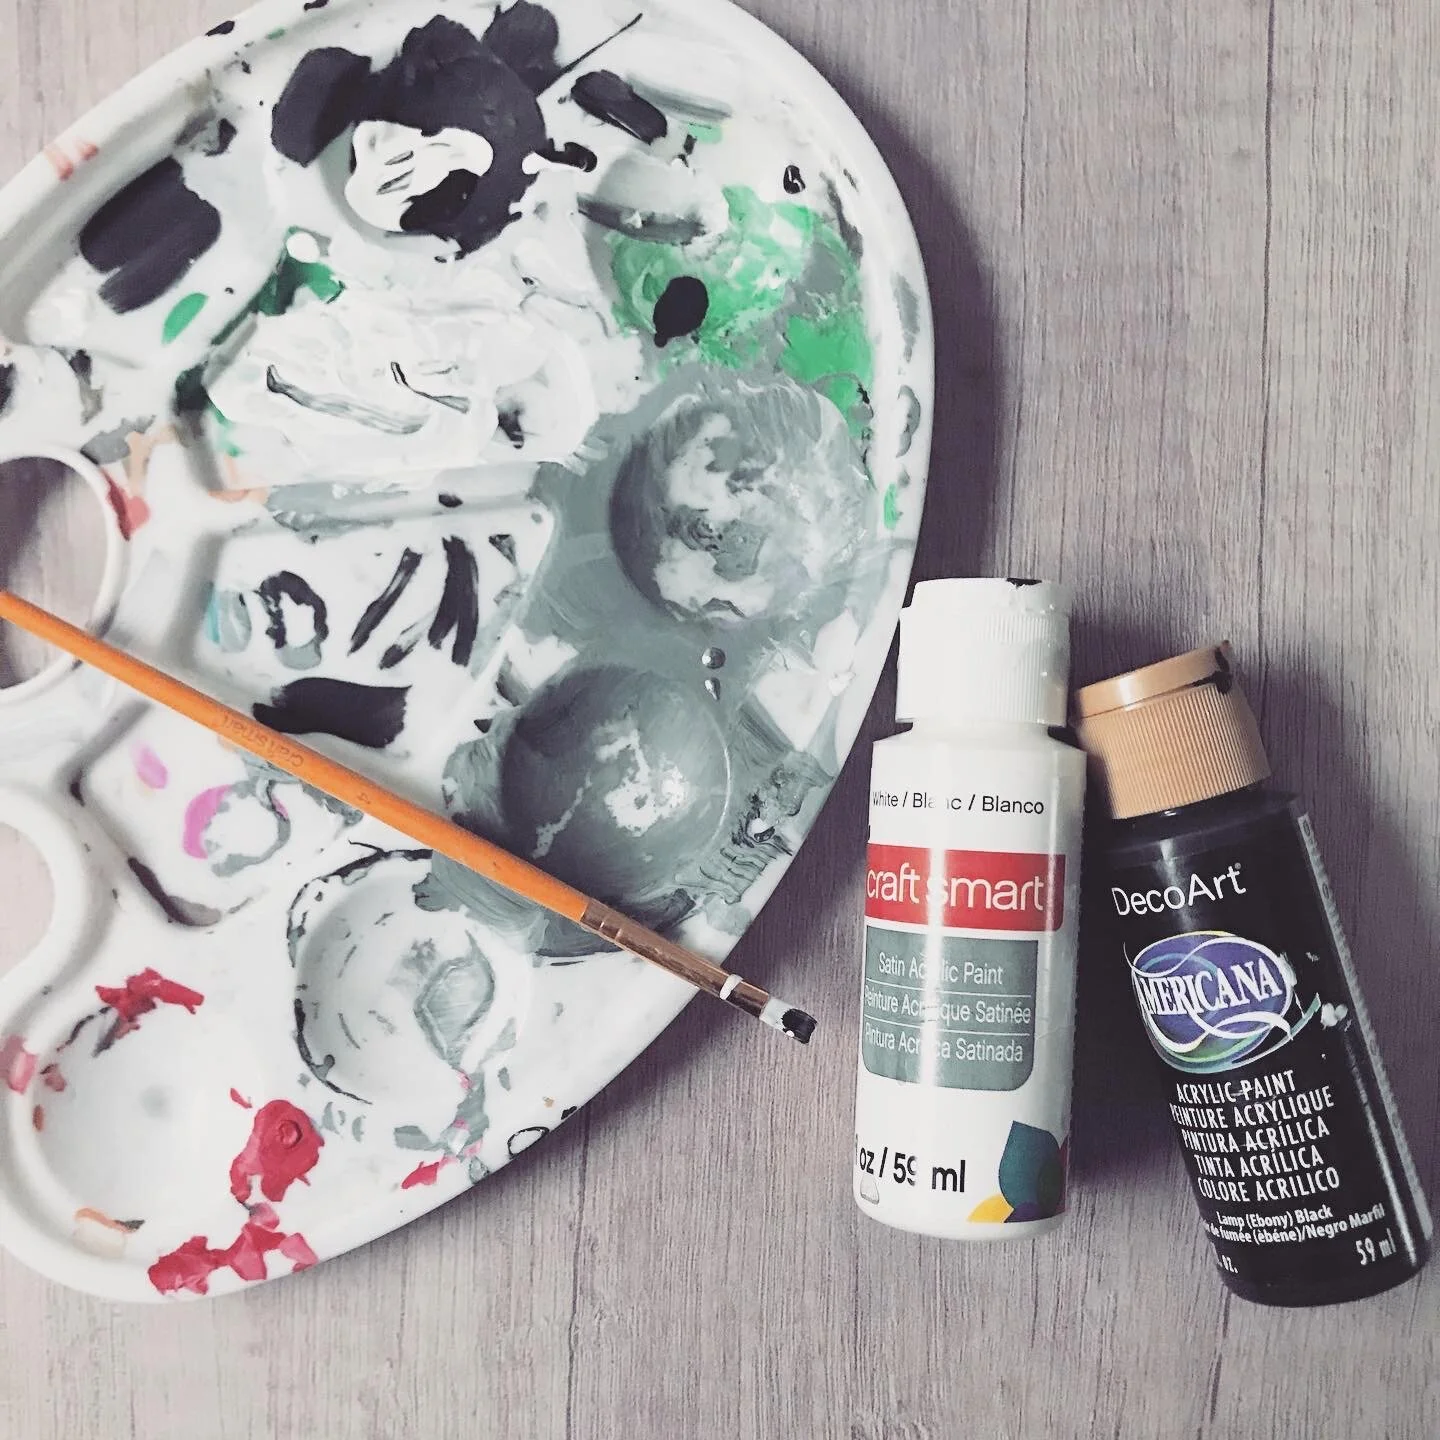
With the glass out, I now had to decide how to up-cycle these- paint of course! Given the neutral color scheme of my home (light grey walls, mostly black furniture) I decided to paint these frames black, using a craft paint. But I did’t just want them plain; I wanted to add a little art to them. After I painted them all black, I reached for my weight paint and thought about adding accents to the corners. I did to one frame and it looked pretty cool.
Then I thought, what if each was different? What if that was the way to tell a story. The next frame, I added white paint as well but this time the placement was horizontally across the frame. And naturally, the last frame had to now be vertically through the frame. In order, these framed looked like a profession or an equation of some sort.
There is no direct meaning behind the placement, but I like that look at them makes you think a little bit more. Isn’t that what art is all about? Interpretation, not just answers.

I love how these frames came out. And with the photos in them, they truly look modern and artistically chic.
Once I marked my wall placement using a tape measure and pencil, I hammered the wall hooks in and finally hung my original works of art.
Take a look at the finished layout as well as close ups of each below.

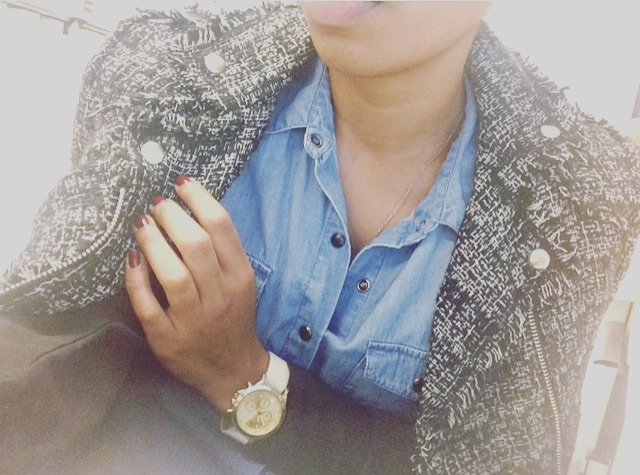
Stay at Home project: DIY UPCYCLED SCRUNCHIE - Featured on Newark's Paul Robeson Galleries website!
So it is now going on week 5 (..?) of the “Stay at Home” quarantine due to COVID-19. During this time, a lot of people are looking for projects to do at home, either to entertain themselves or their children.
This has become highly noticeable and my good friend, Kristen who is the Associate Curator at Paul Robeson Galleries here in NJ reached out to me for some DIY projects that I could share to be on their Activities Blog.
Obviously, I love to create things so a lot of ideas came to mind initially, but I wanted to share something that can be easily done at home, especially for the many people who do not know how to sew or don’t have sewing machines at home. Also, I wanted to share something that was useful, but also fun and stylish. Thus came the idea of the hair scrunchie. This can be made with no sewing and takes literally minutes.
Being that I have slightly big curly hair, I’ve always love scrunchies, and I am pleased that the then 80’s trend is coming back. To me, it is easier to were than a headband (those give me headaches sometimes) and adds a little playfulness to your hair styles.
I also love to up-cycle and I have A LOT of old clothes. Combining these aspects, I came up with up-cycling these old clothes I had laying around by using it to make a new, stylish scrunchie.
I found an old denim shirt, grabbed a basic elastic hair tie, liquid stitch glue, and a candle (don’t be confused- you’ll see what it’s for) and made this easy to follow tutorial which is featured currently on Paul Robeson Galleries website.
DIY Scrunchie
Made from an Up-cycled Denim Shirt
Please go check it out and make use of your old clothing, scarfs, bed sheets, etc.
Up-cycling is a great alternative to throwing away old clothing and textile items that you find while your spring cleaning and since most of us have nothing but time these days, why not make yourself (or someone else) a something cute for when we get out of this situation.
Enjoy!
A
Street Style of New York: A Fashion Illustration Series
Nothing is more captivating than seeing clothes become alive when moving down the city streets.
Street Style has been such a phenomenon that the images depicted everyday wear by the cool and stylish IT girls in the fashion cities have easily replaced rehearsed photoshoots and stiff poses.
Effortless style being worn in the nuances of everyday life has become the addiction of the fashion world, or least me.
I love seeing walking images of outfits of the day strutting through cross walks or waiting for taxis (or should I say Ubers) on the sidewalks.
I have recently been expressing my idea. through painting, and have complied a series of illustrations and paintings depicting street style in New York City.
Each named as a medial task that we all go through everyday…
Enjoy :)

The Pockets

The Wait

The Sway

The Suit

The Pose

The Chill

The Strut
What makes a perfect Winter Coat?
Winter is here, and here to stay. With these chilling temperatures, ones wardrobe requires a few staple items. A main one being a good coat. “Good” meaning: stylish, comfortable, and of course, warm.
Unfortunately I’ve been a little late in my preparation for this season and I have yet to choose the perfect type of coat I’d like to make for myself. In the past, I’ve made a lighter weight wool blend coat, wish I still adore but I feel it’s time to revamp my outerwear selection, as I’ve outgrown that coat.
The thing is, making a tailored winter coat, is not the fastest or easiest of tasks. There are so many elements of that go “behind the seams” of the many coats we see hanging on the racks of the many stores we visit.
*(Disclaimer: I have considered purchasing a coat, however I have had little luck in finding one that I truly love and that I feel embodies the look and style that I want. So I came to the conclusion to try to make one to my liking.)
So, embarking on an endeavor to create my own requires a bit of planning and clear decision making before picking up the scissors and wishing for the best. To help do this, I am brainstorming ideas of the primary elements that would make up my ideal coat.
To start, I have to choose the fabrication. Of course, I want warmth to endure these low temperatures, but still want to look and feel stylish. As opposed to a down filled polyester puffer coat, which I have never really been a fan of wearing unless COMPLETELY unavoidable due to the ridiculous weather of the east coat, I would prefer a more stylish outer layer, like say wool.
A wool coat is classic and timeless. You can never go wrong with neutral colors like black, gray, or camel. However I feel those are all too common. I want something different, with the right amount of detail that makes me stand out in the sea of black coats walking the icy sidewalks of winter New York.
Which brings us to some variations of wool: herringbone, houndstooth, or my preference wool tweed.
These textiles elevate a coat with some textural details and can add a unique flair. Of these three, I prefer tweed, as it can equally mirror the elegance of the Chanel tweed suit as well as some modern edge with frayed seams and “unfinished hems”.
Wool tweed fabric is fairly easy to sew, as it is medium to heavier weight and does not move around on its own too much while it is being sewn, However, like I mentioned before, making a warm and sturdy coat requires some tucked away elements such as fusible interfacing which is used to build the shape of a coat by ironing it onto the underside of the outer fabric.
Now, interfacing is used much more extensively for detailed tailoring like that used for suiting where it is used throughout the garment (sleeve, shoulders, collar, lapel, body) to add structure and stiffness that makes those expensive suits last so long.
For the type of coat I am going for however, a lightweight weight interfacing, such as a fusible tricot will add the support and subtle structure I want without causing too much stiffness. This interfacing can be used on the shoulders, collar, lapels, and back vent, if any.
Next, a lining must be chosen, as it conceals all of that interfacing. Personally, I love a lining that is interesting and pops out as a surprise element when the cast is opened. Any kind abstract print, or corky design repeat would catch my eye. When lining wool, theres a range of fabrications to choose from. The most common choice is a polyester blend, as it maintains heat and is stiff enough to stand behind the thickness of wool textiles. Other options include satin, silk, or rayon and cotton blended linings that will be a bit more light weight and soft to touch.
As far as closures, I am open to either a zipper or buttons, or both! A lot of times I prefer buttons as I can add yet another level of detail and contrast with a pop of color or interesting textured button.
Ah, and lets not forget pockets! Whether they are in the side seam or patched onto the front body, a great coat has pockets. Period.
So, now the I have my list, I must head out to get these and get started. Wish me luck and stay tuned for updates!
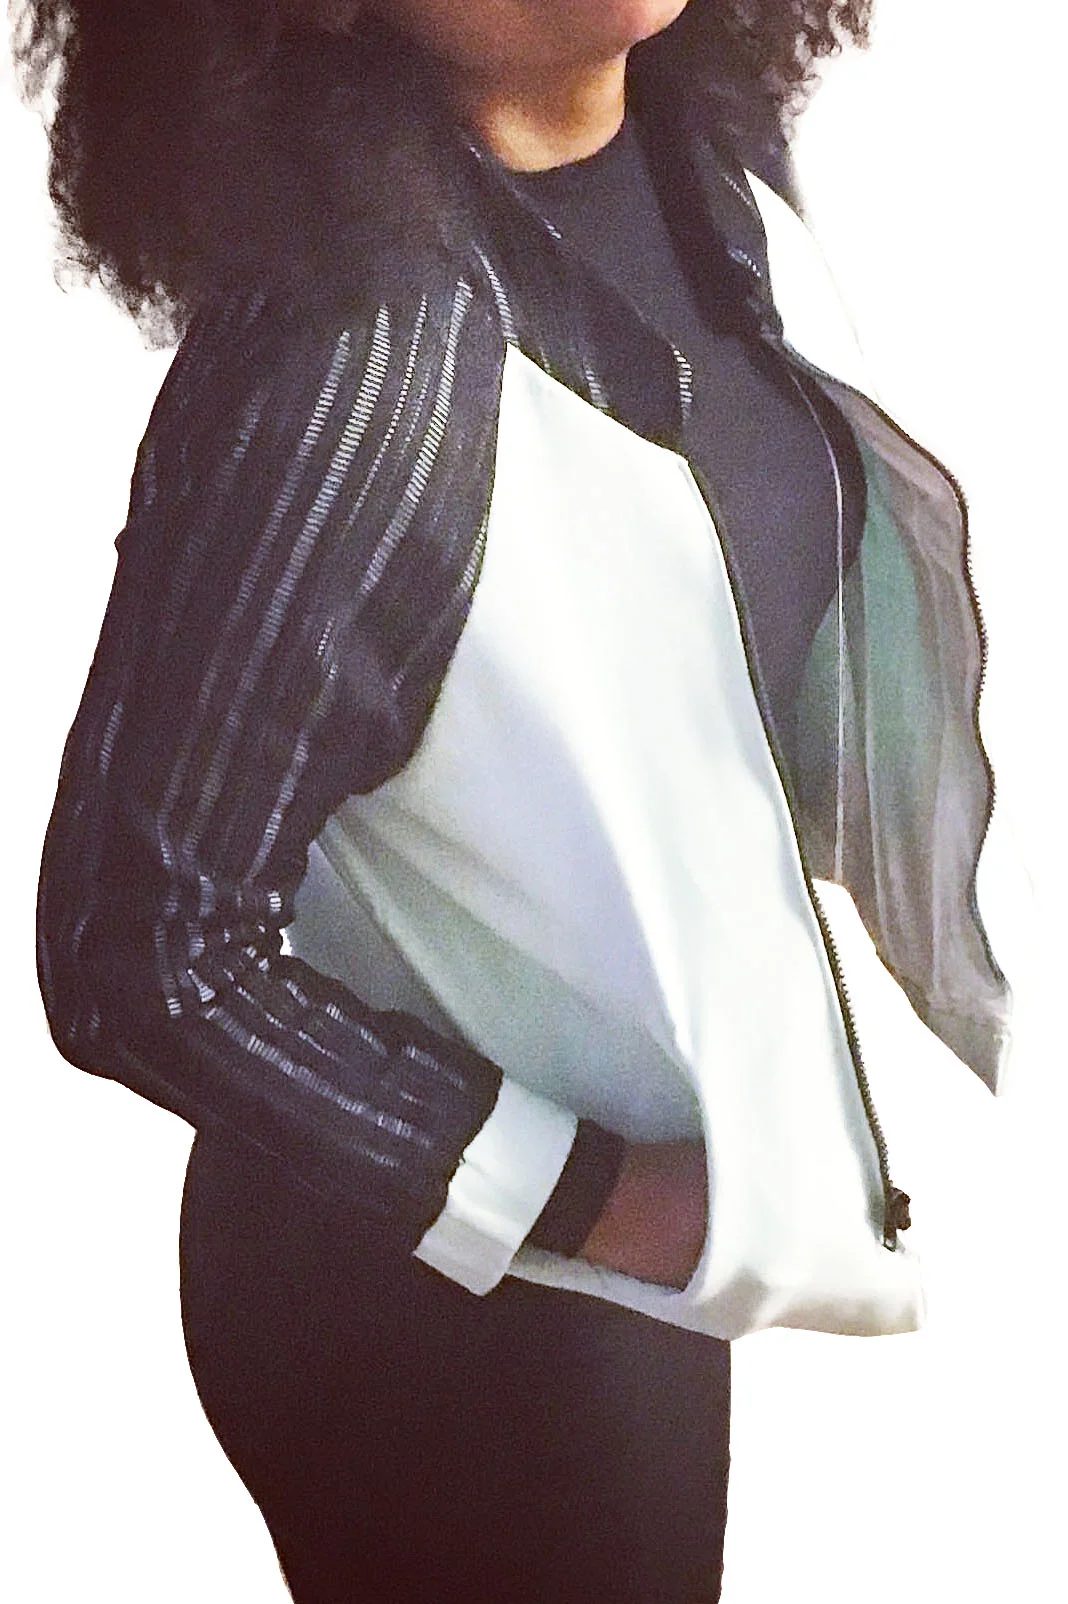
Another One: Reinvention of the Classic Bomber Jacket
I did it again- and this time it's even cooler!
This Bomber Jacket I created features a black knit netting raglan sleeve overlay, collar overlay, and a florescent silver lining. The body fabric is a sea-foam green stretch nylon spandex that is reminiscent of neoprene, but much more lightweight. Both fabrics are from Mood Fabrics right here in New York.
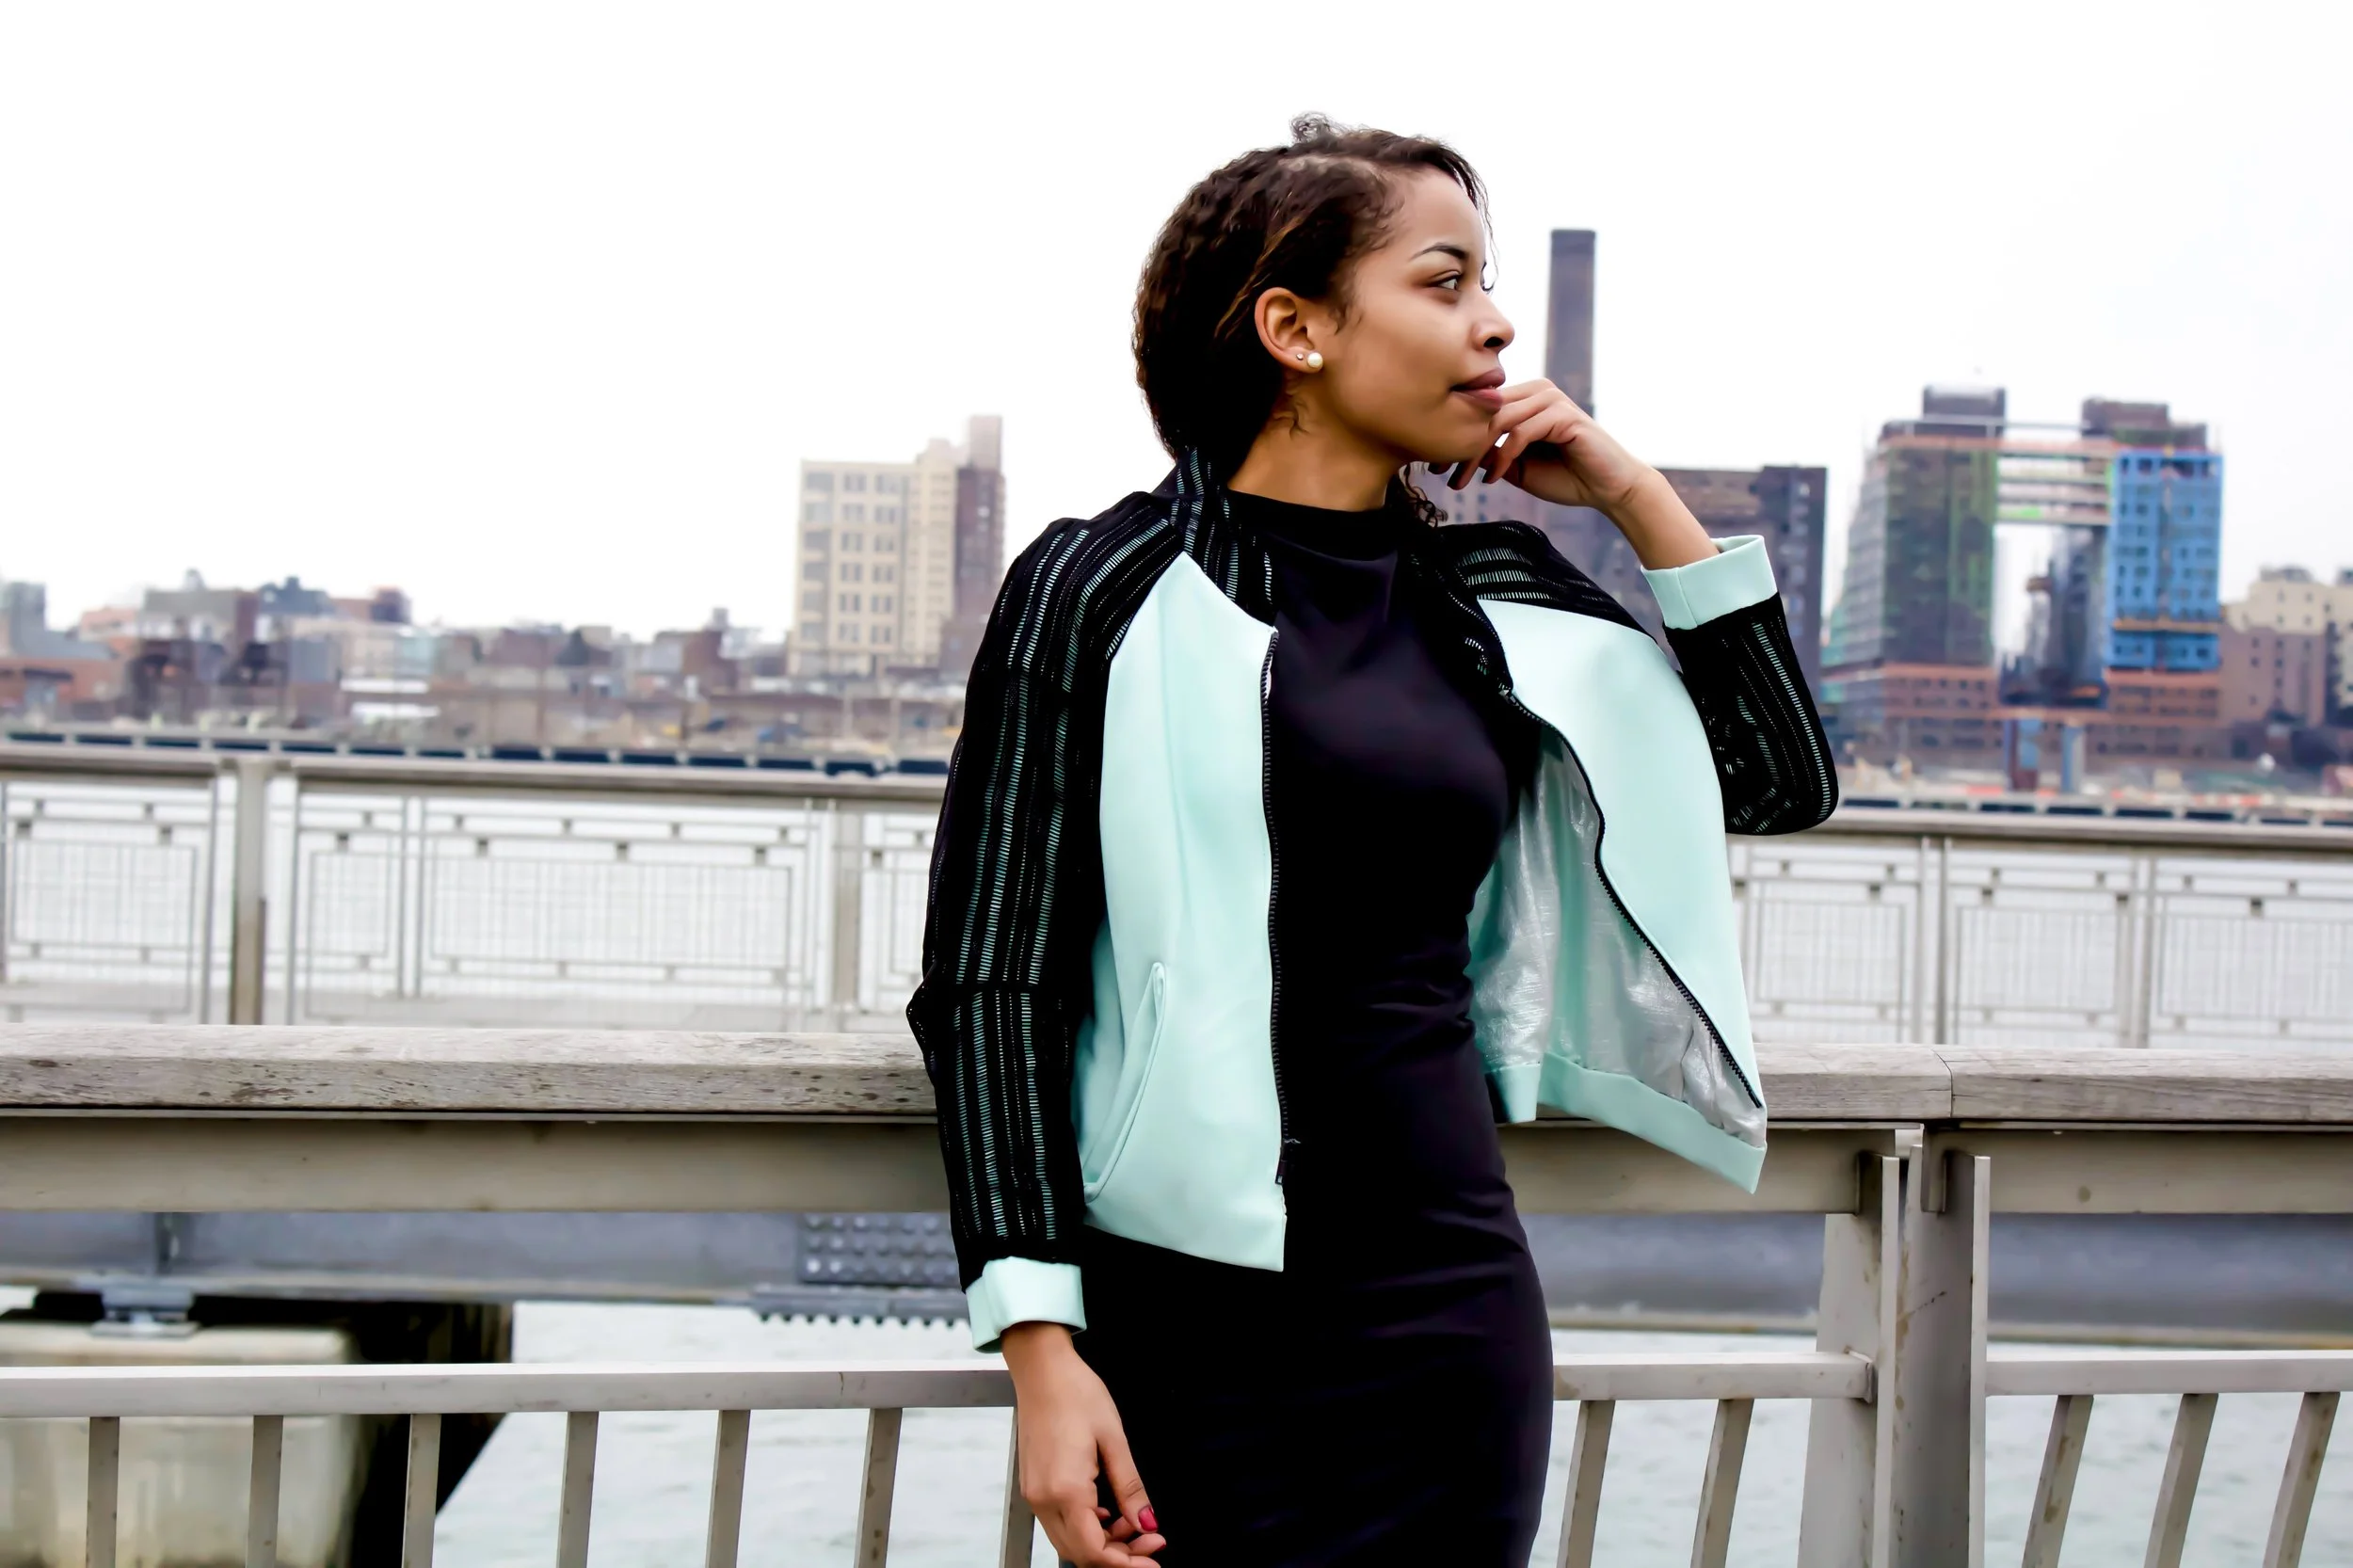
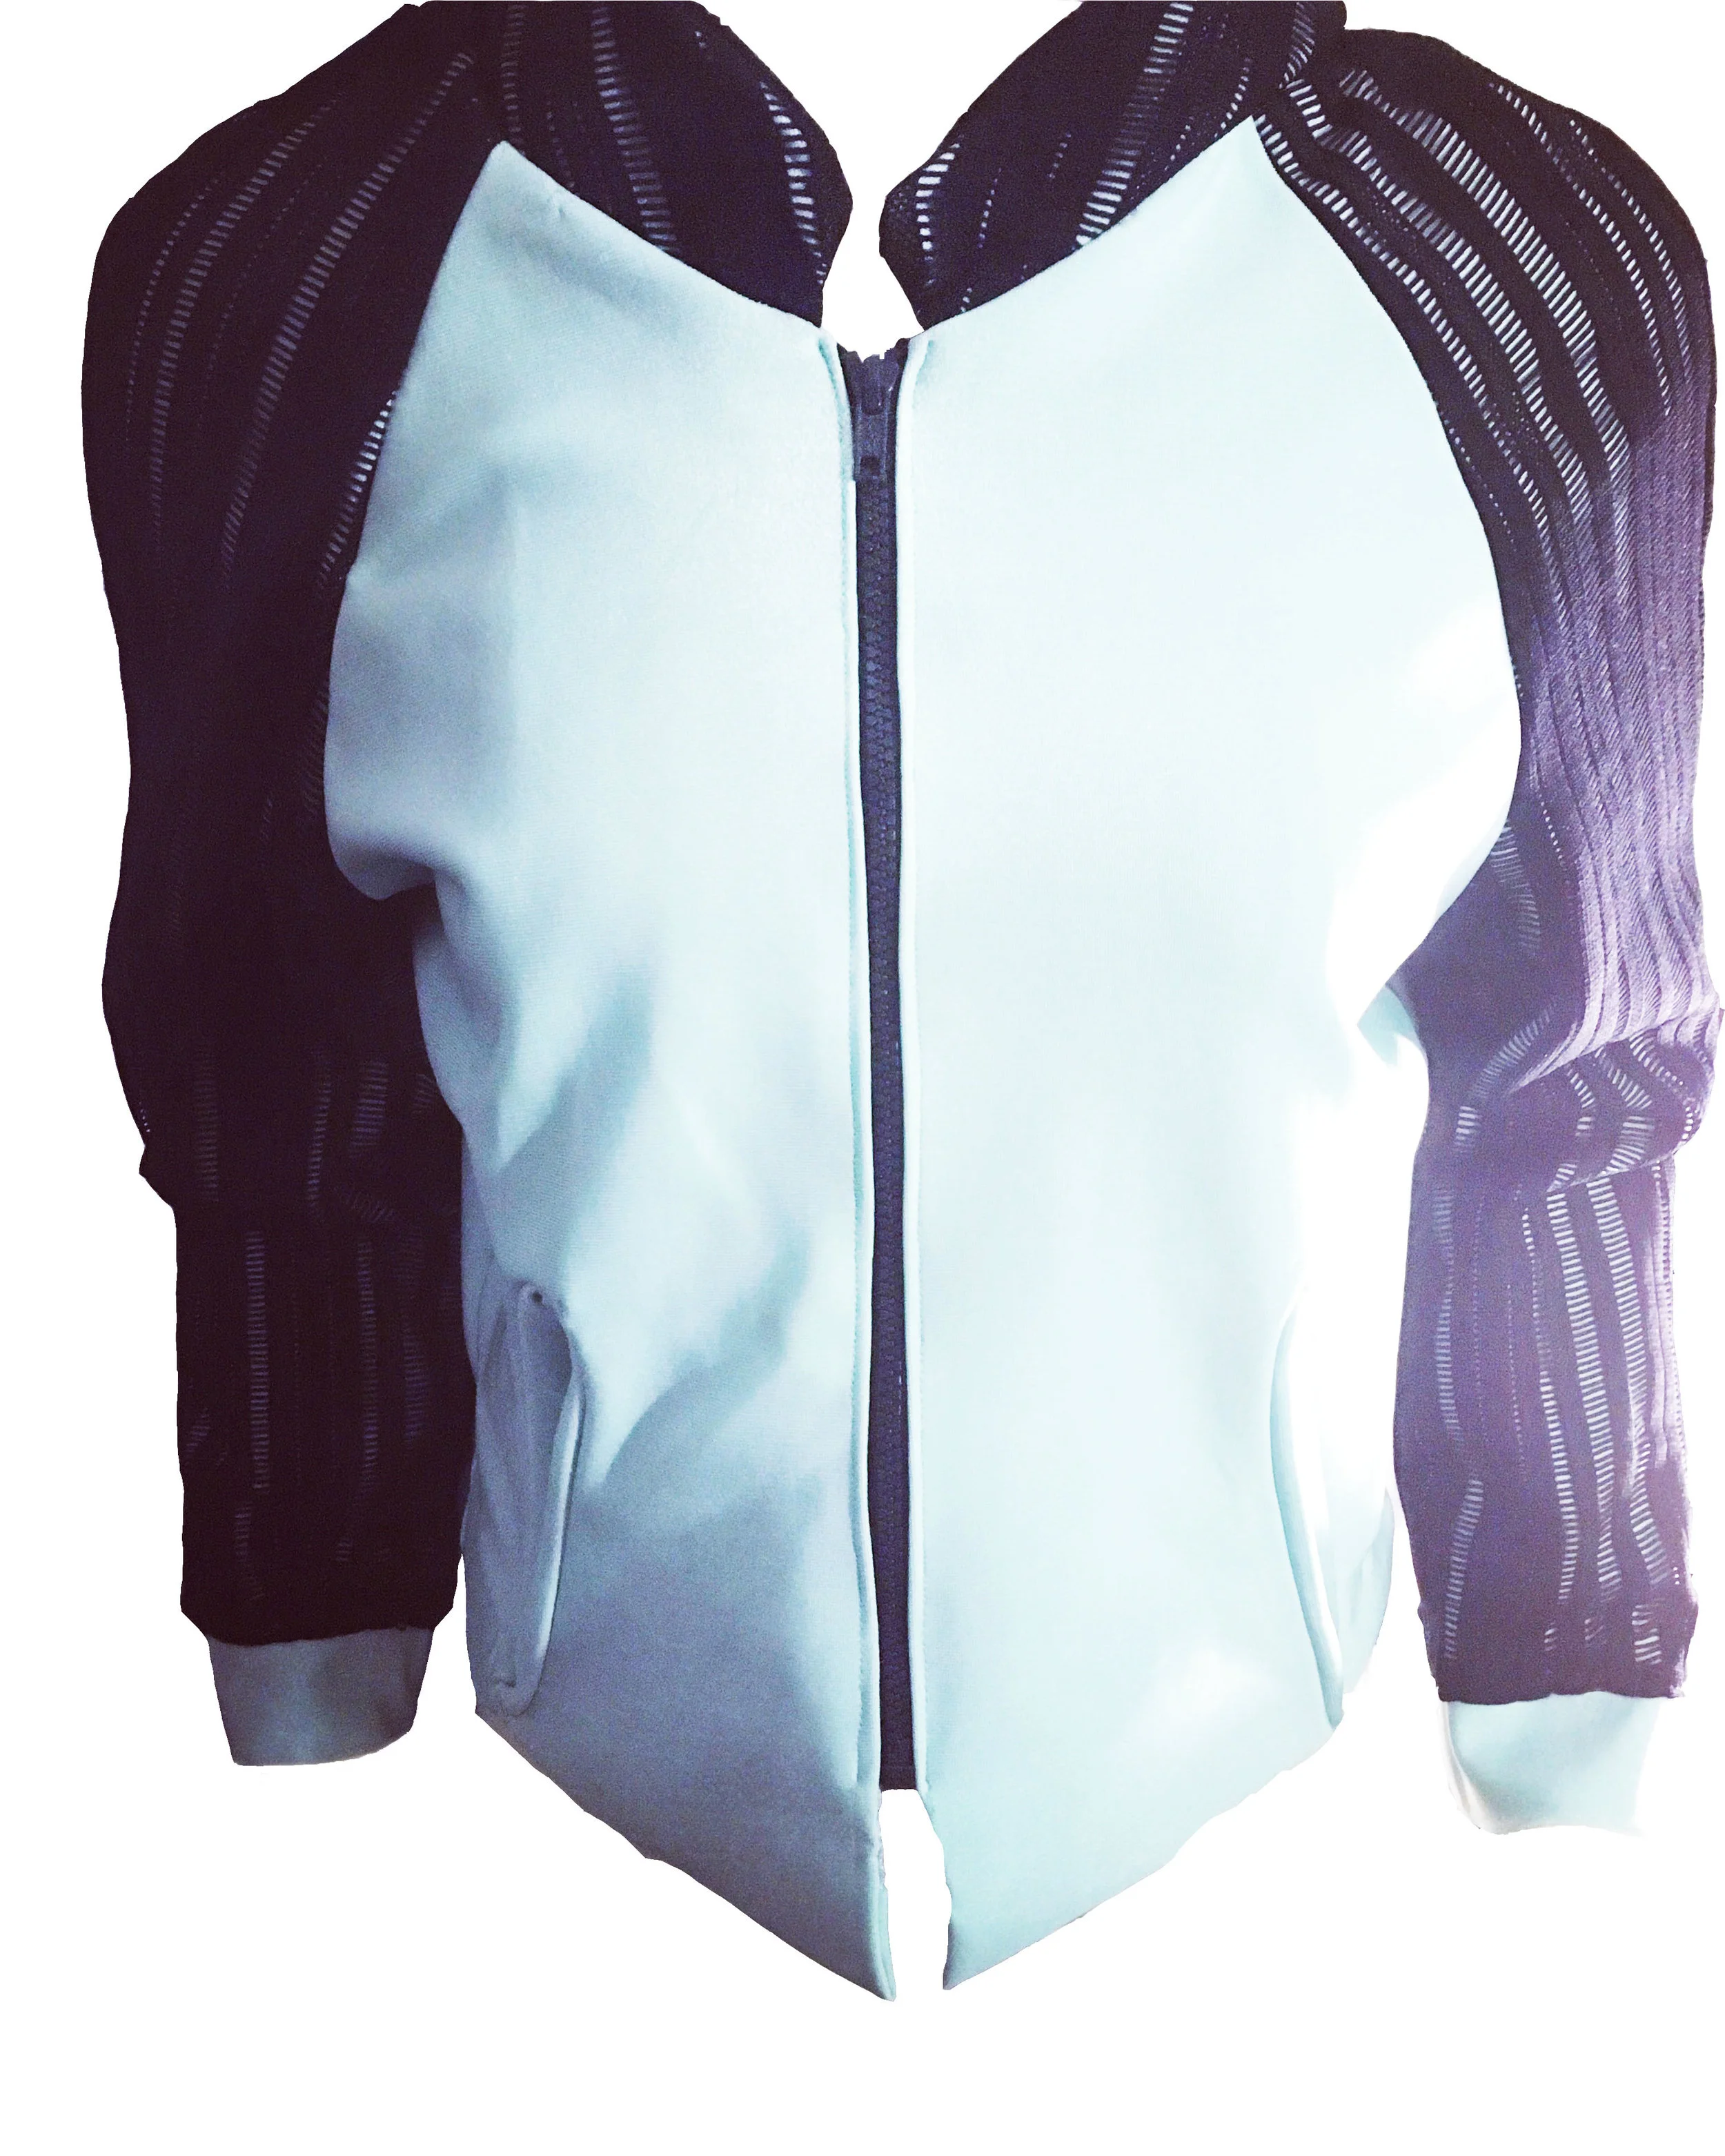
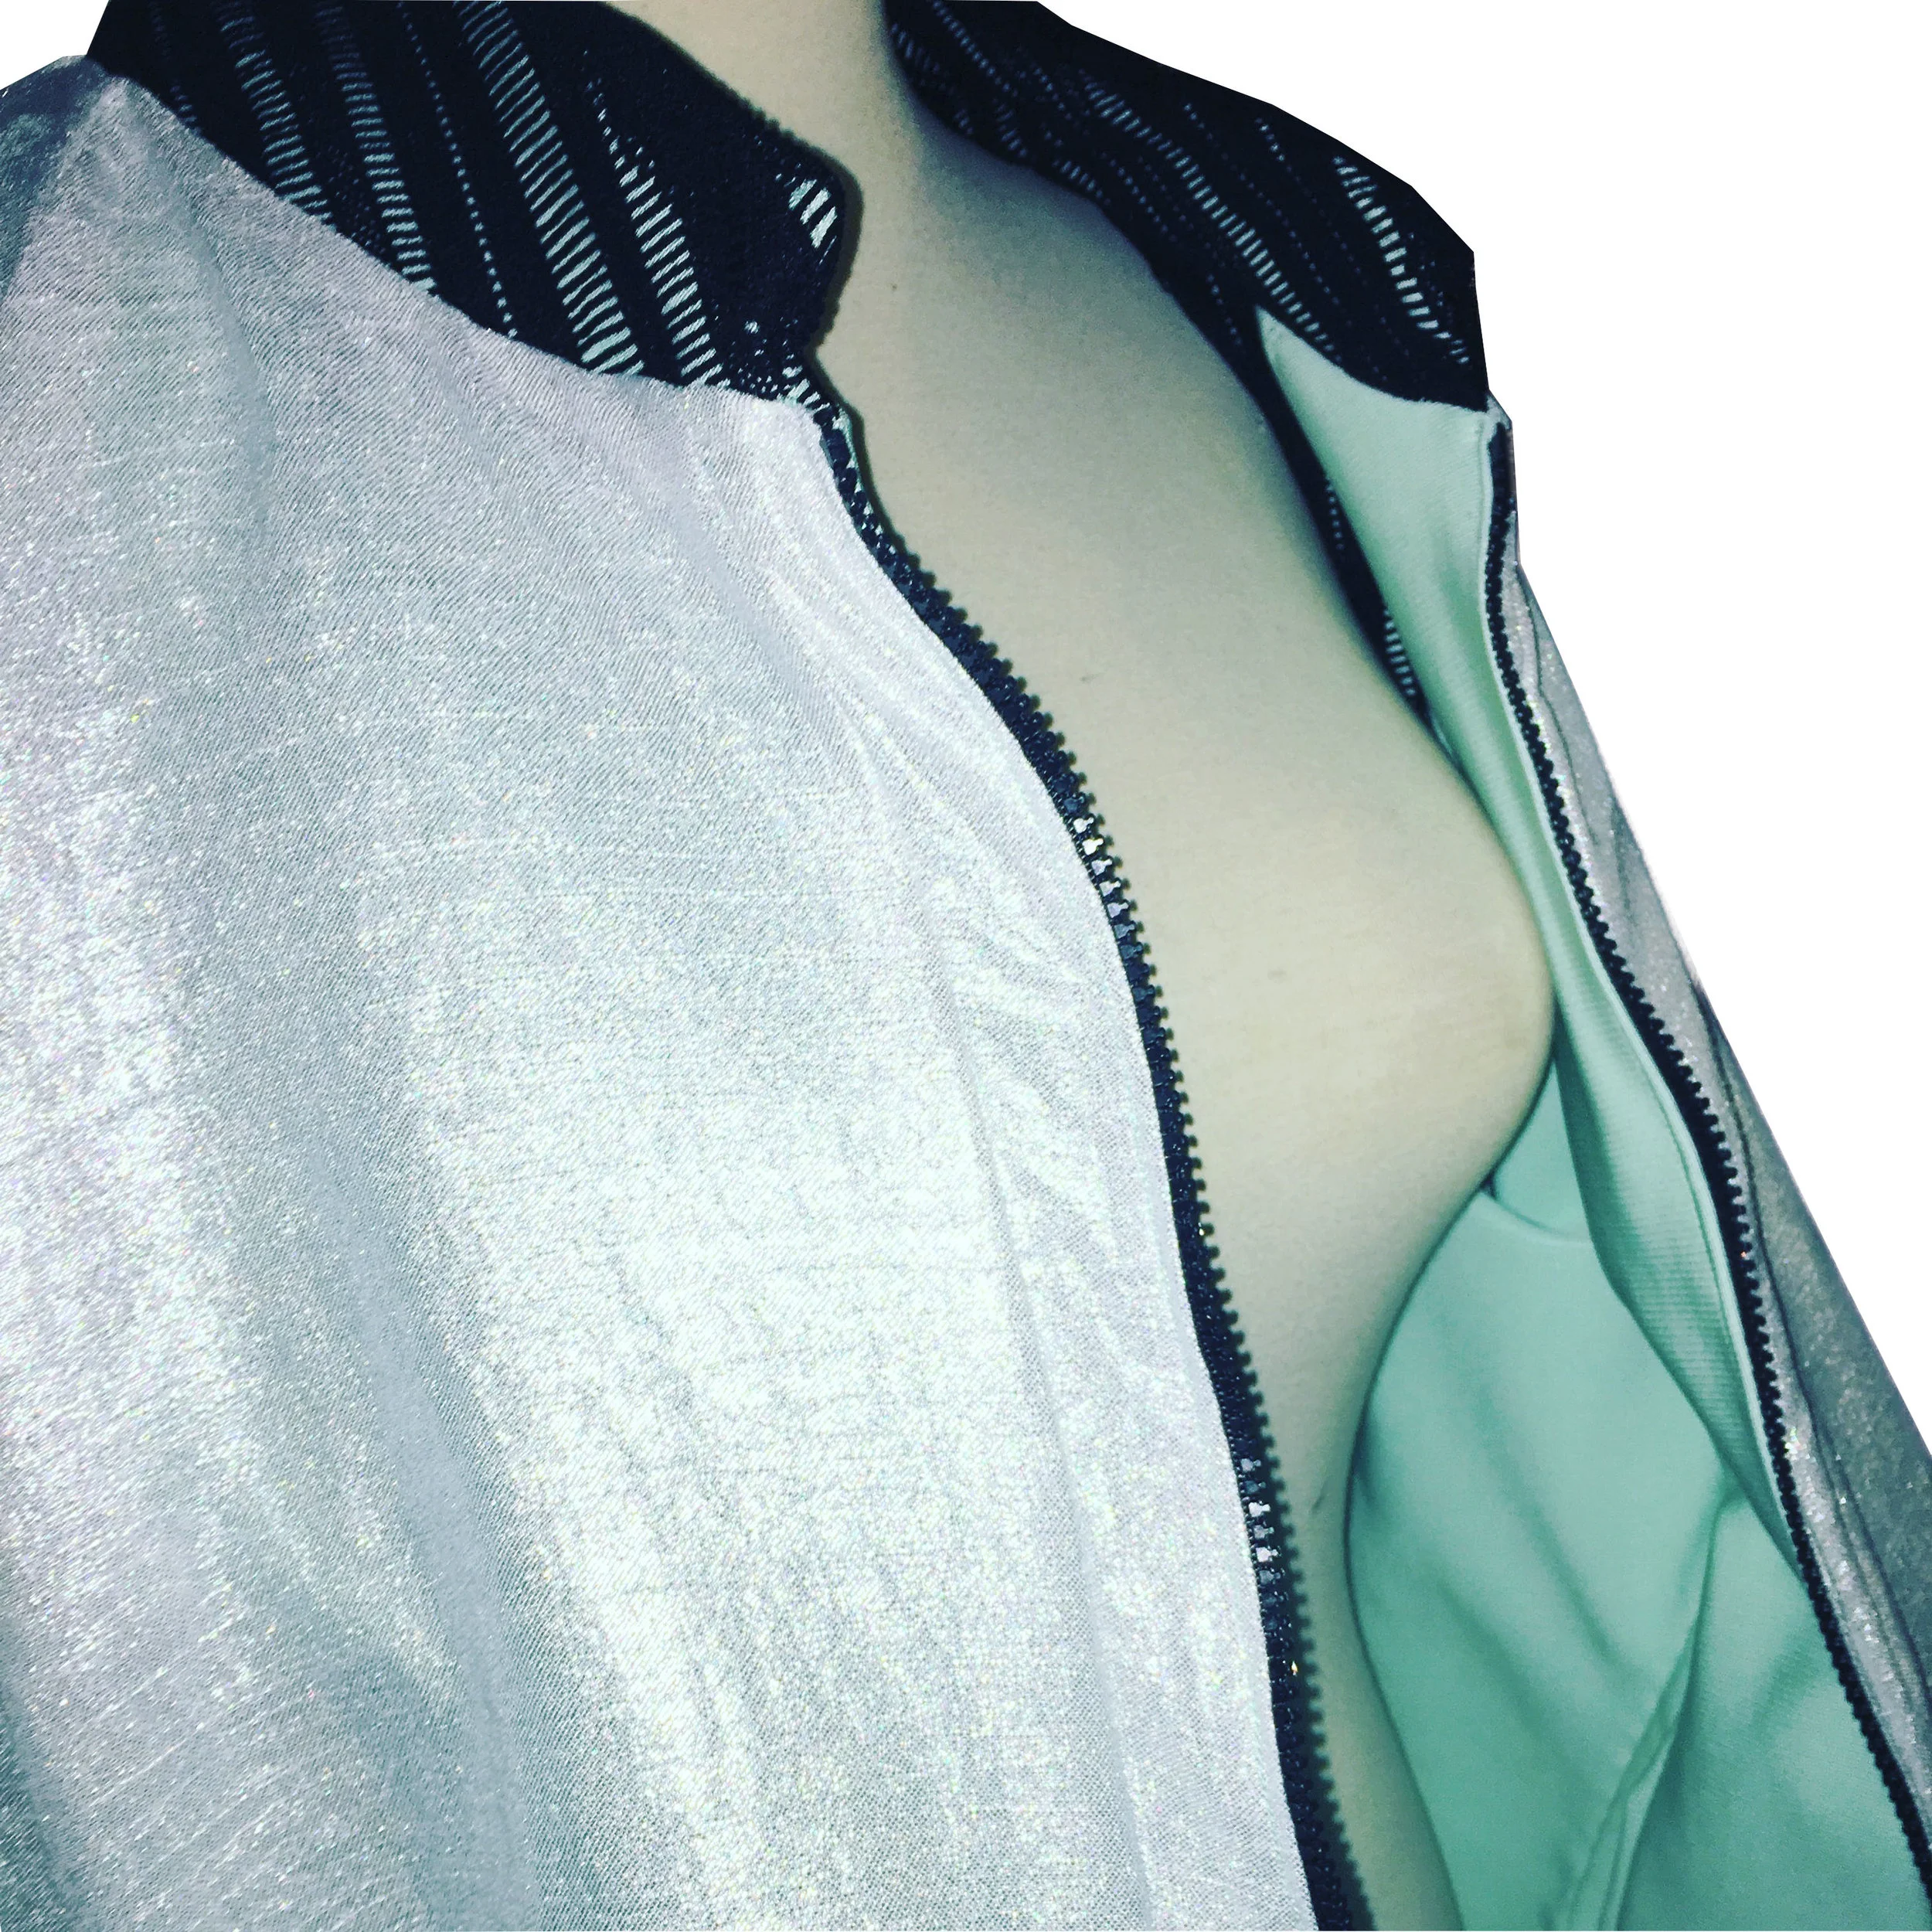
For my second time around, I have to say I am beyond happy with the result. Constructing this bomber jacket was a lot smoother than the first time, I think mainly due to the ease of working with this fabric. I love this stretch nylon spandex because it gives just enough volume (and warmth) for be an effortlessly cool fall statement jacket. The pop of the silver lining really adds extra flare too. This is one of my favorite pieces I have created thus far!
More of these to come!

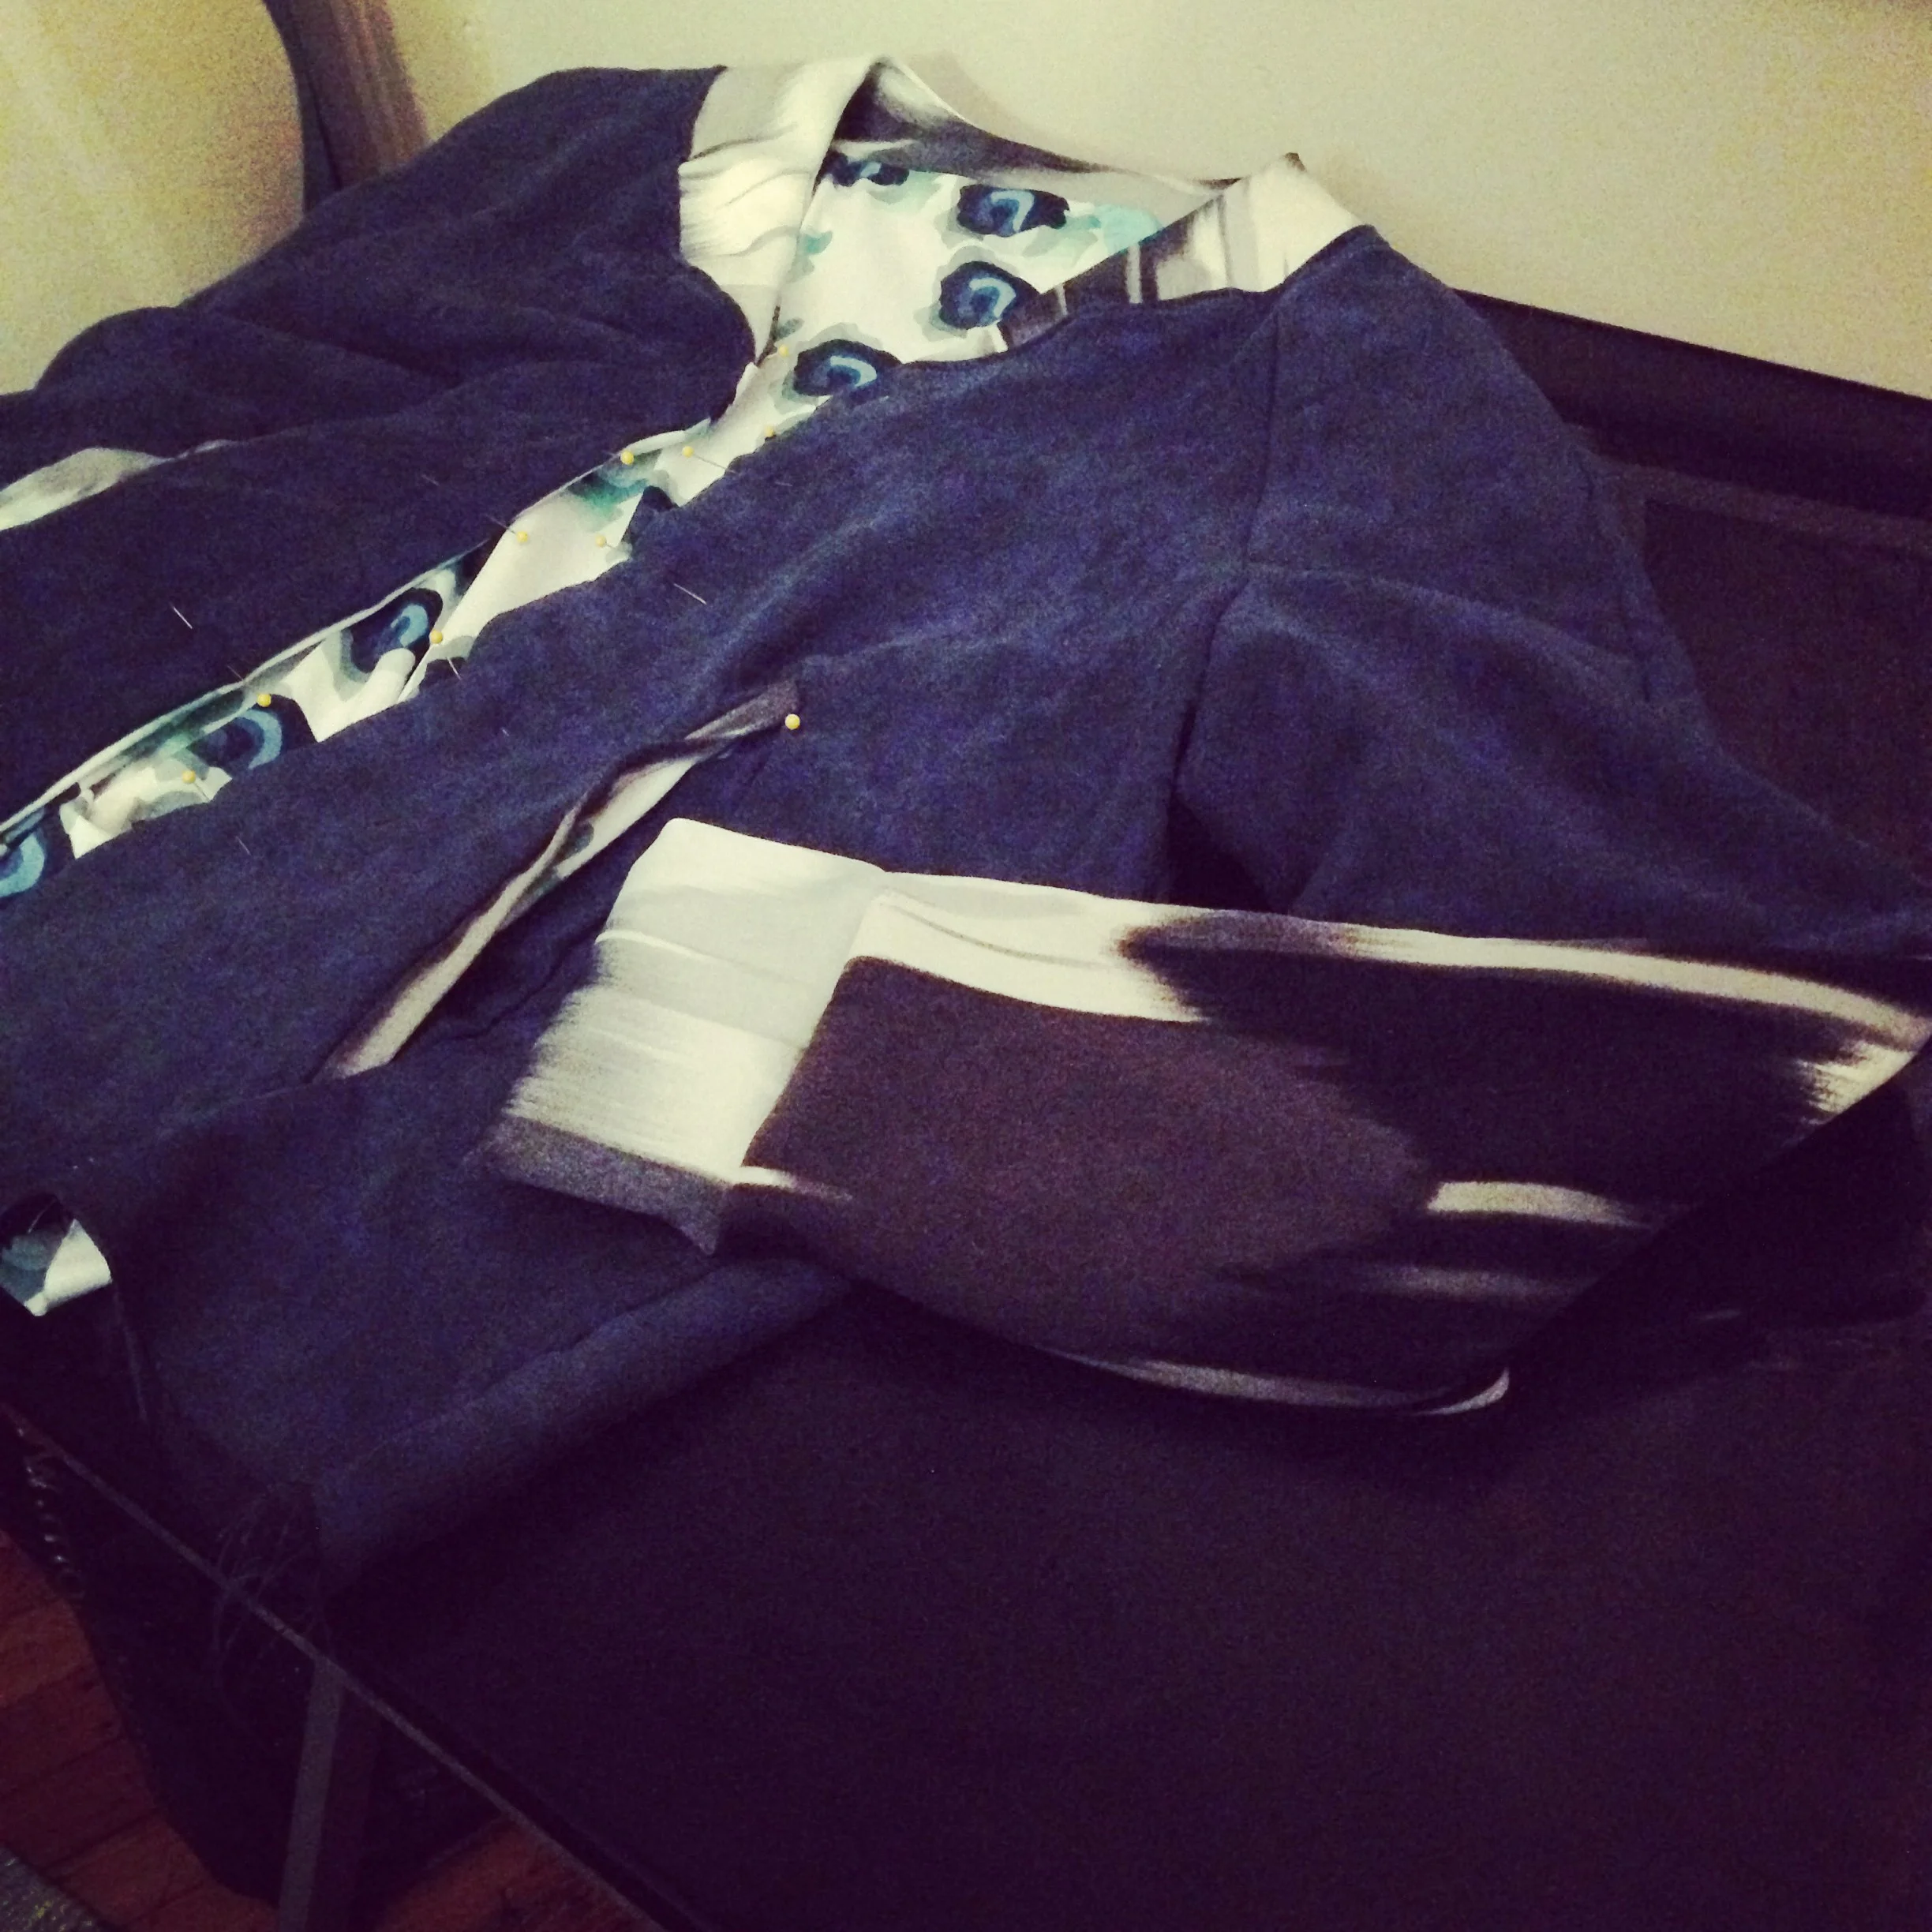
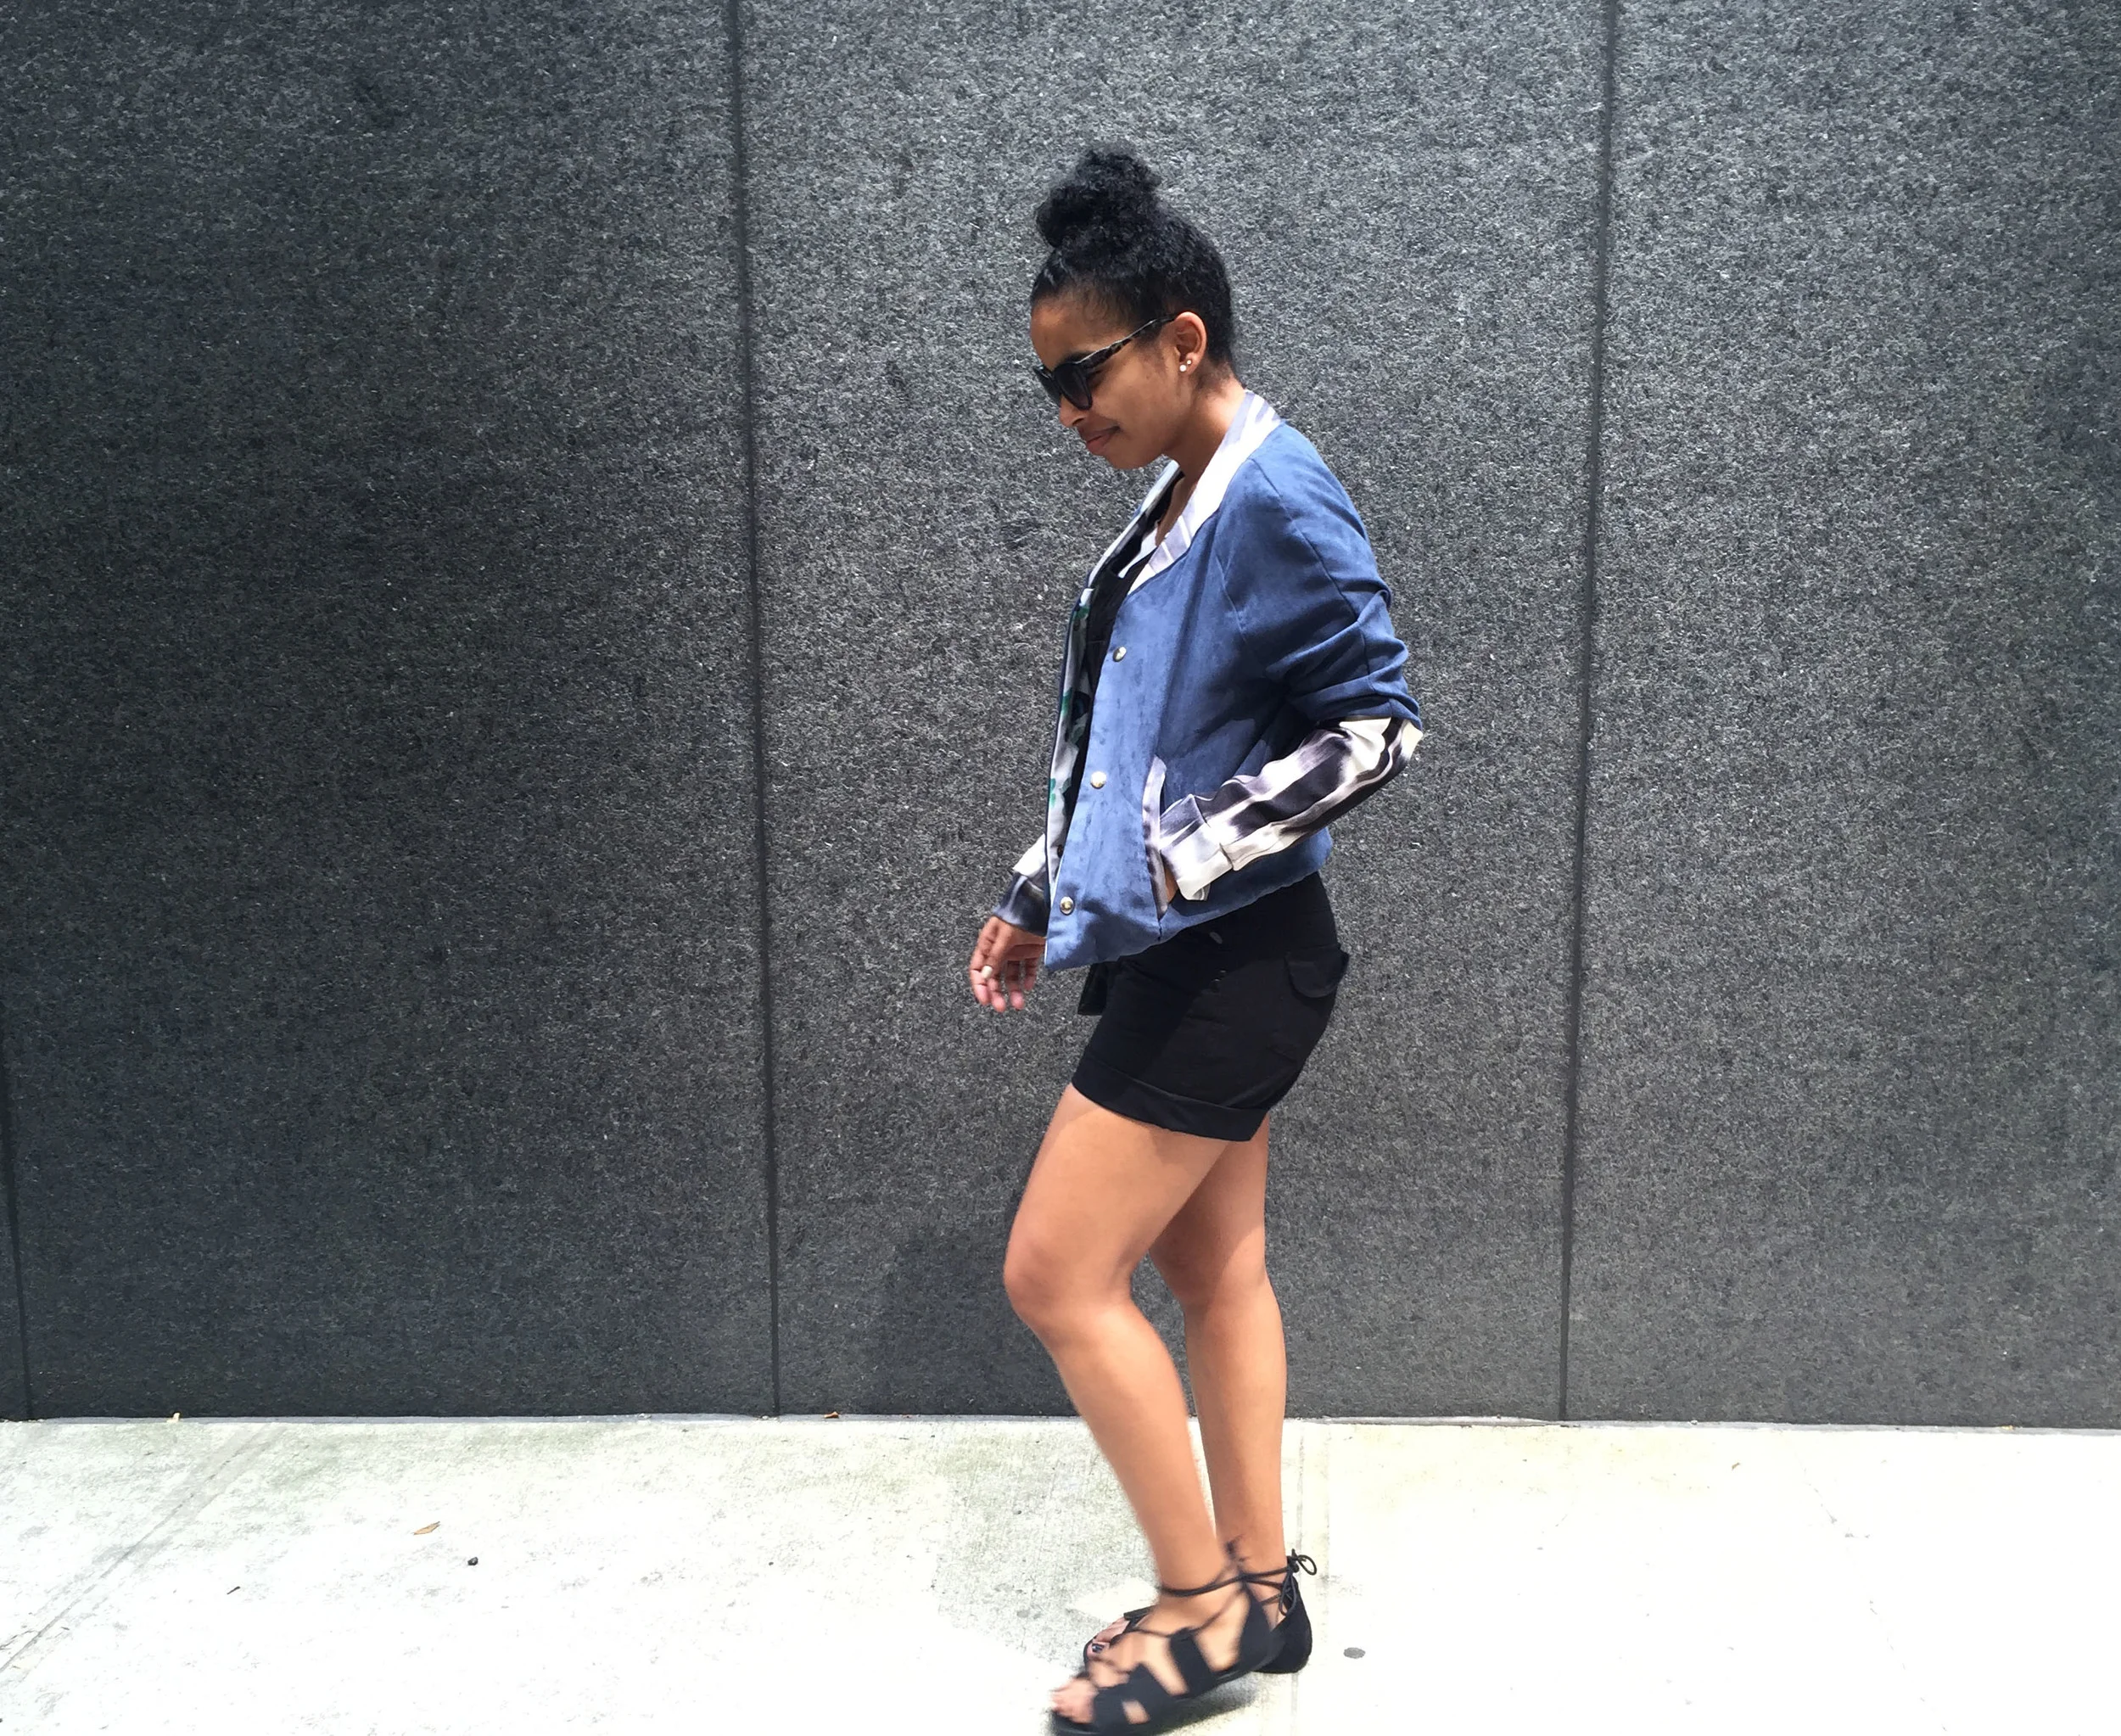
Reinvention of the Classic Bomber Jacket
My latest creation is a new take on the jacket that defines cool: the bomber.
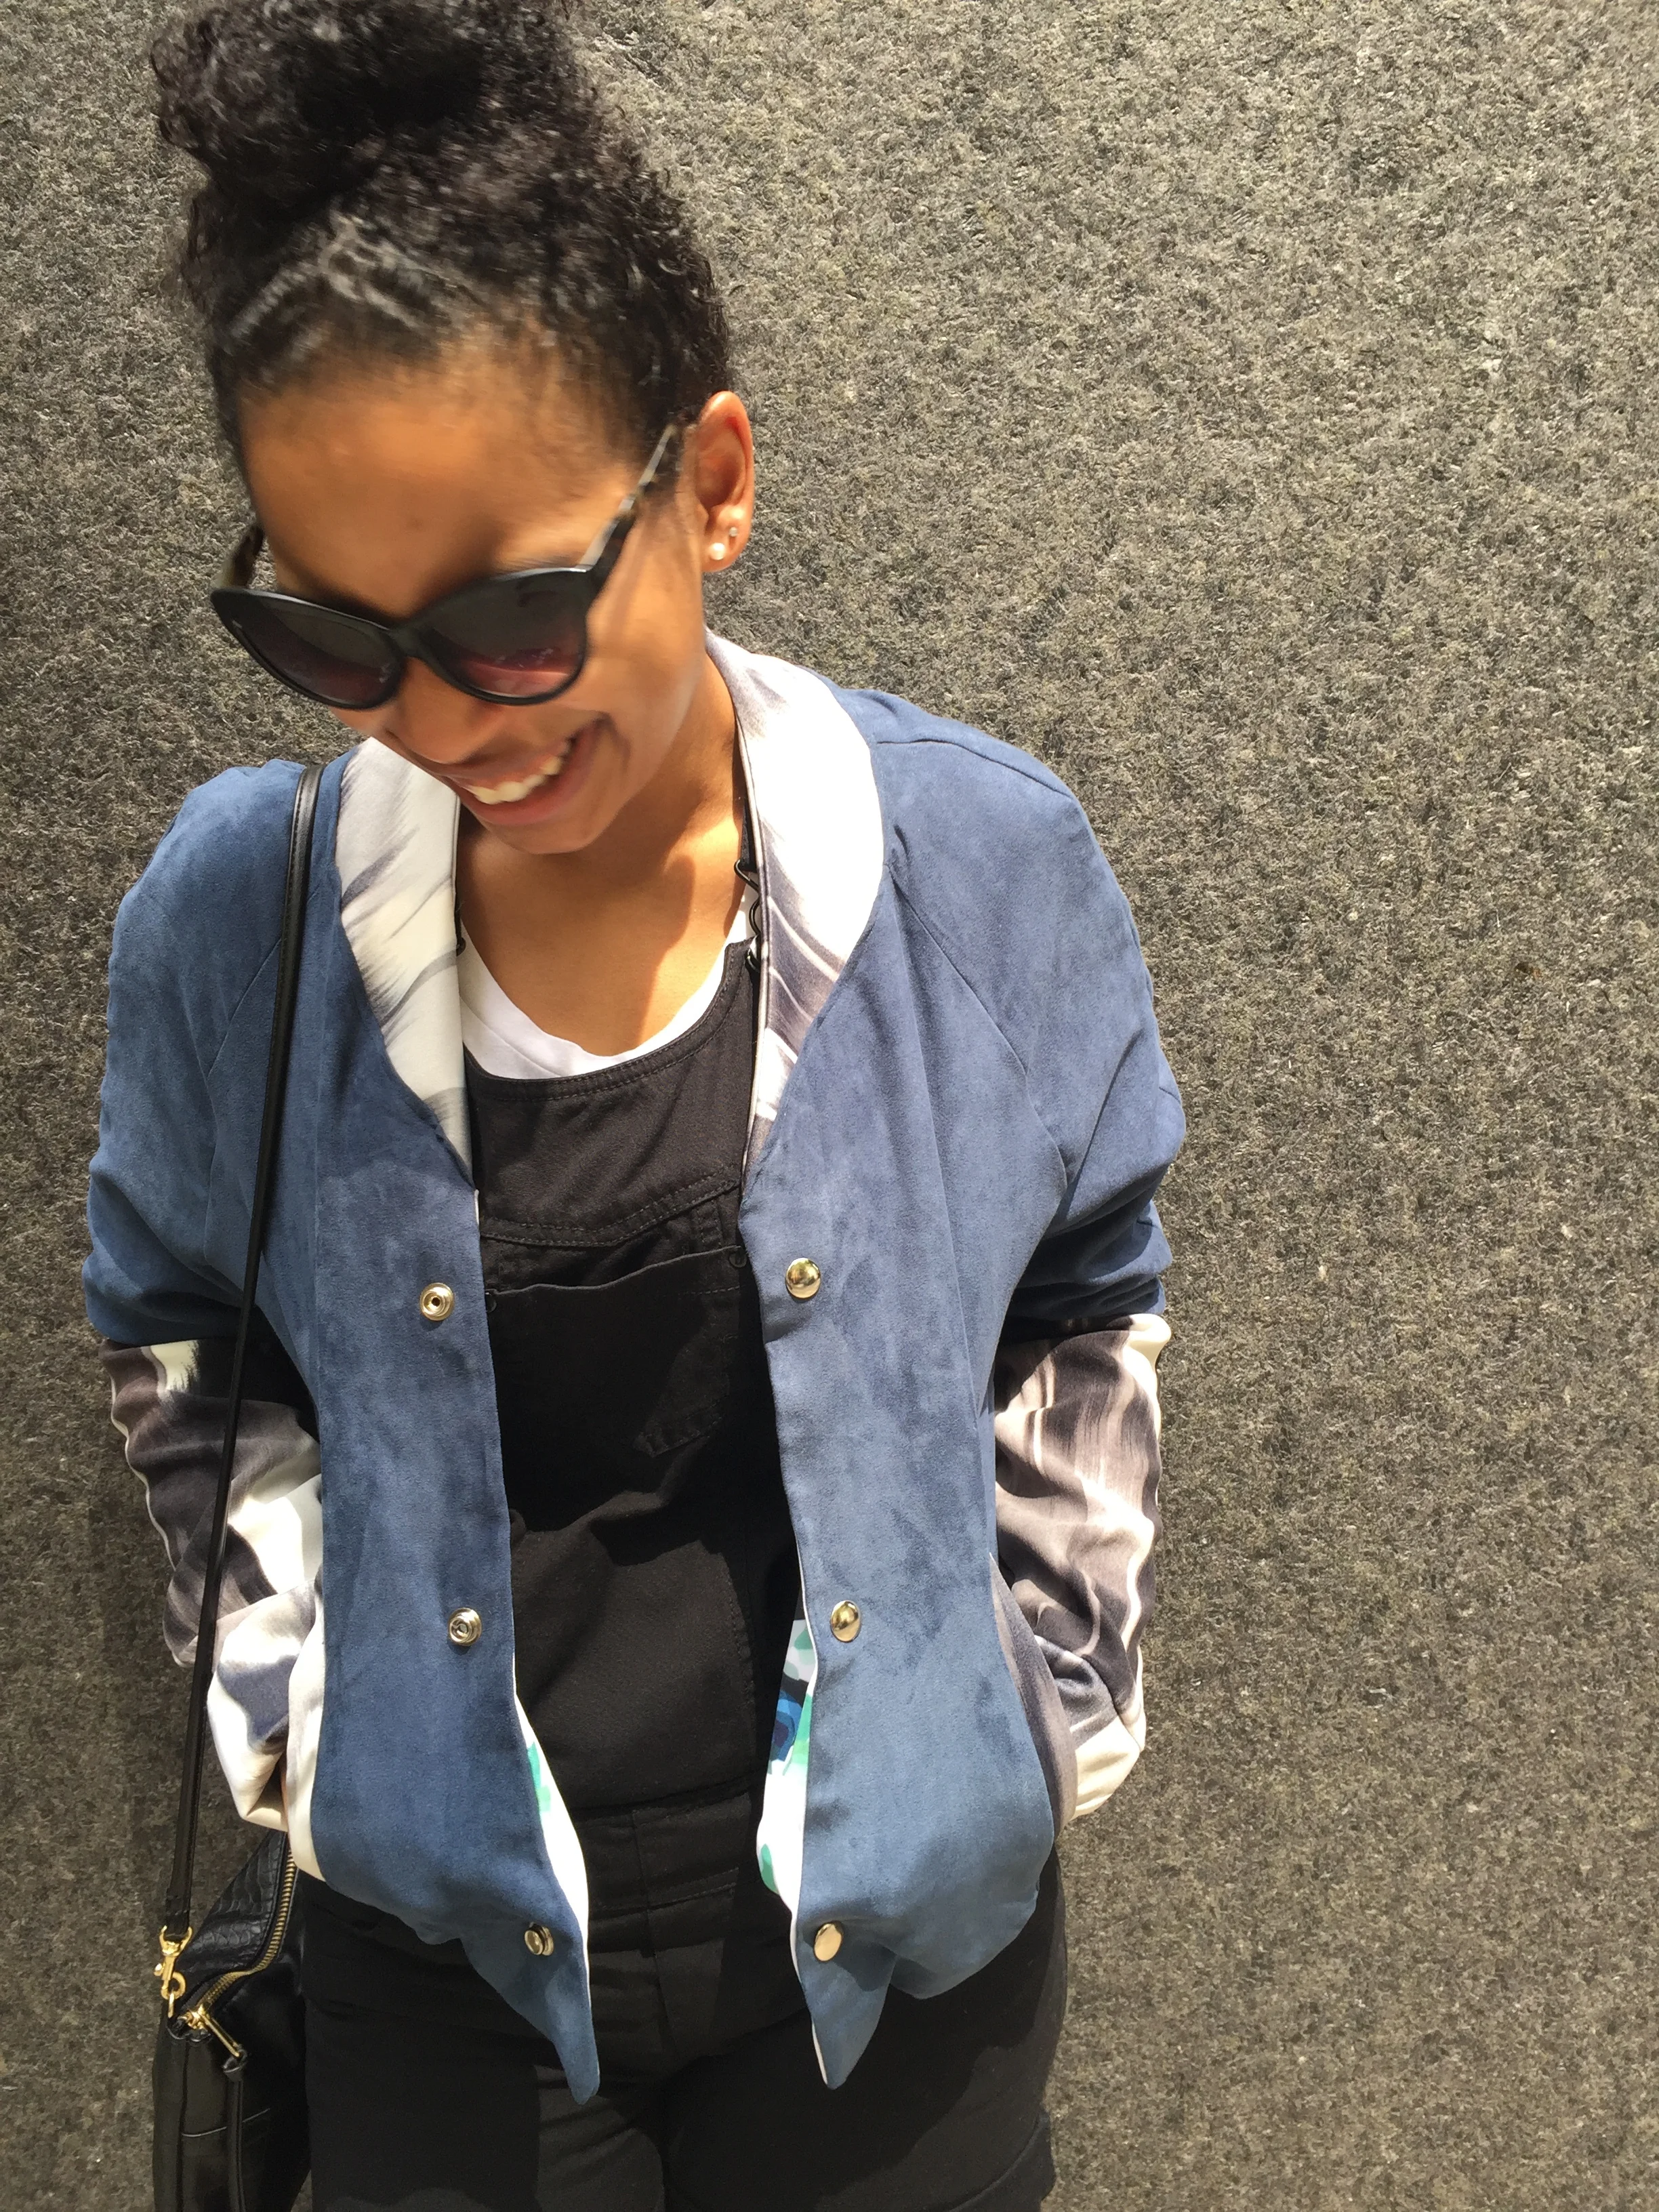
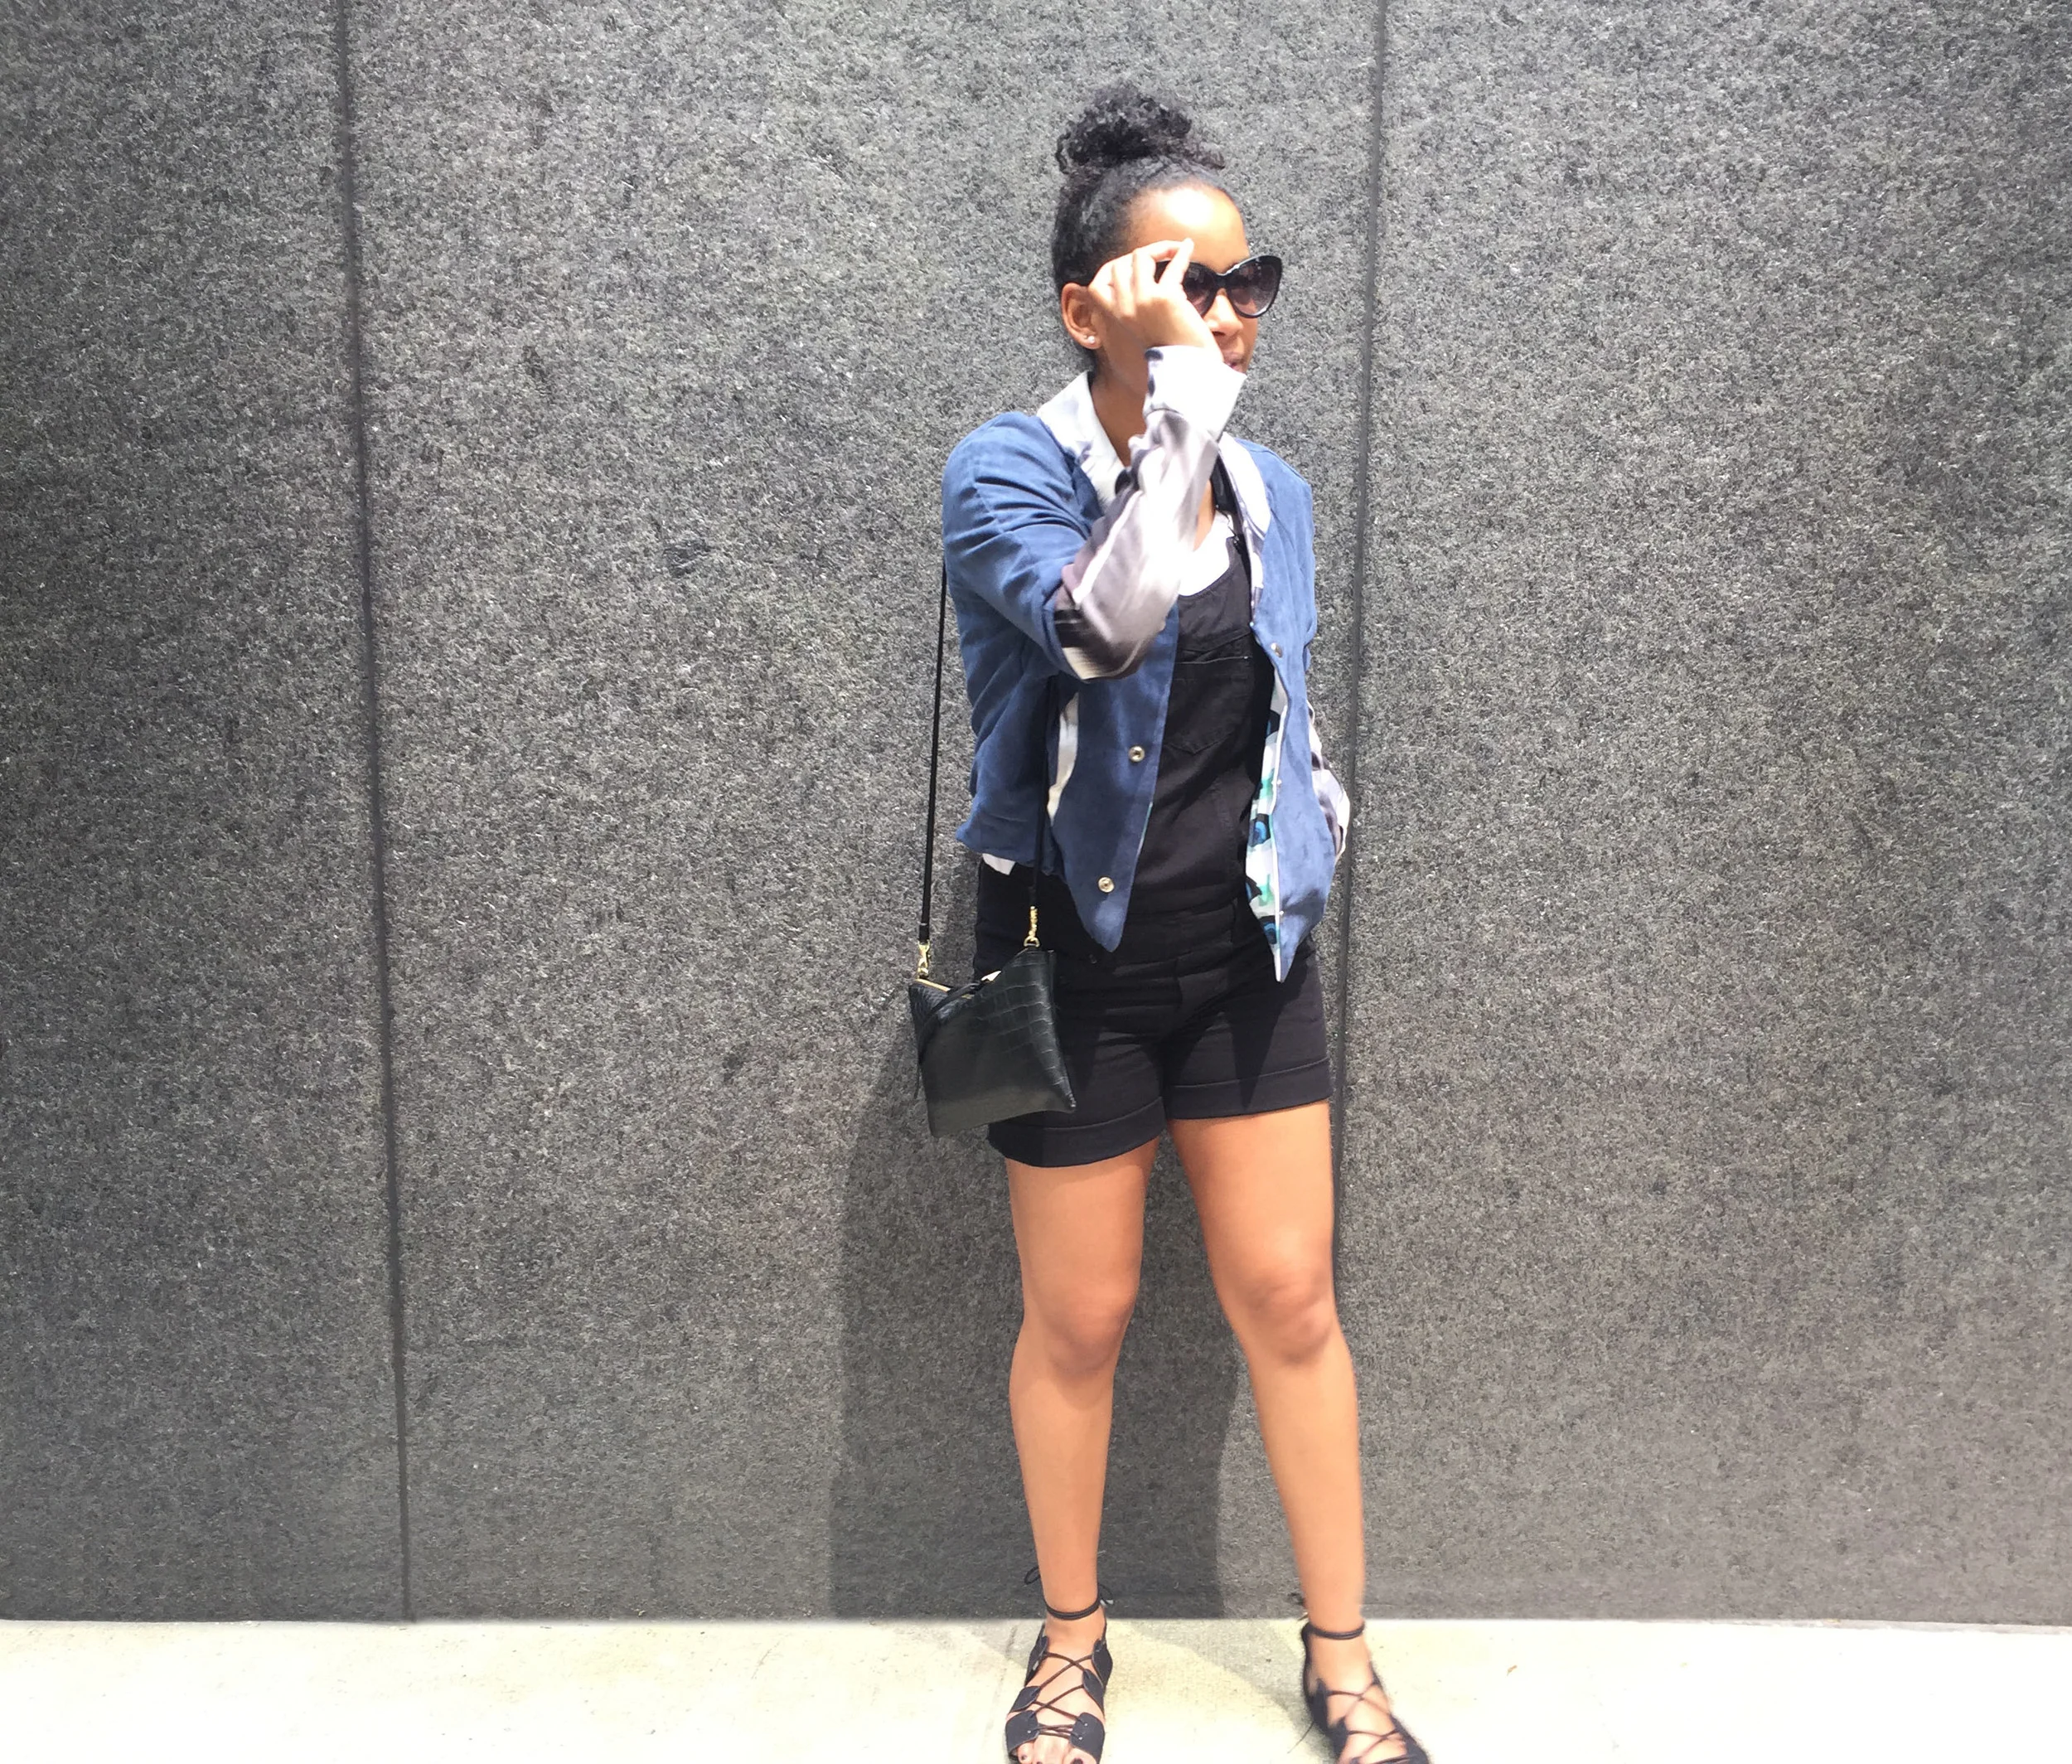
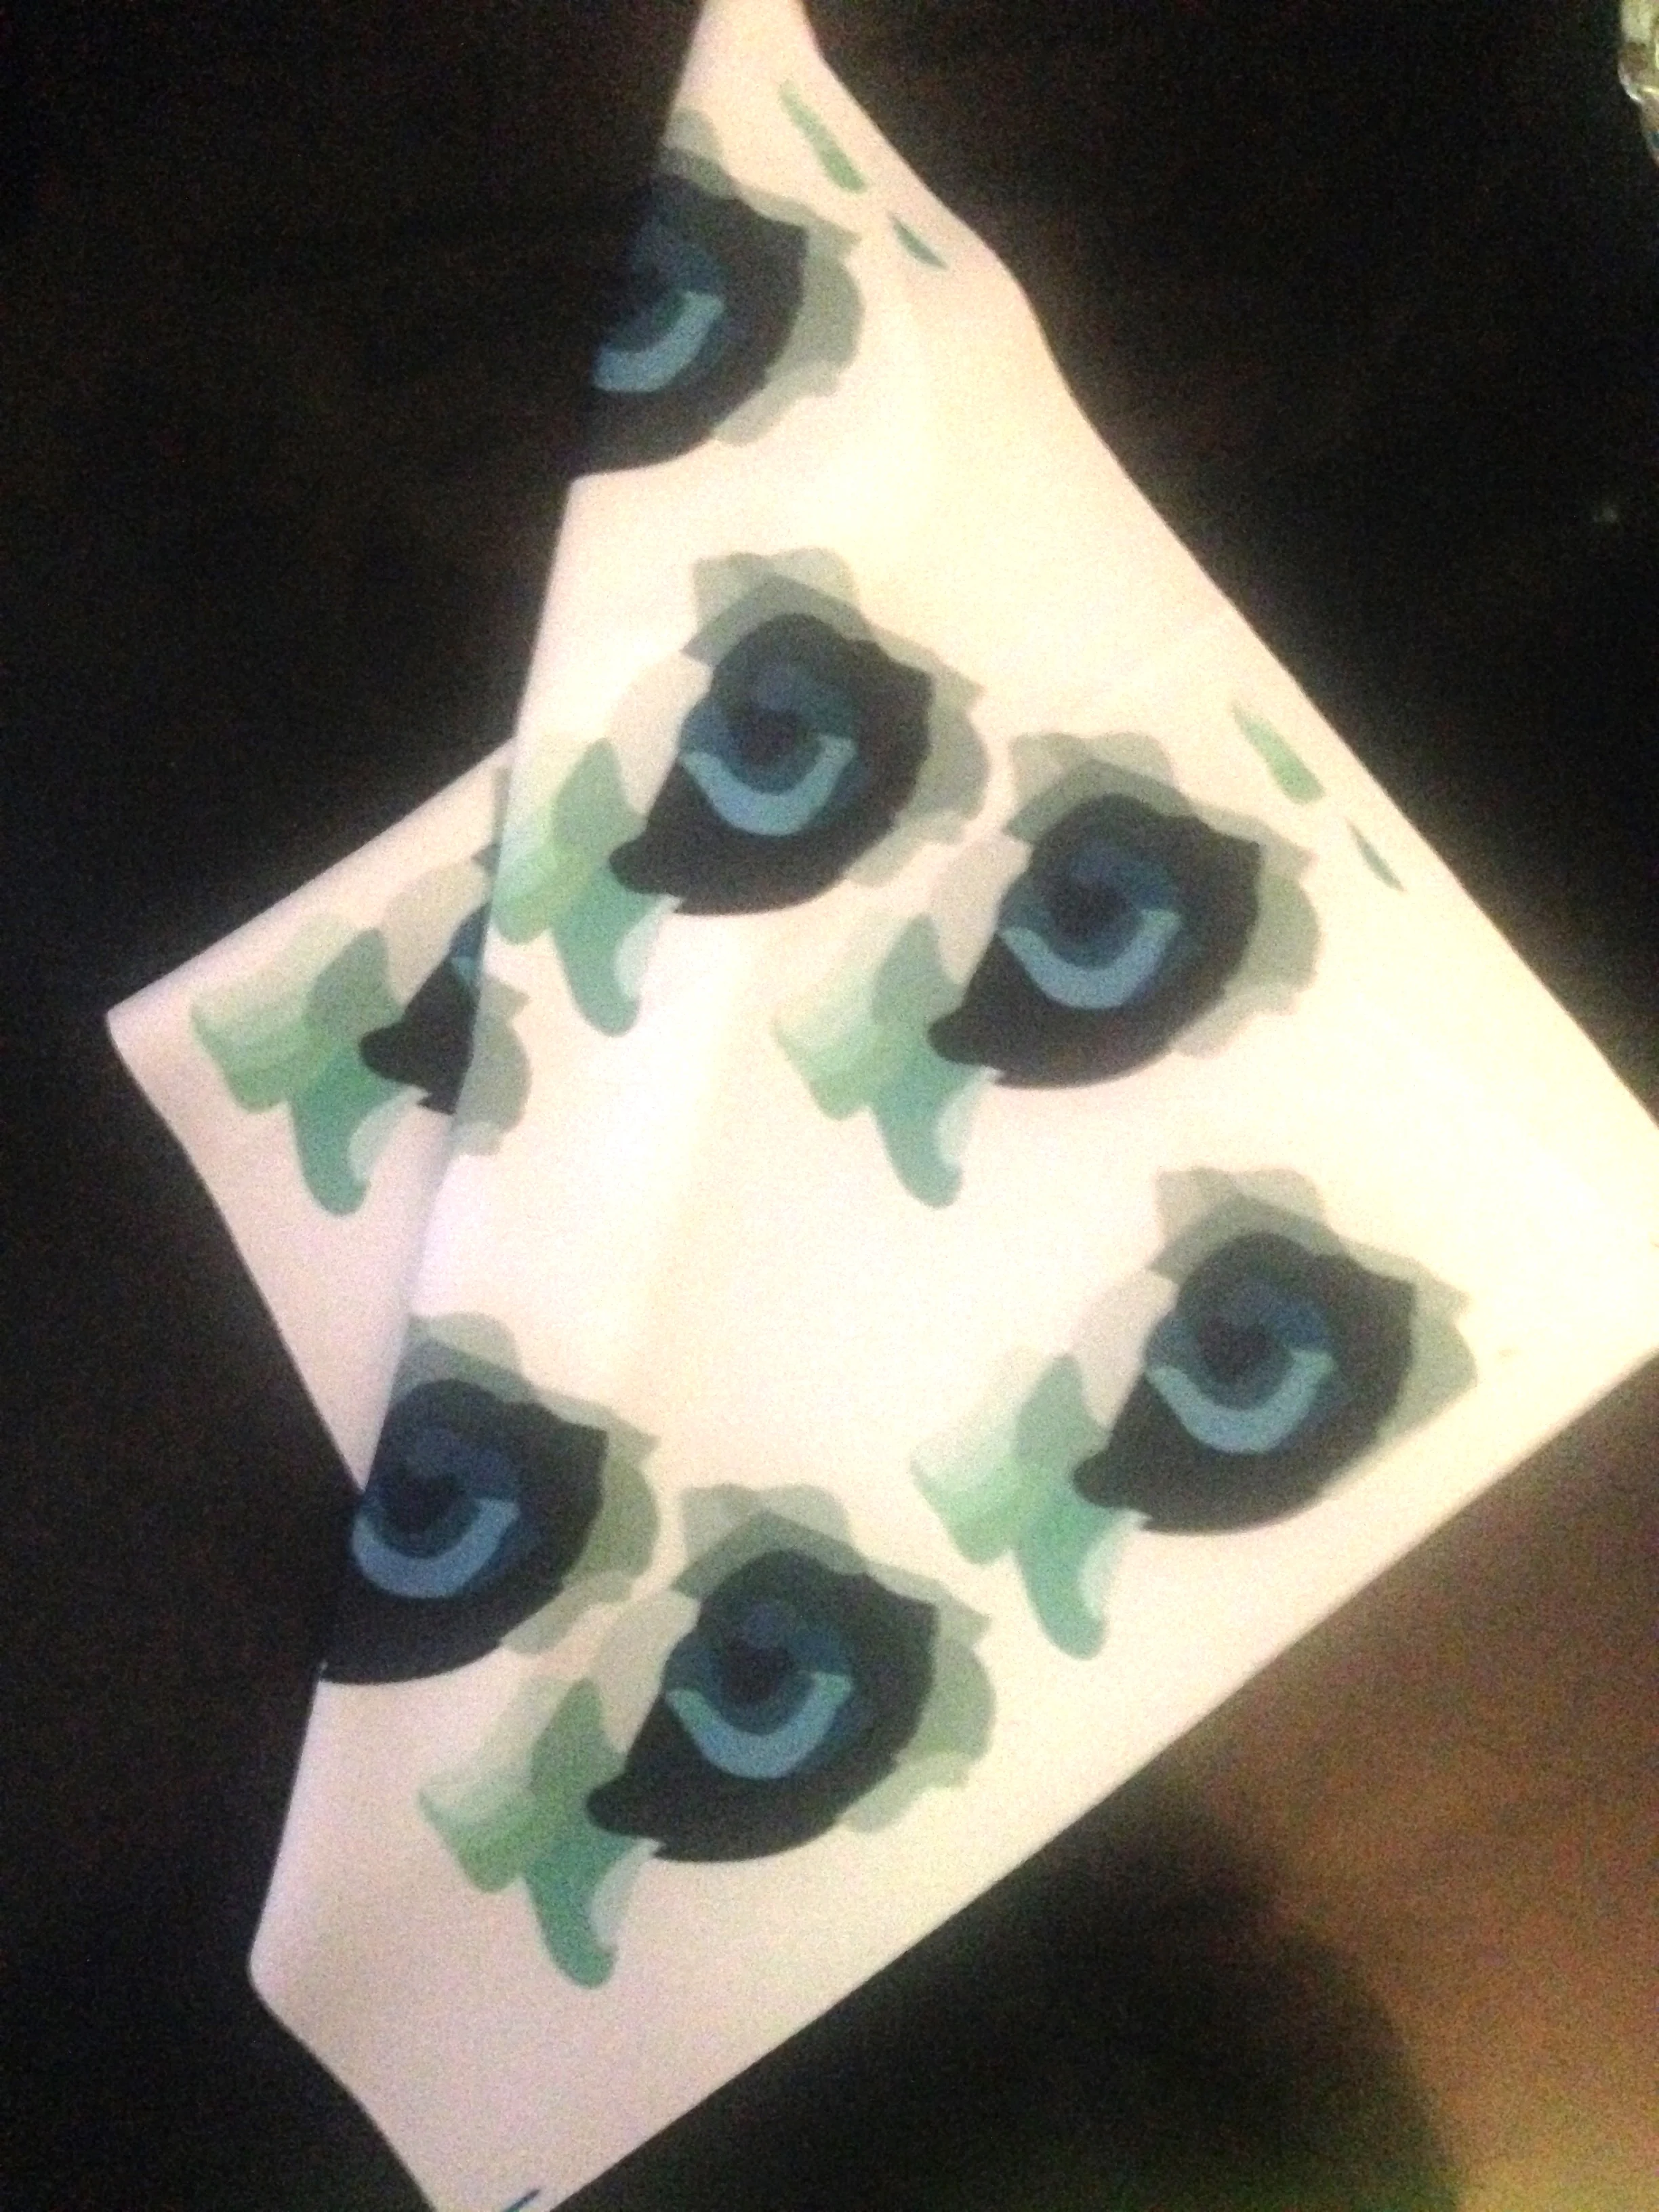
Using the remaining fabric from my previous designs, this multi-textured bomber jacket features a navy blue suede body and a folded half sleeve, double faced brushed twill for the remaining half of the sleeve, collar, and the reverse side of that same twill for the sleeve cuff. Also, for the lining I used the print I designed using an illustration of my late dog, Buster's eyes. I added snaps too and pocket trim using the brushed twill.
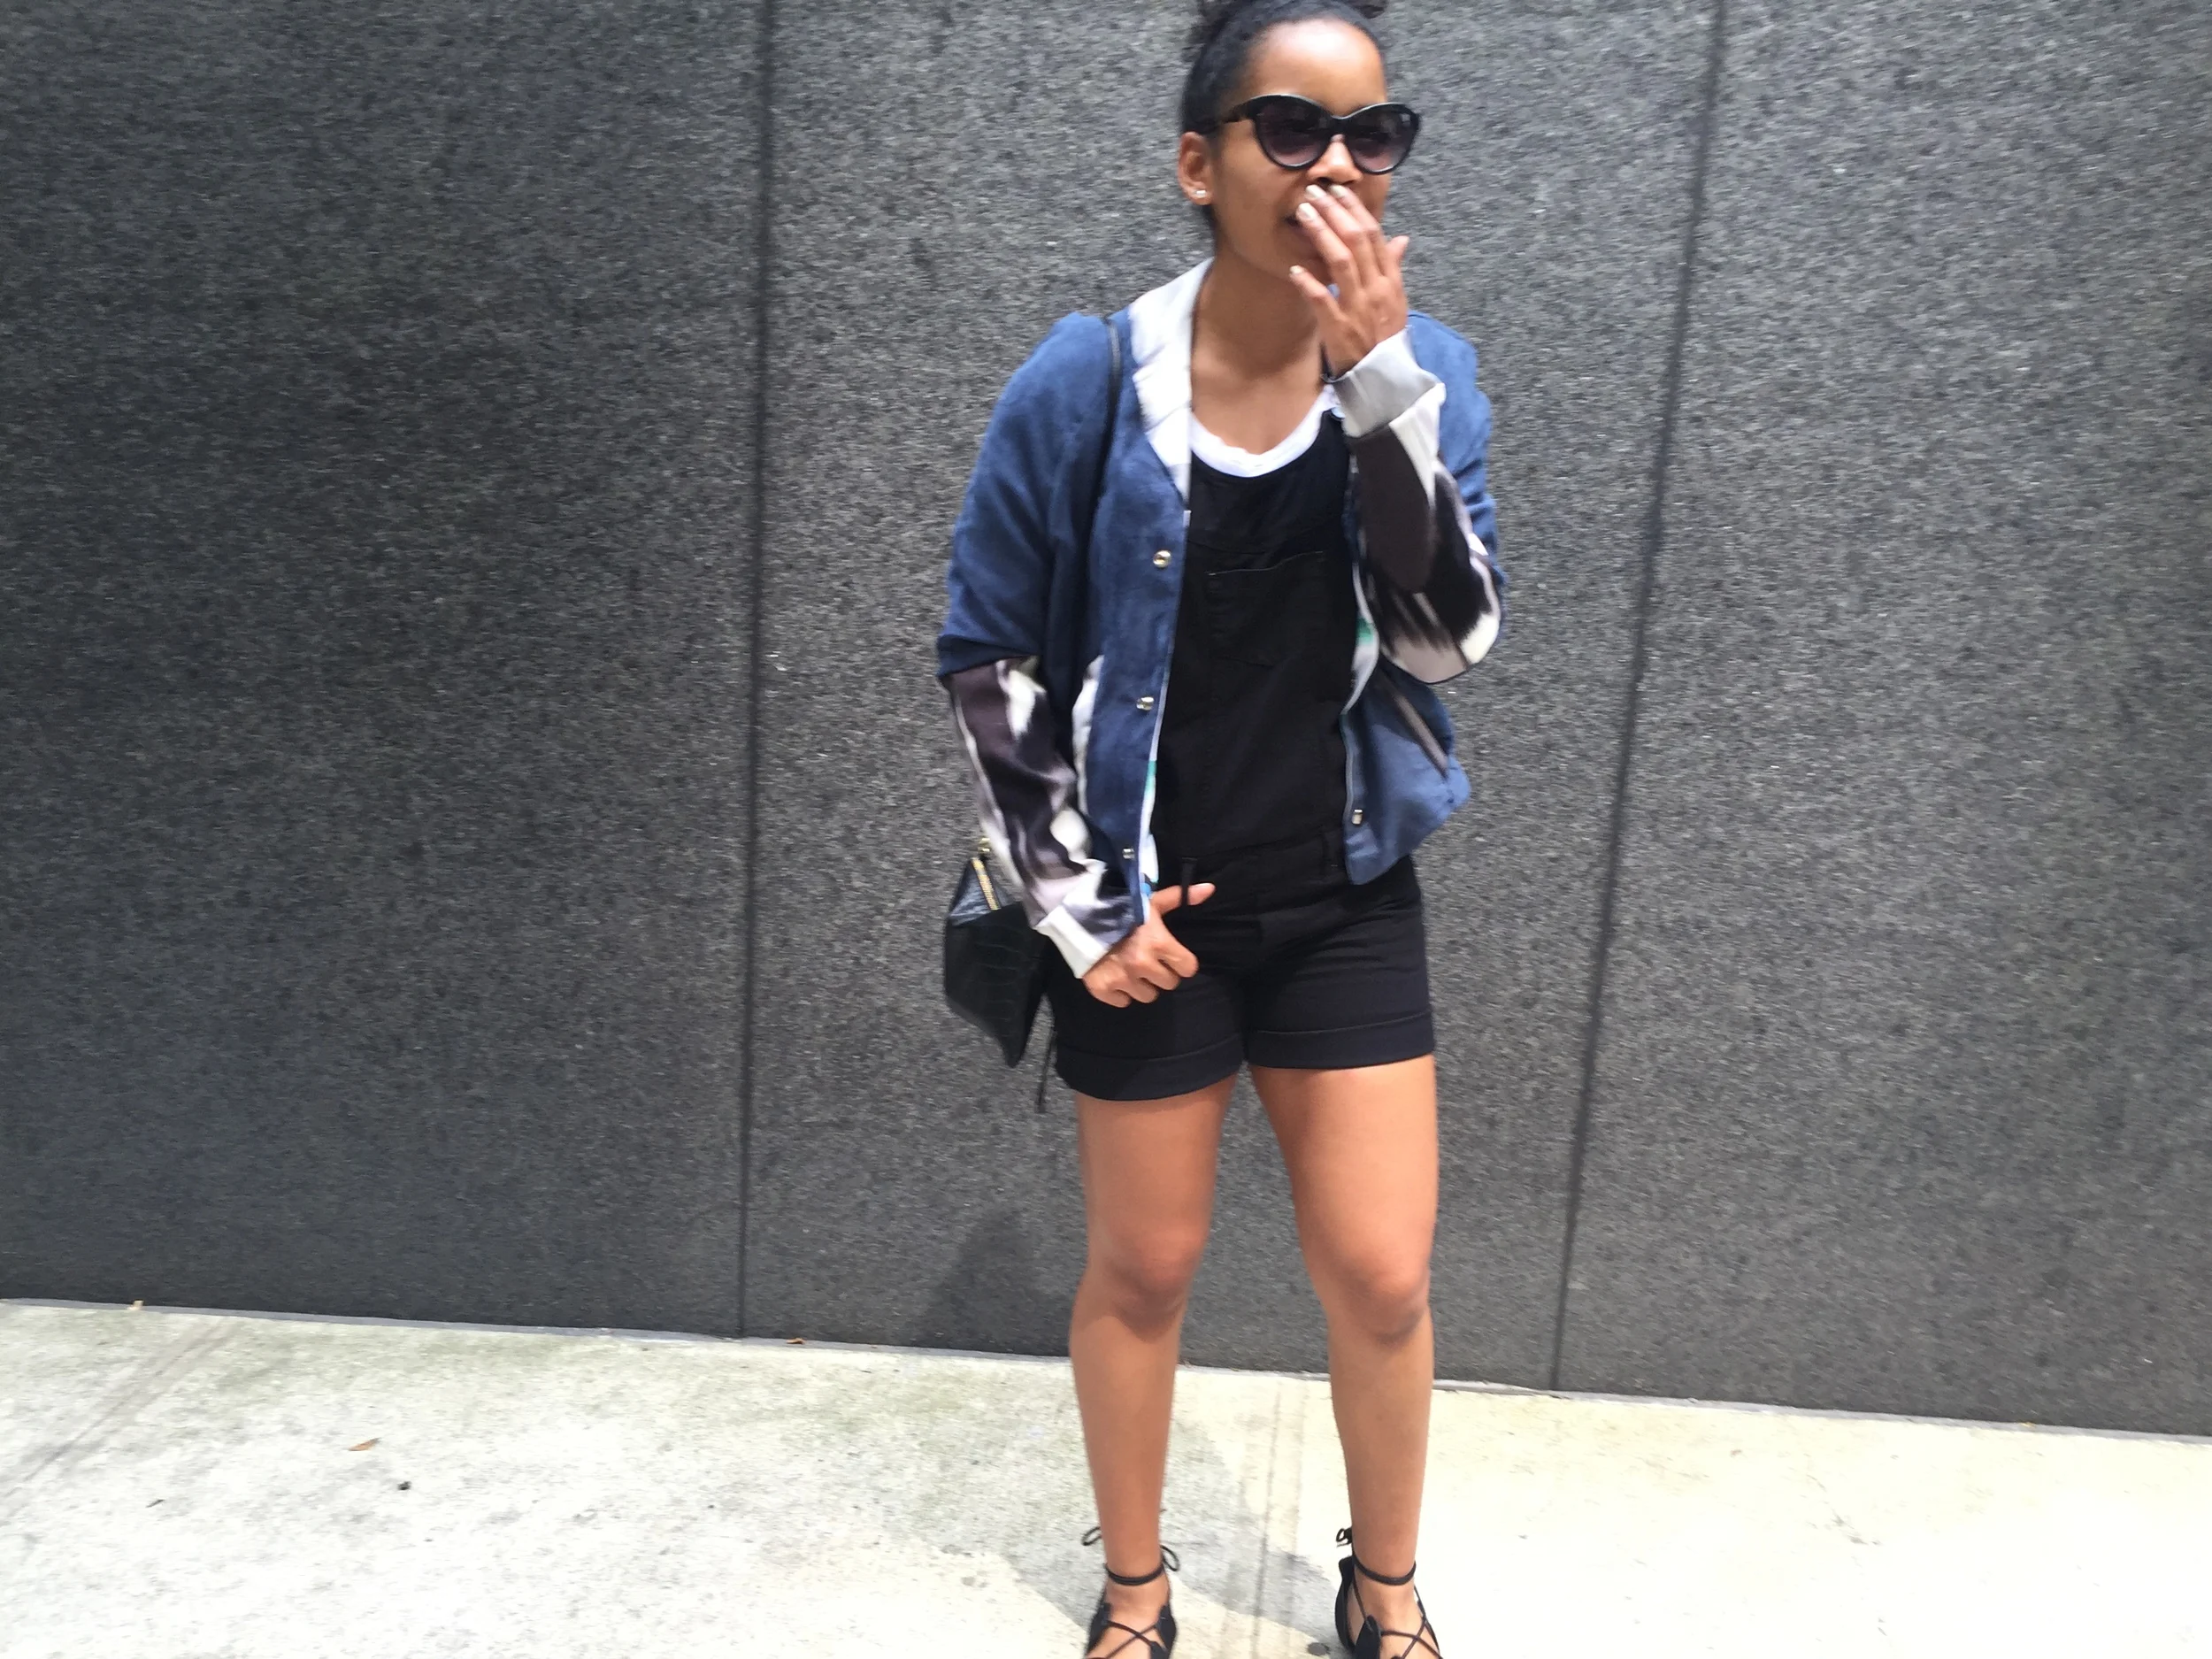
I definitely loving this unique design & will be making more like this soon!
I definitely loving this unique design & will be making more like this soon!
Stay Tuned!
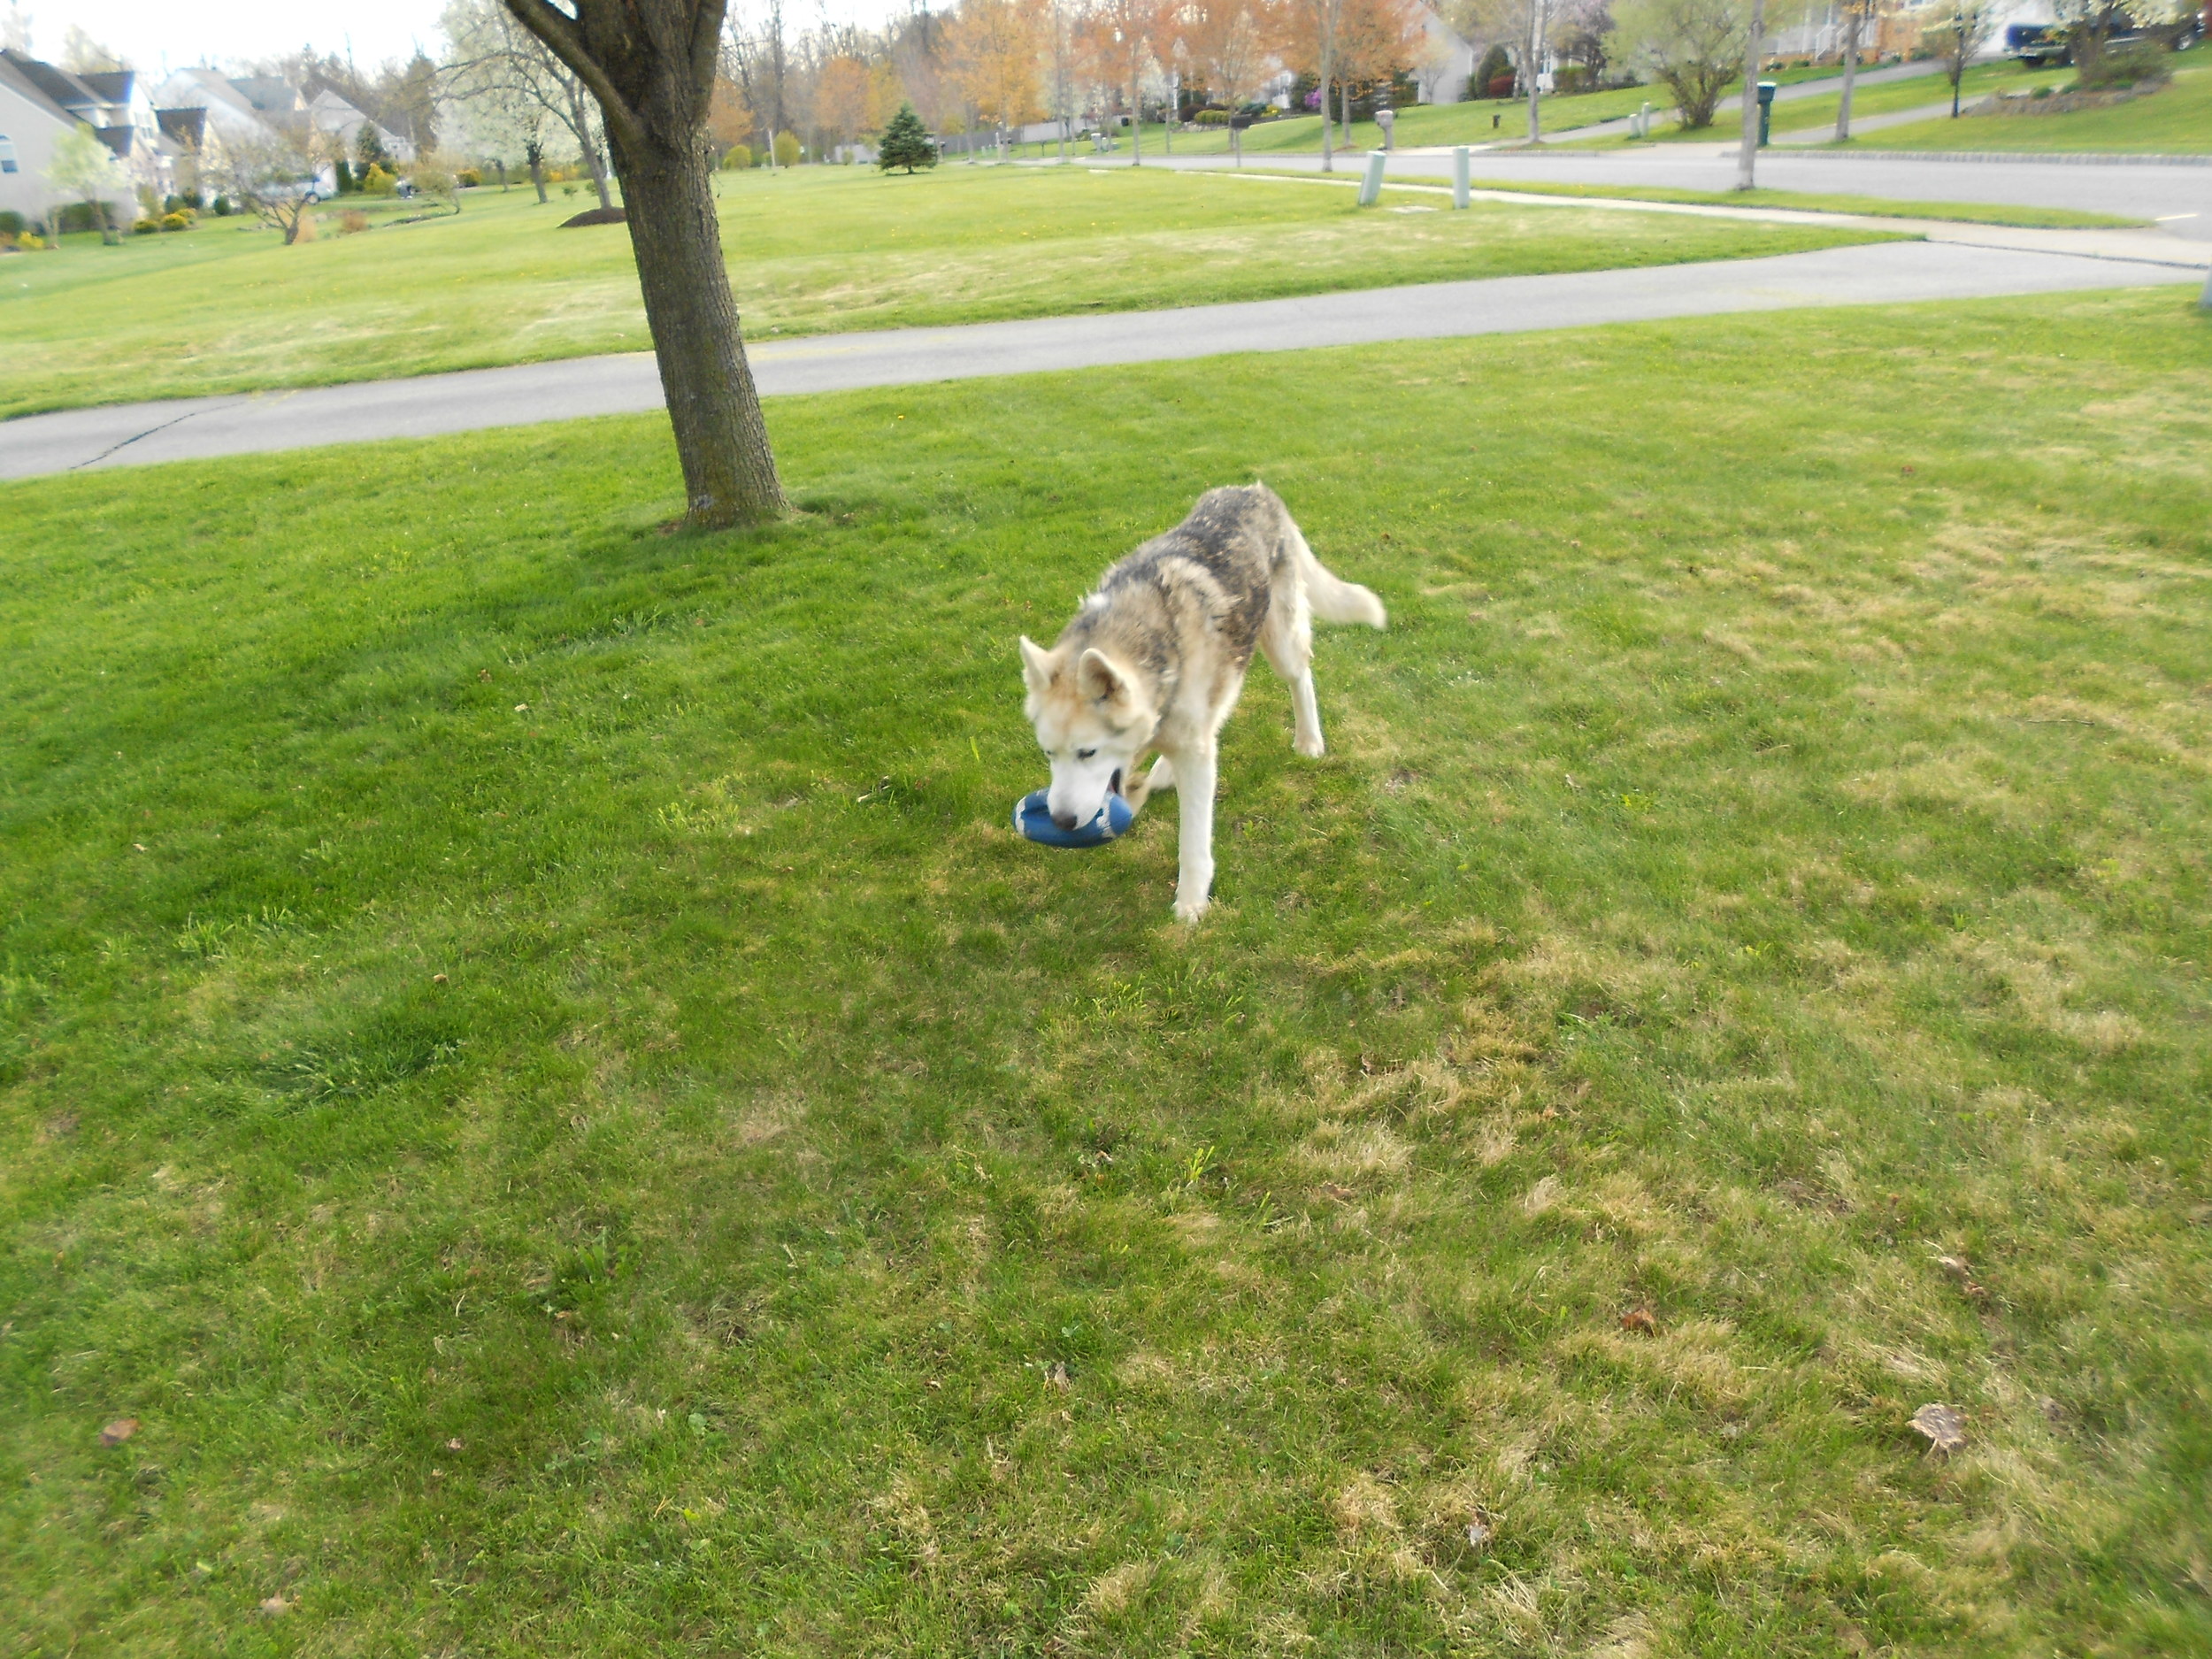
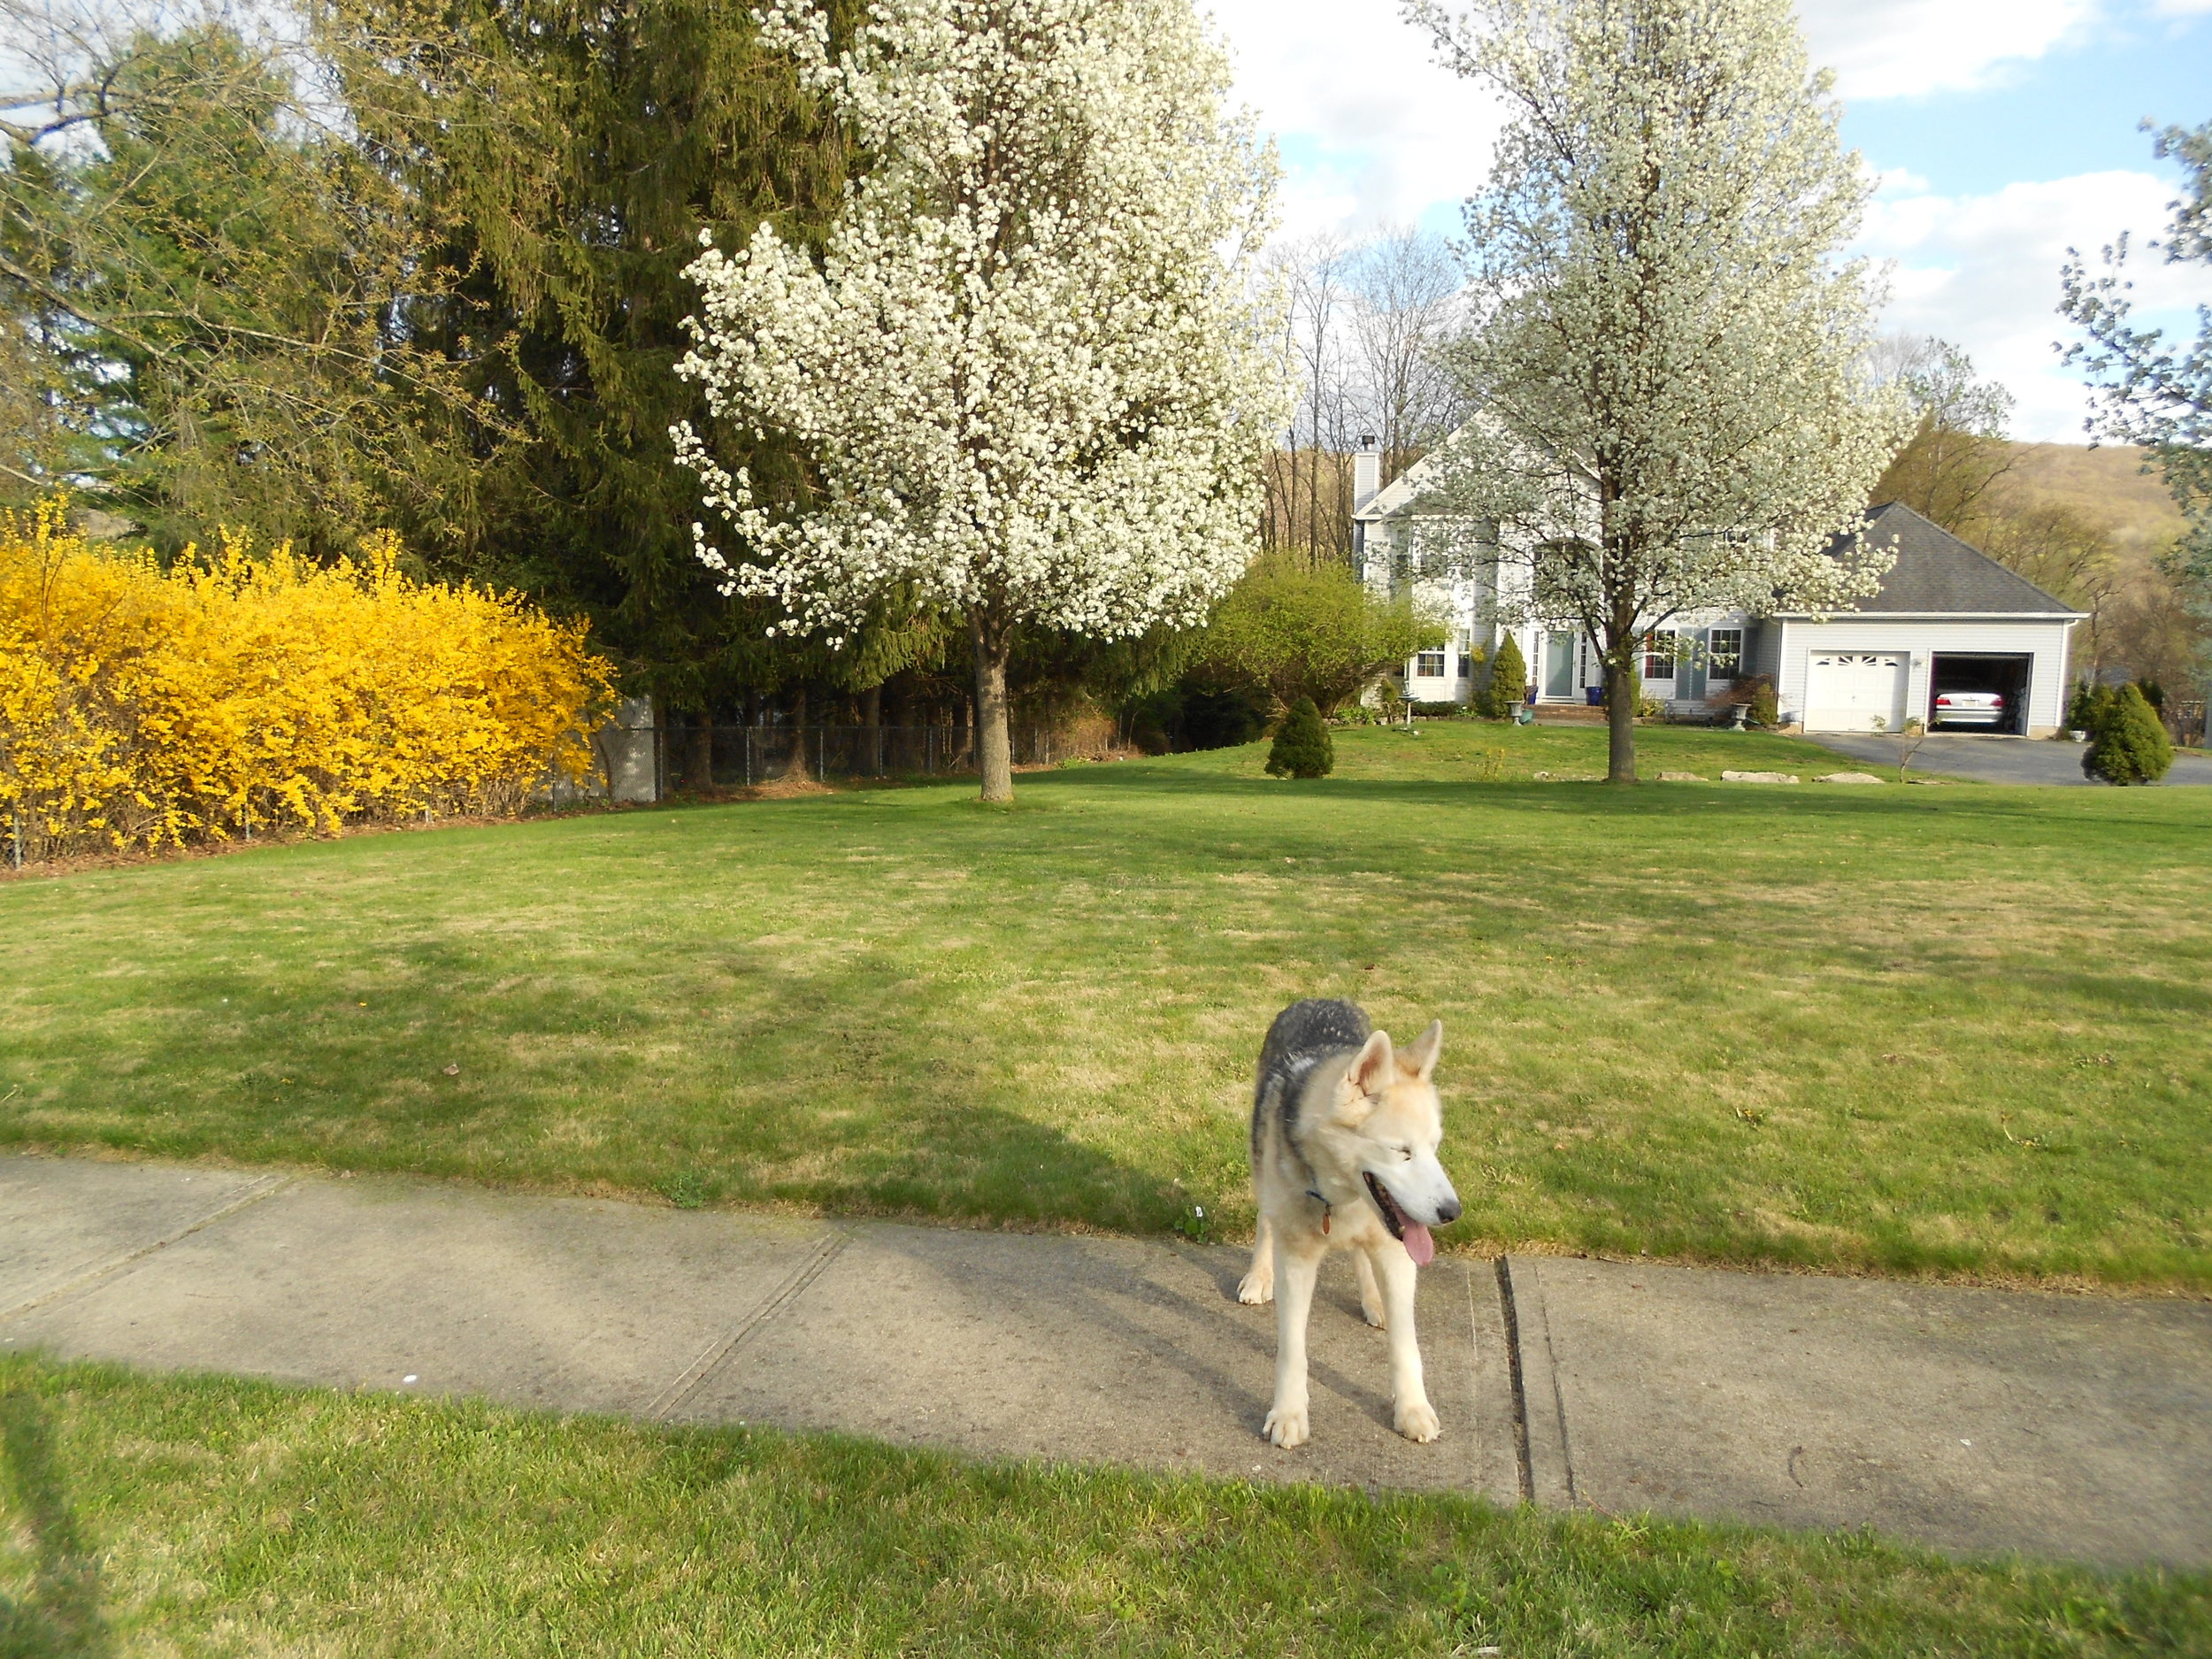
Diggin' Fur Inspiration
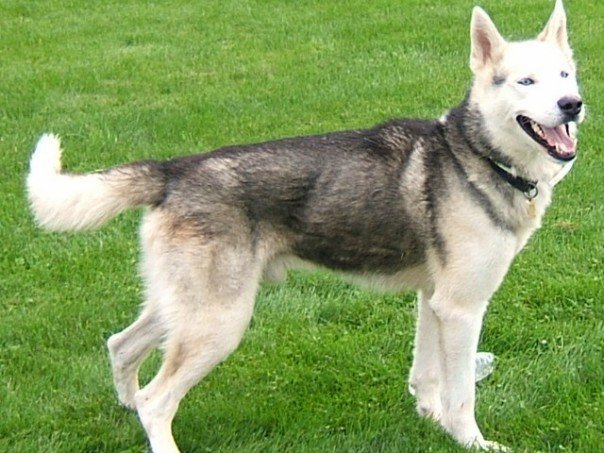
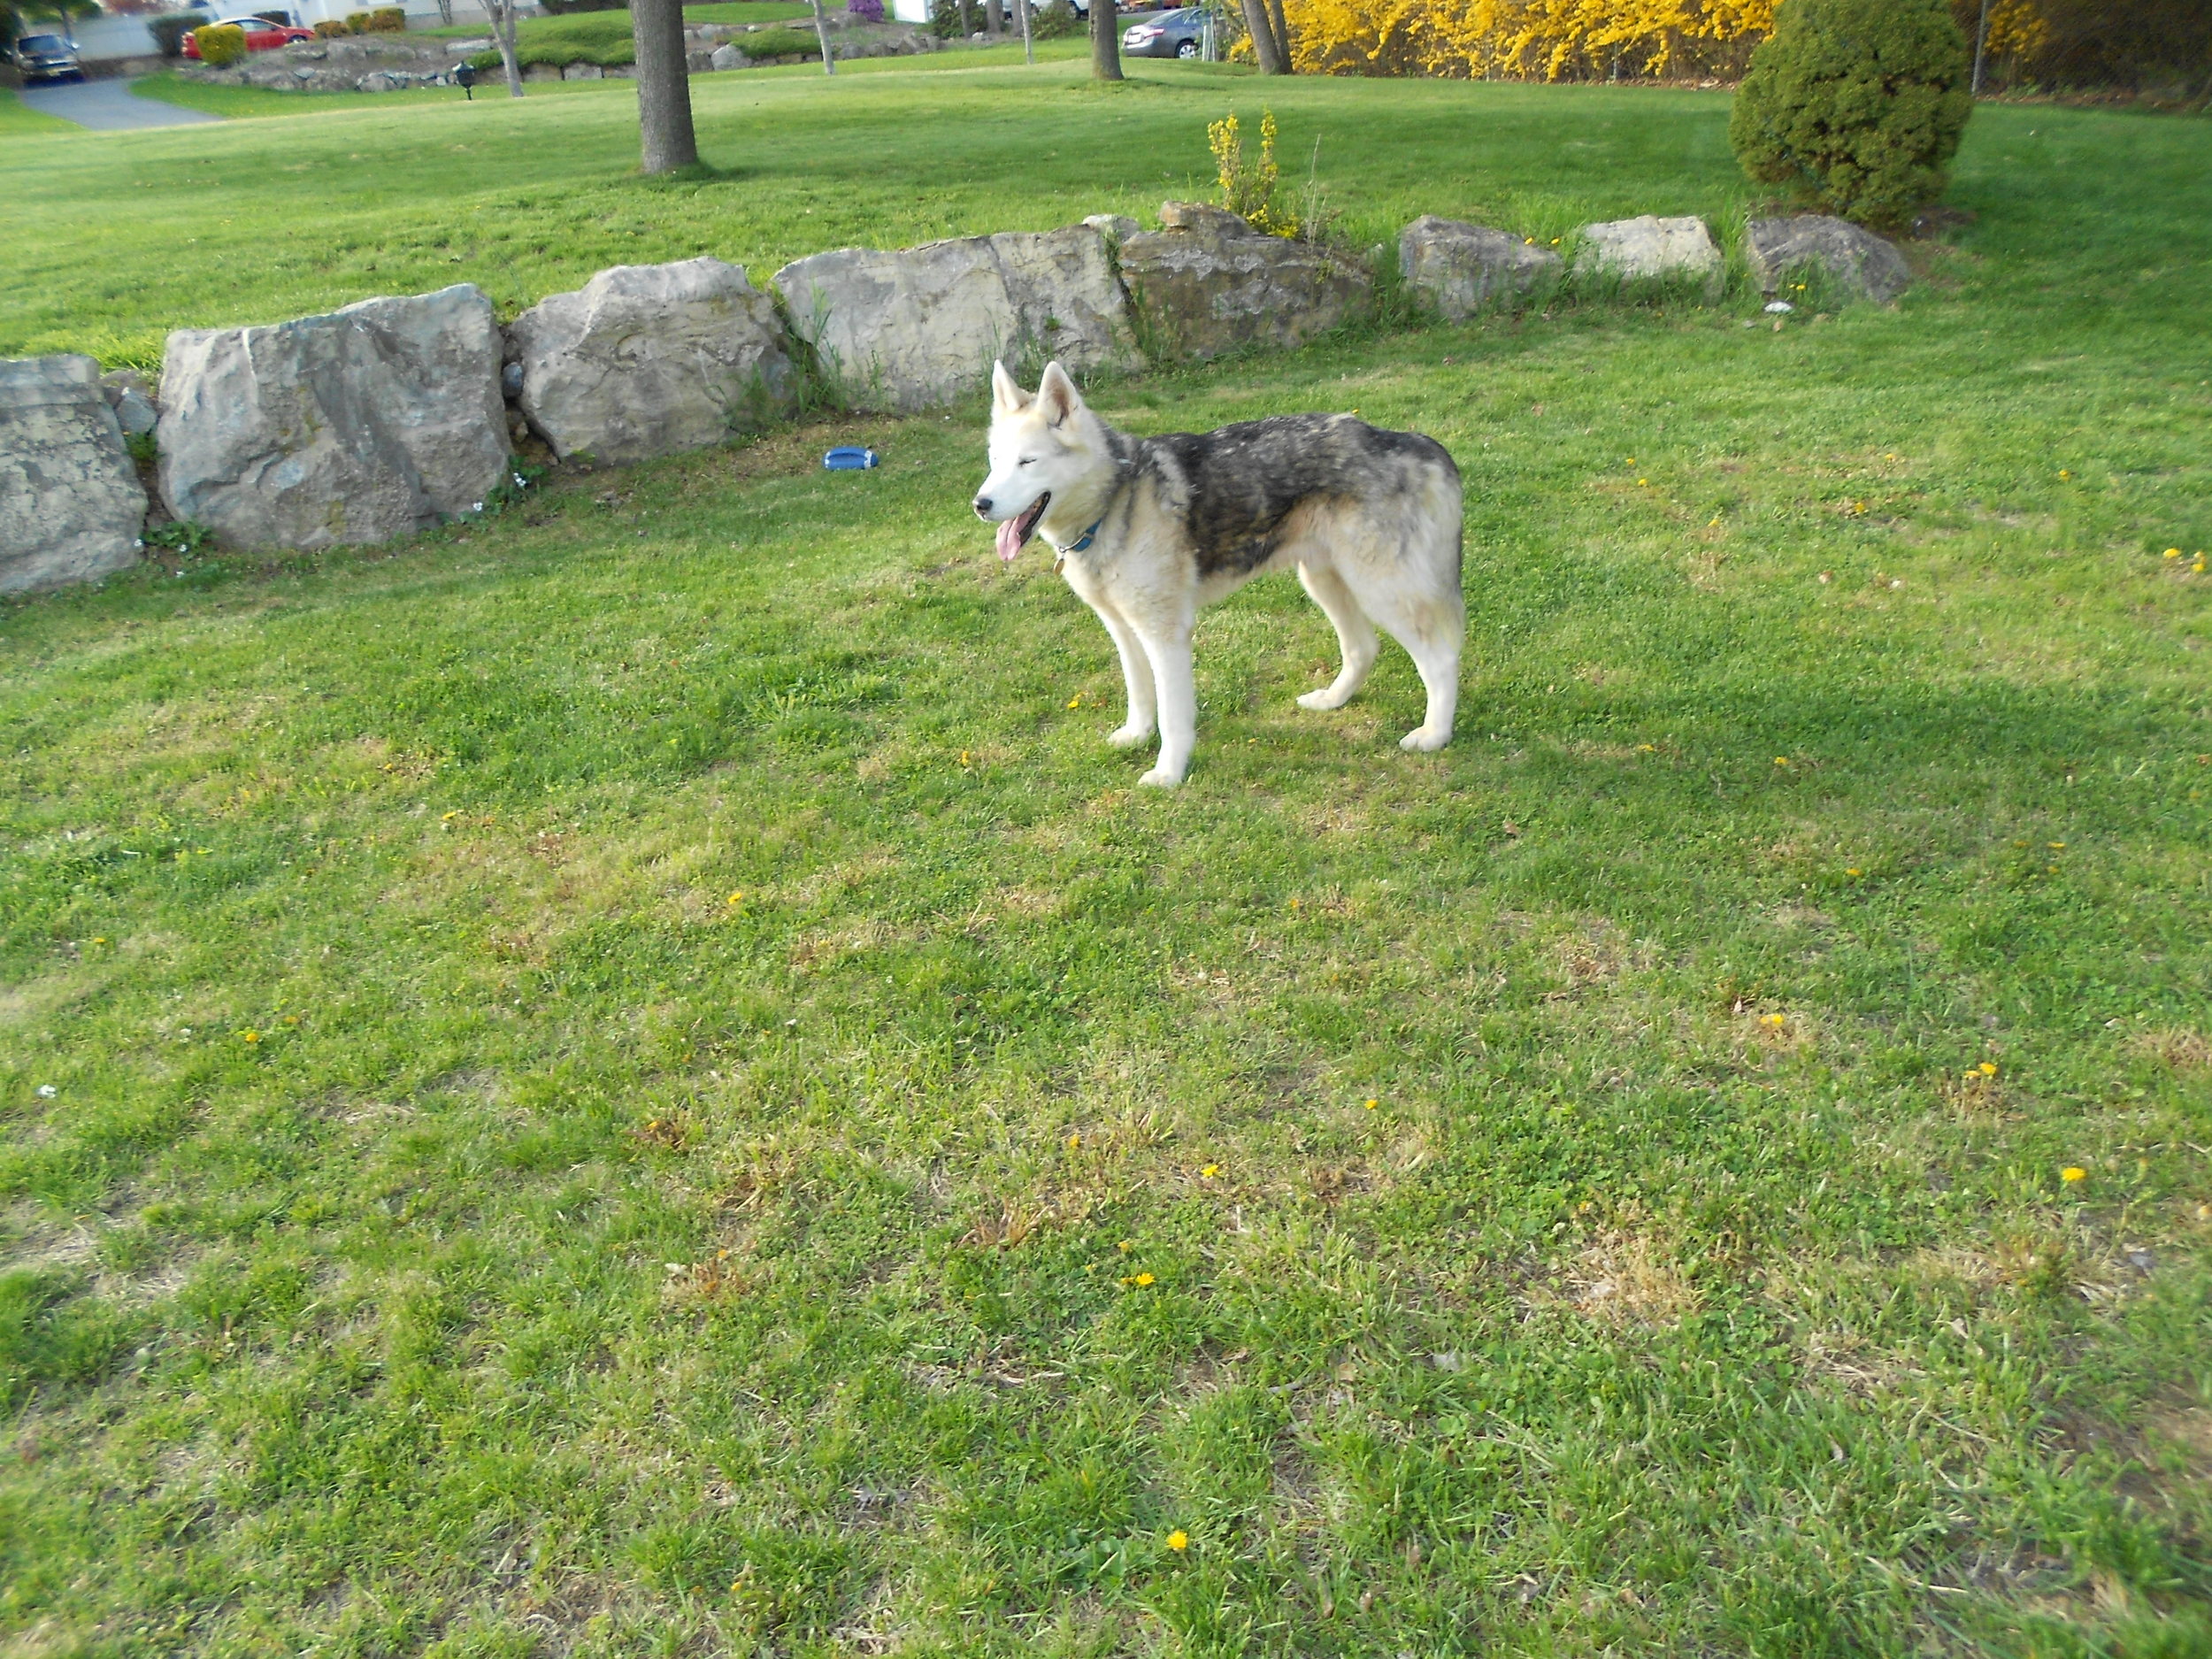
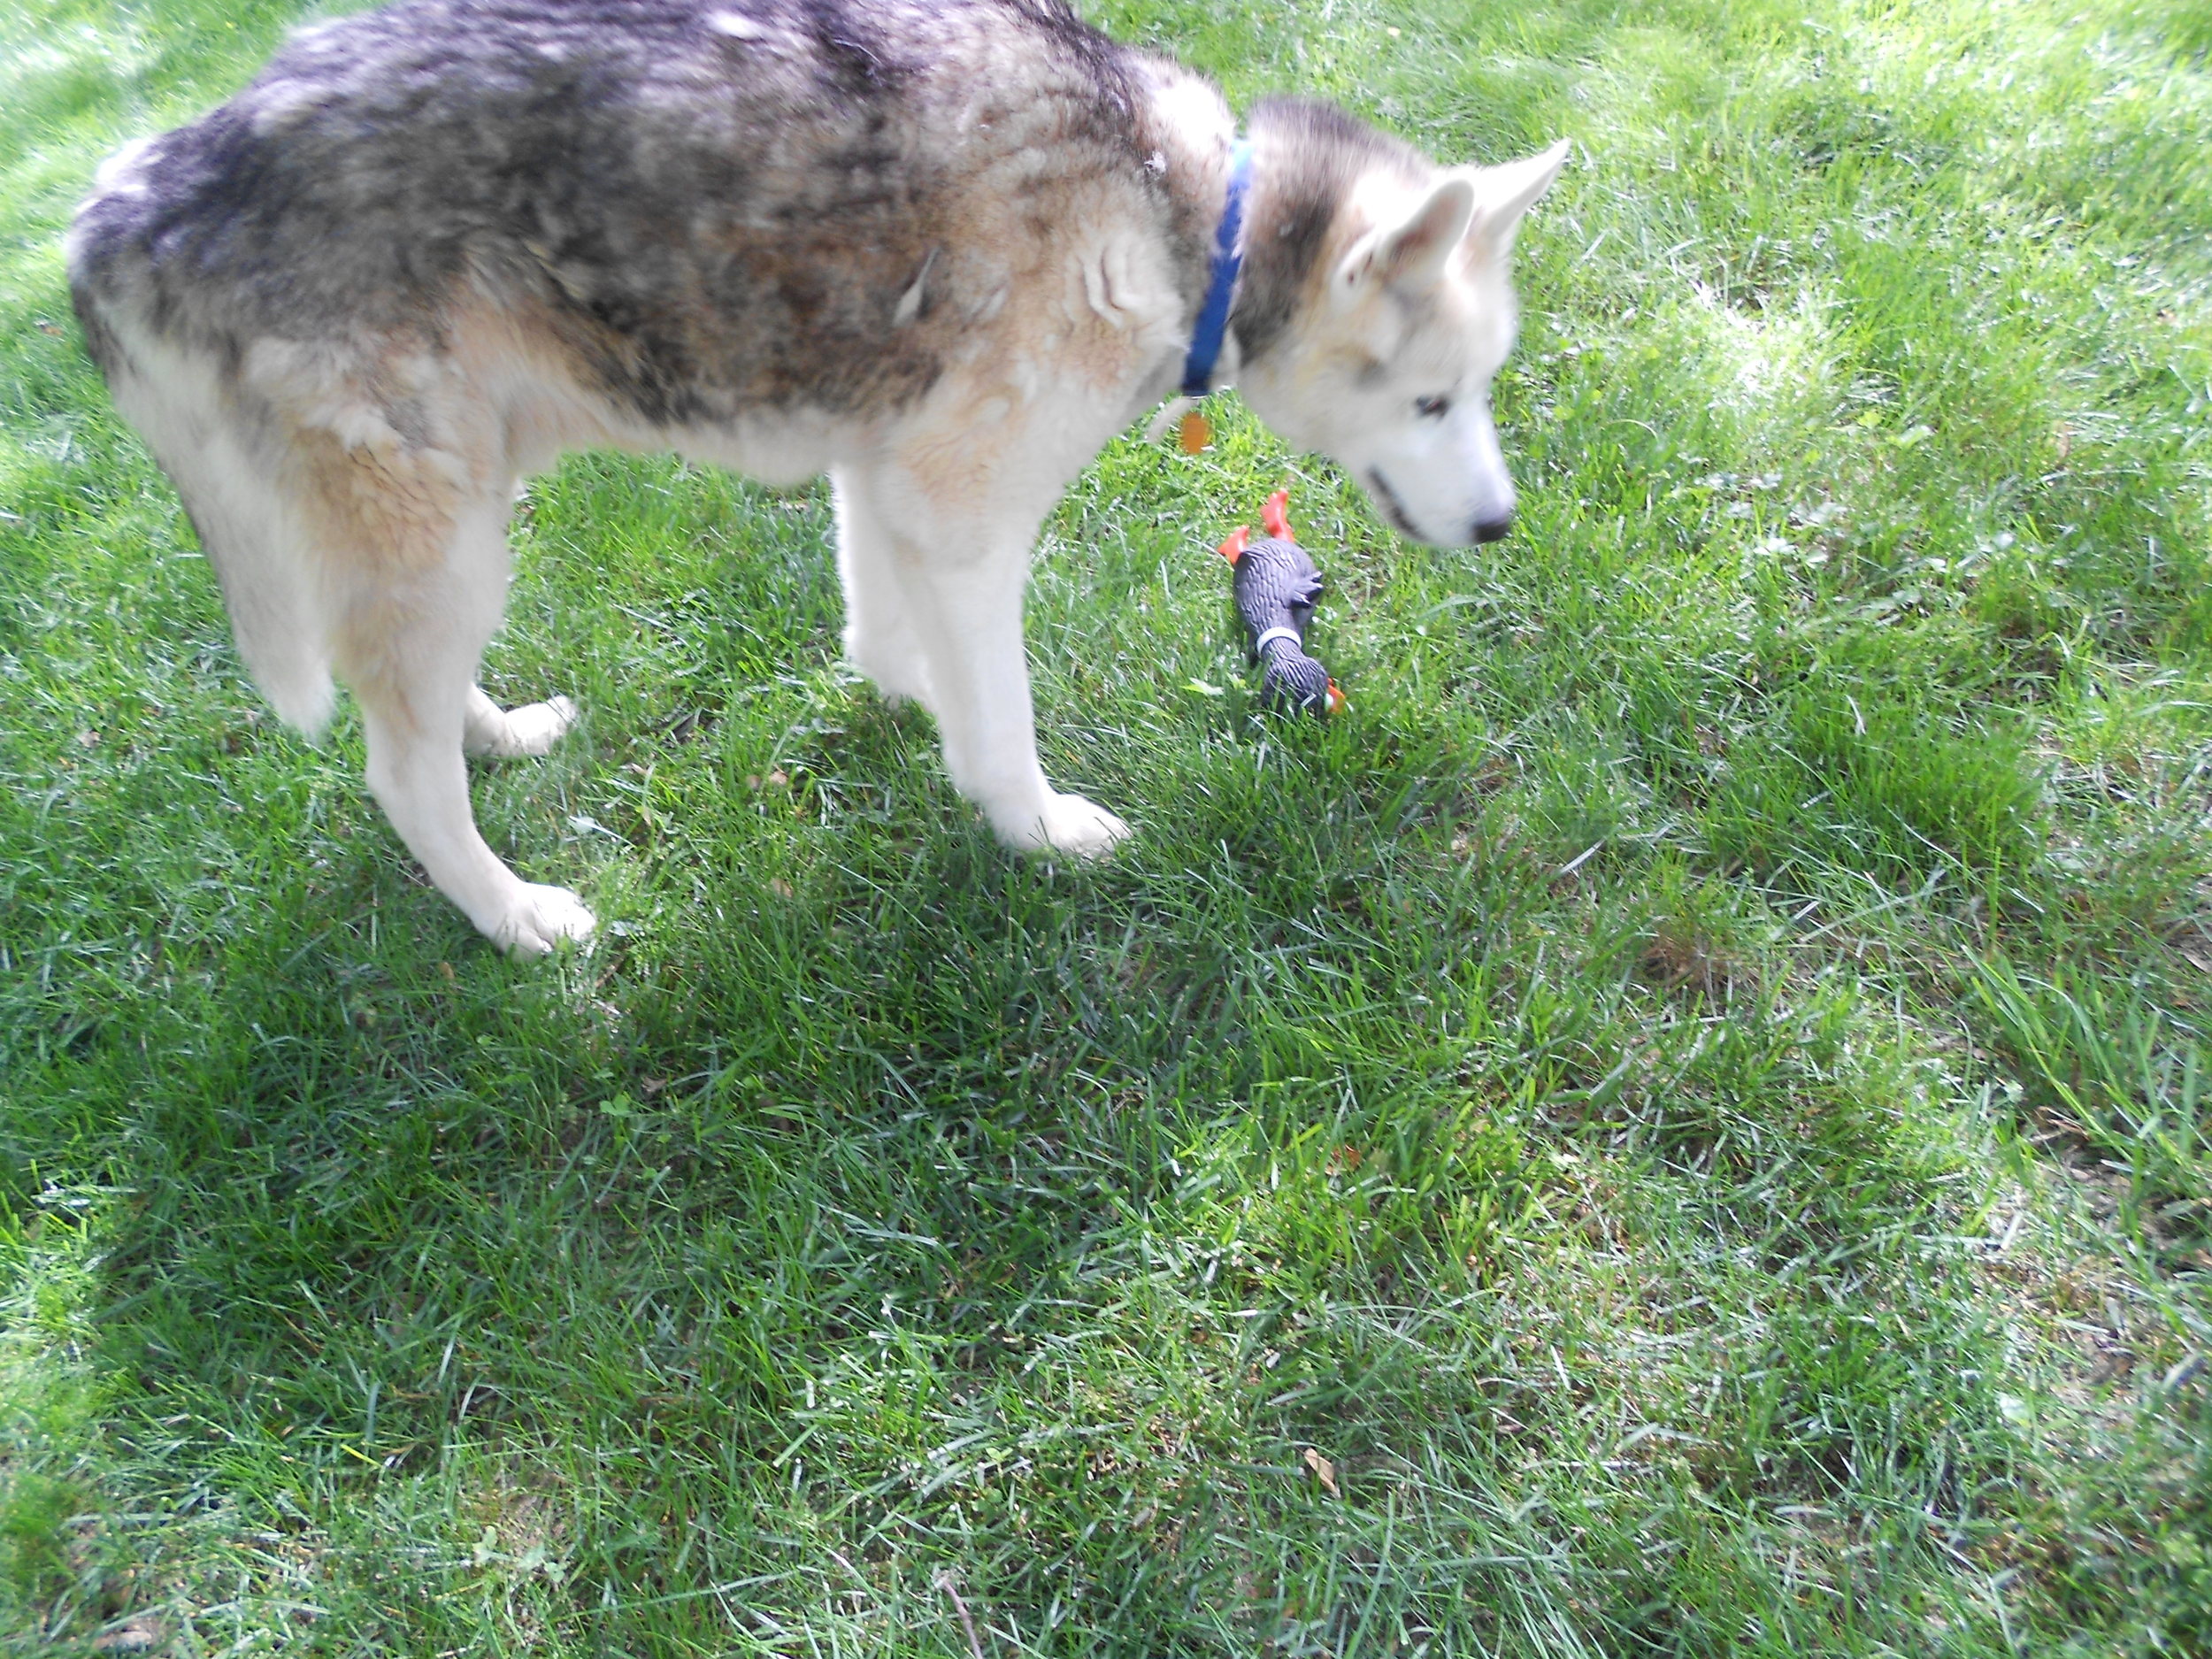
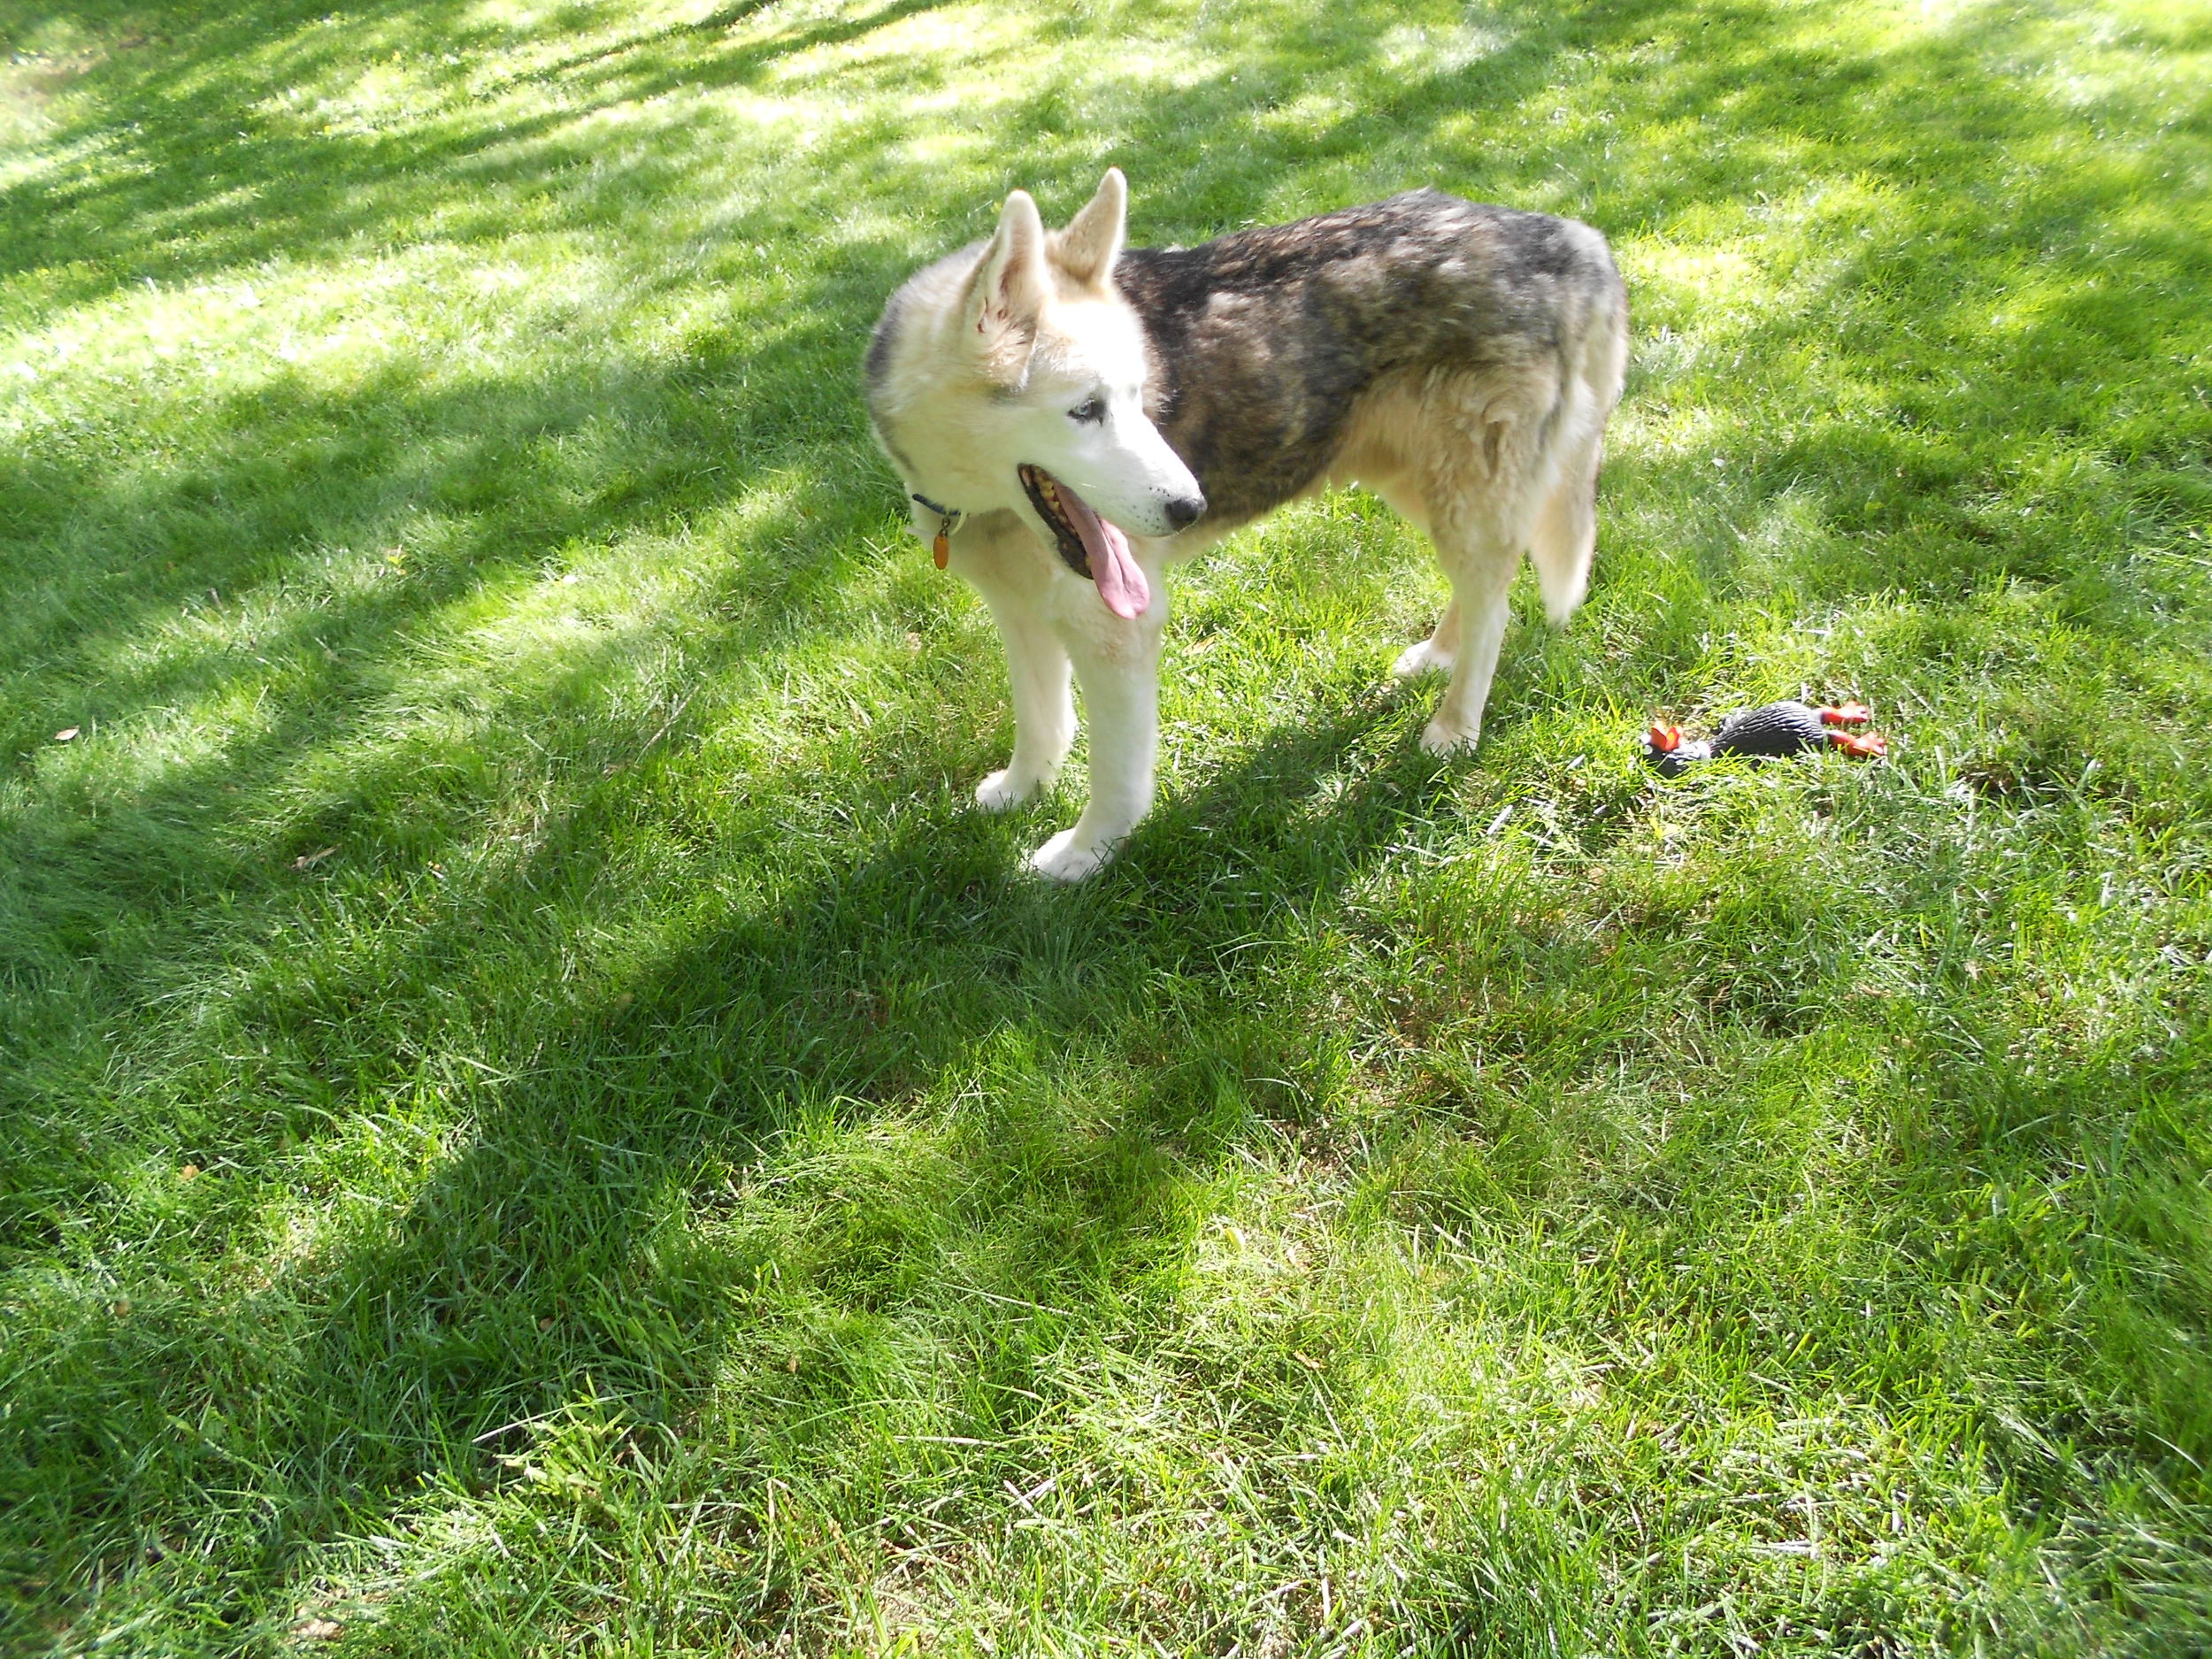
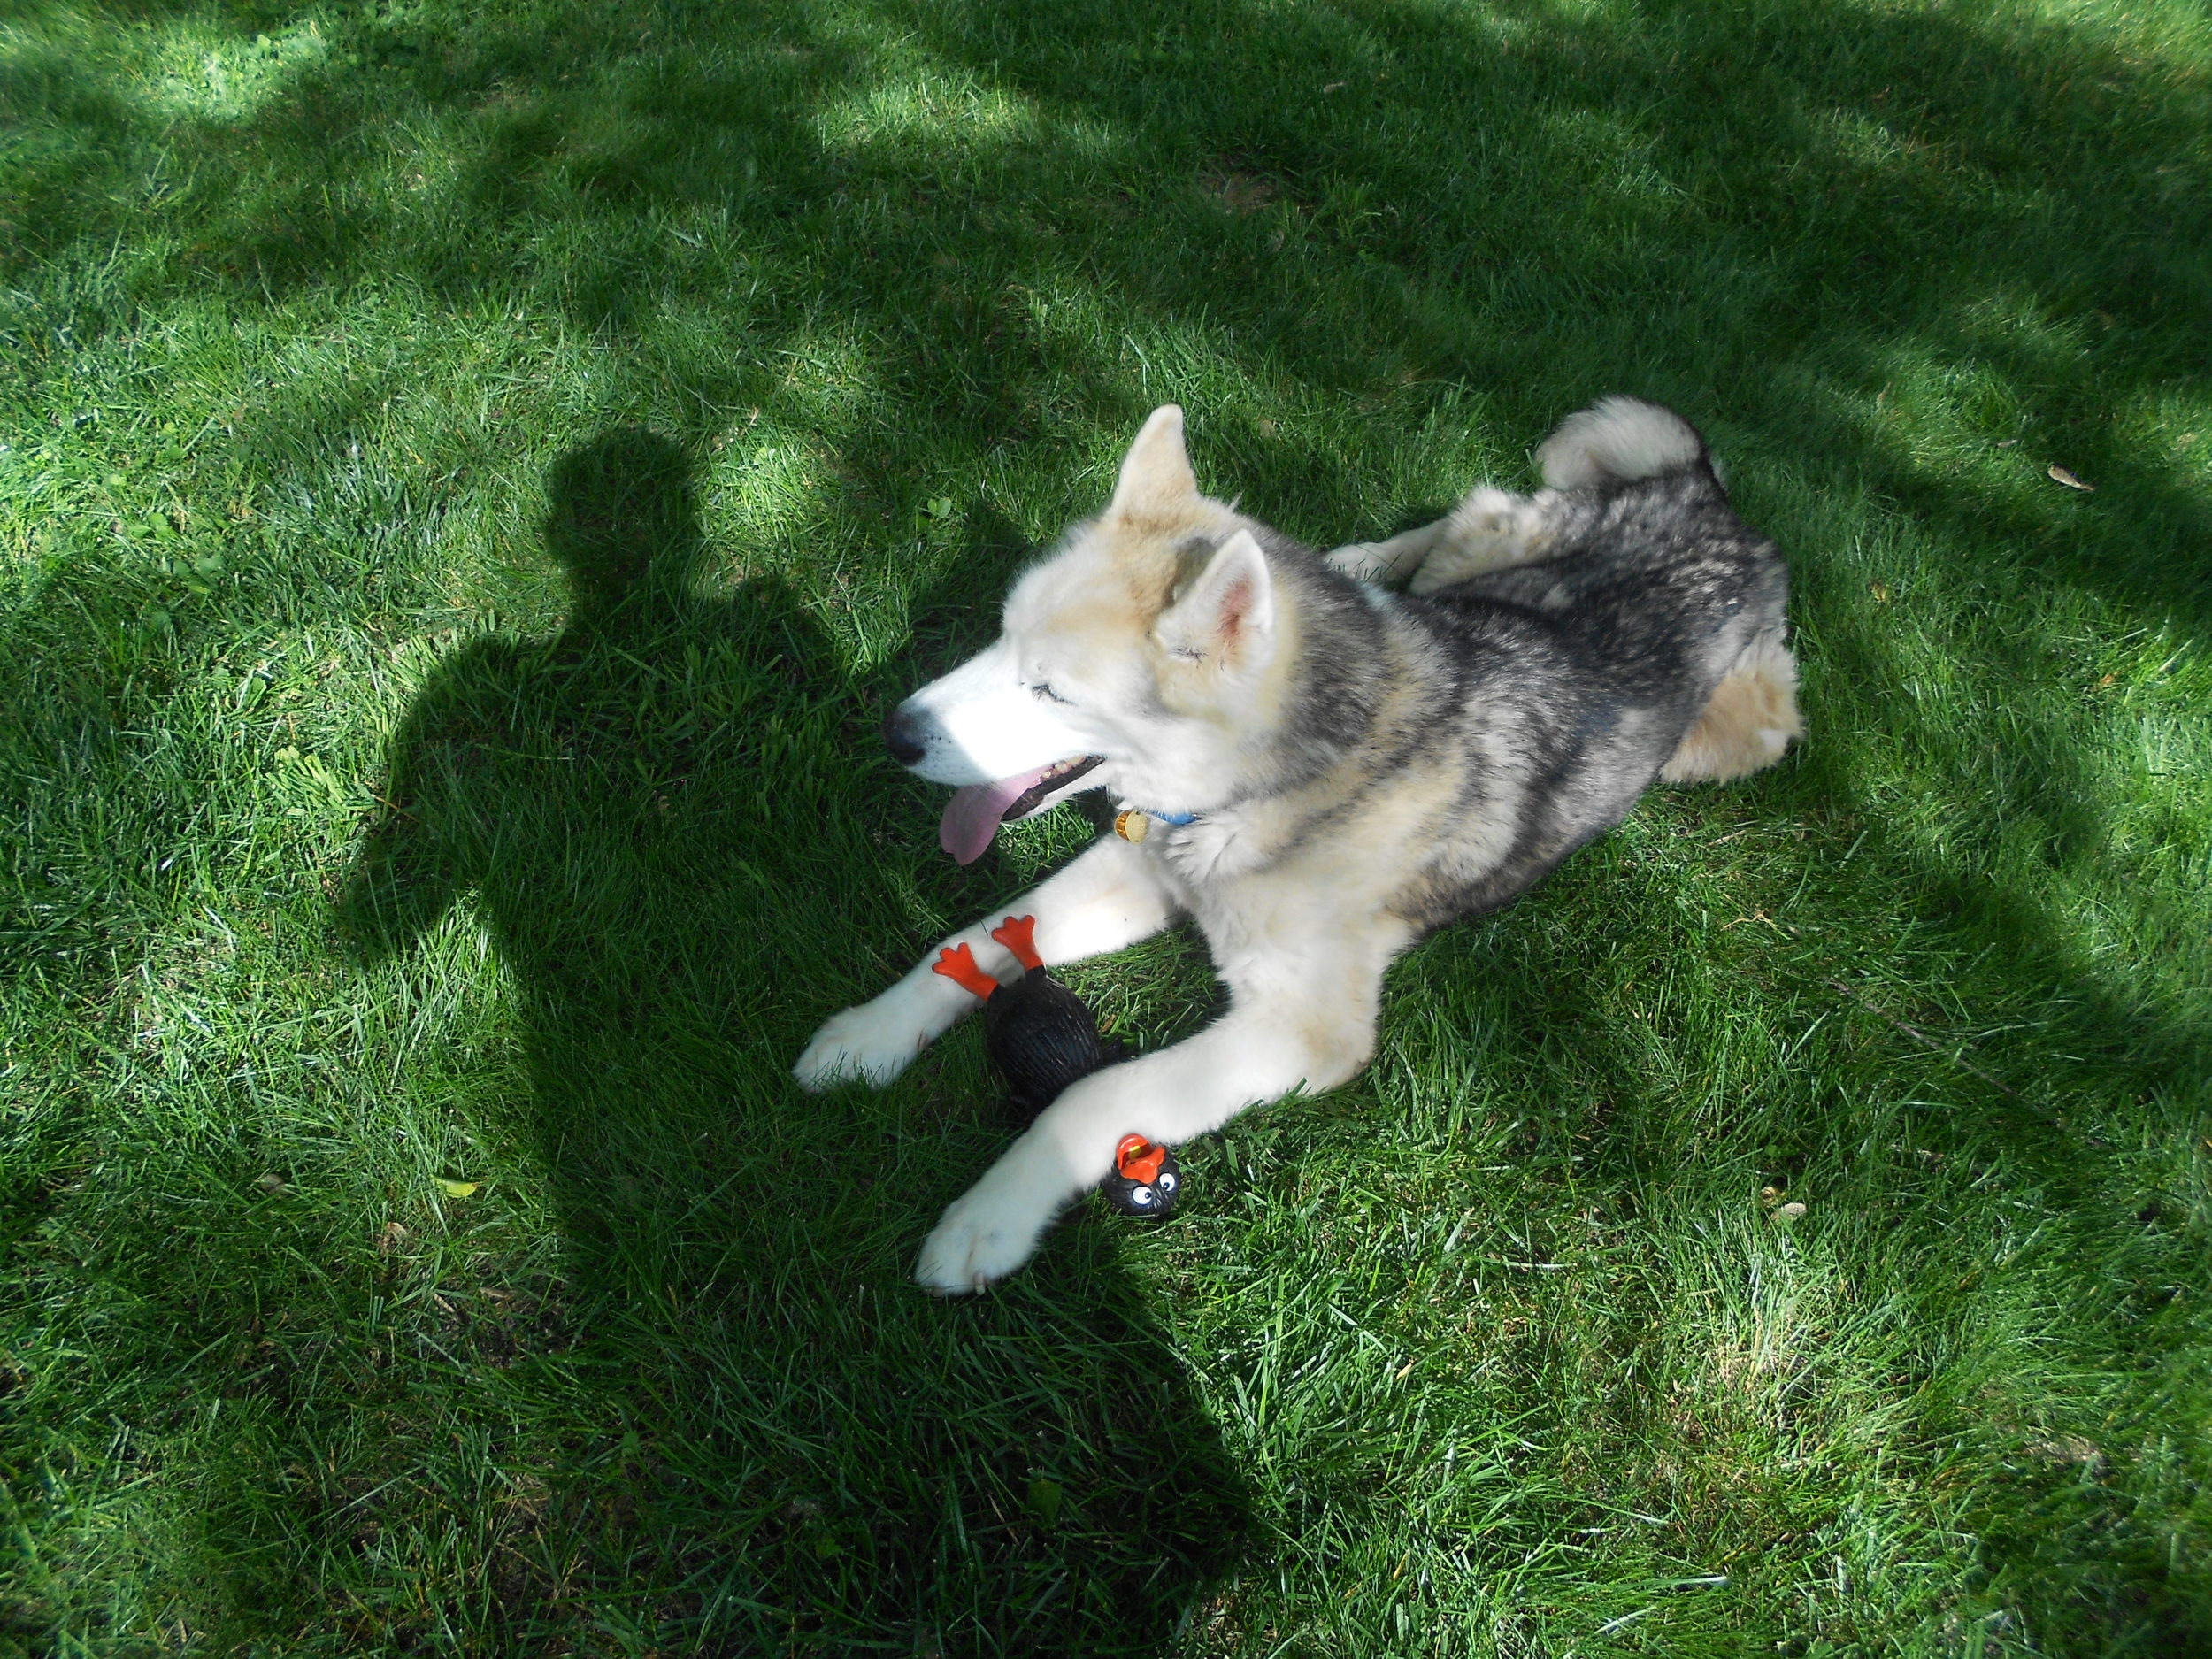
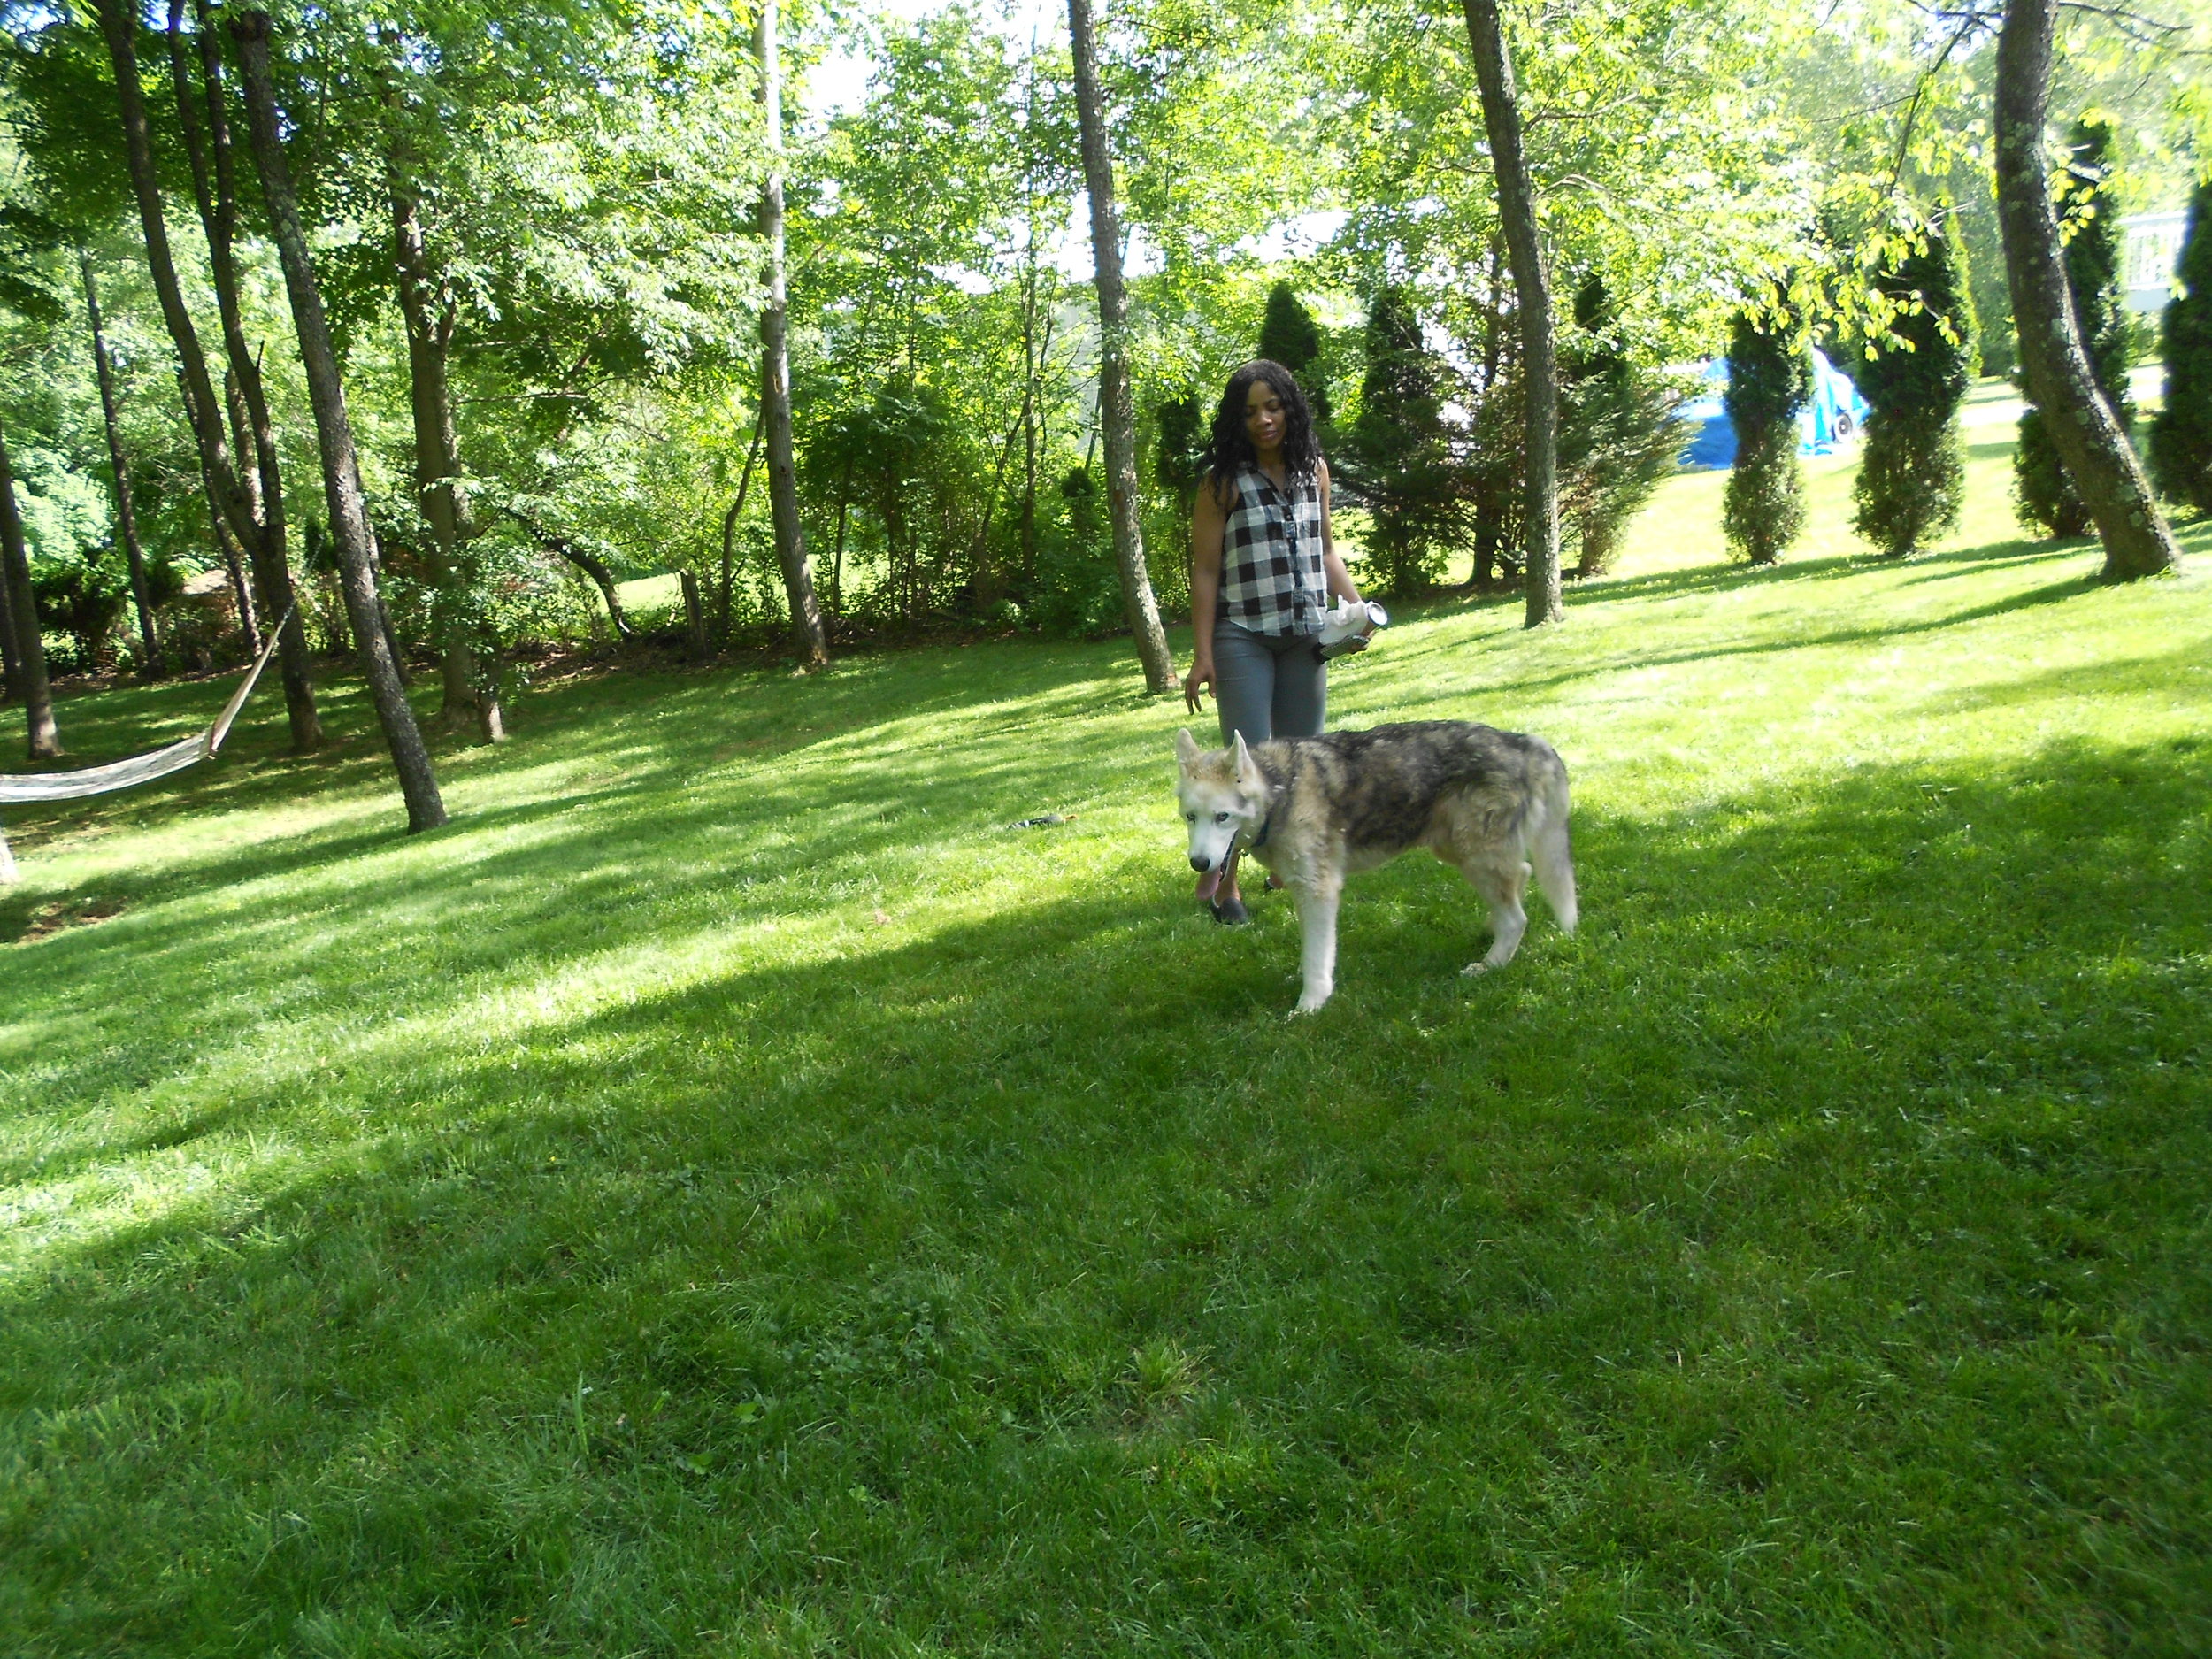
The weather has been consistently conflicting with the tradition calendar seasons for a while now. But, that doesn't mean we can't at least get a little excited about what we will (hopefully) be able to wear in the coming months. My most recent project was created on whim and was actually unintentionally influenced by my late dog, Buster. It wasn't until after his passing, that I realized the abstract print of this fabric resembles his gray/white/black Husky fur.
This set is made from black/gray/ergret abstract polyester double faced brushed twill. I created a "bib" style top that ties with braided leather trim in the back and is worn over a black stretch jersey ITY knit bralet that I also created. This tiny top is paired with a high waist gathered skirt with pockets (of course) and back zipper closure.

Made in with Mood Fabrics
Fun fact about this piece: being that this is a double face twill, the reverse side is slightly darker version of the outside. It is also extremely soft to the touch, so I did not line both pieces purposely in hopes that comfort embodies this spring outfit.
I'm looking forward to wearing this throughout the coming months as well as summer!
I'm also looking forward to the further inspiration that I will continue to receive from my furry angel, Buster.
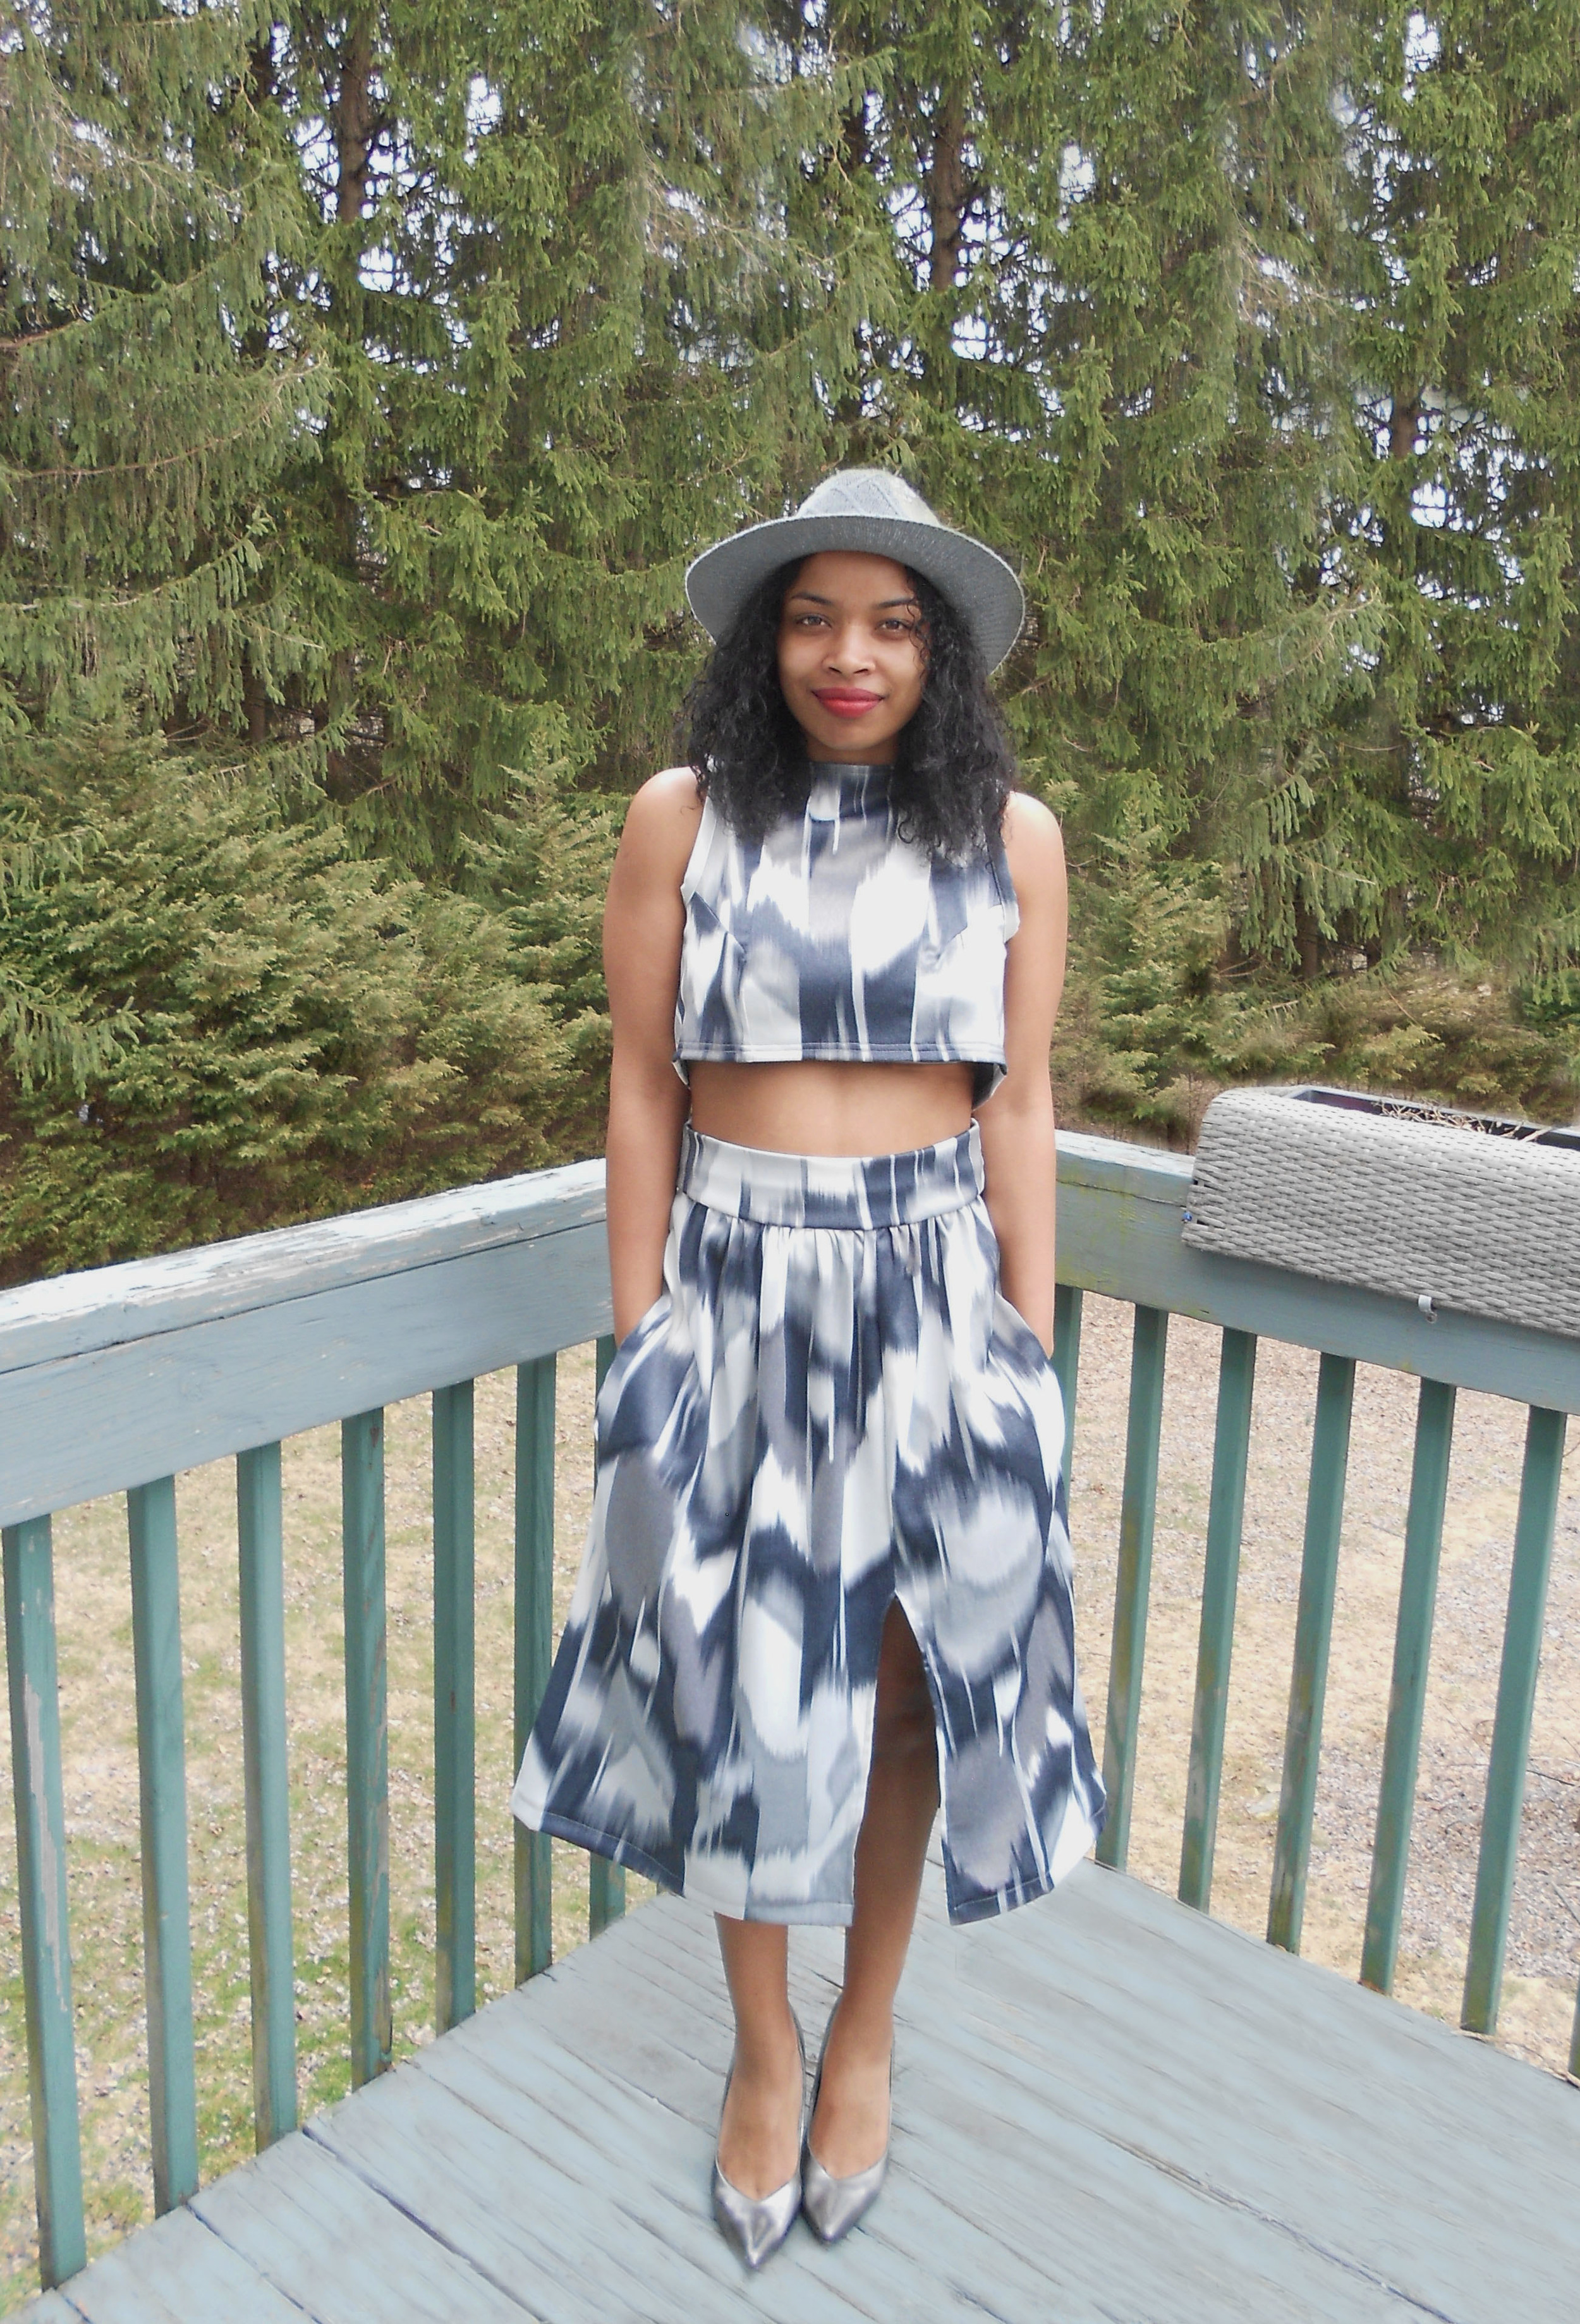
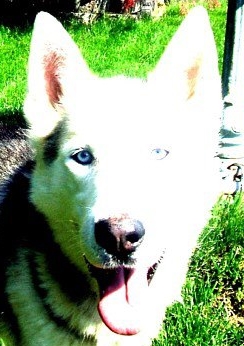
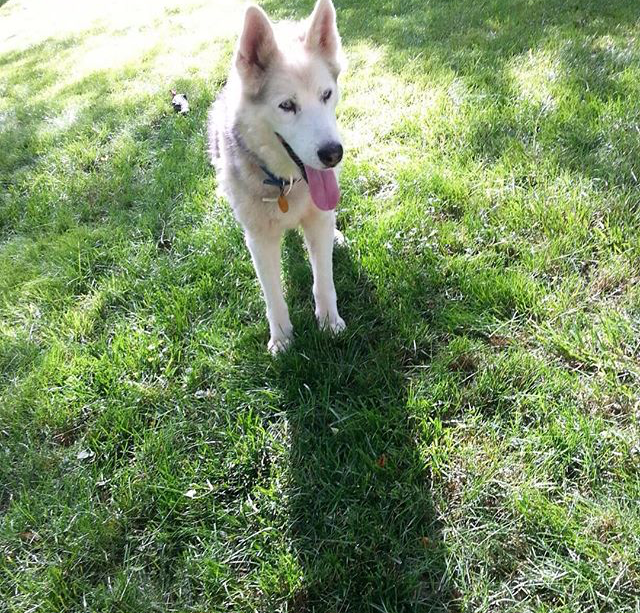
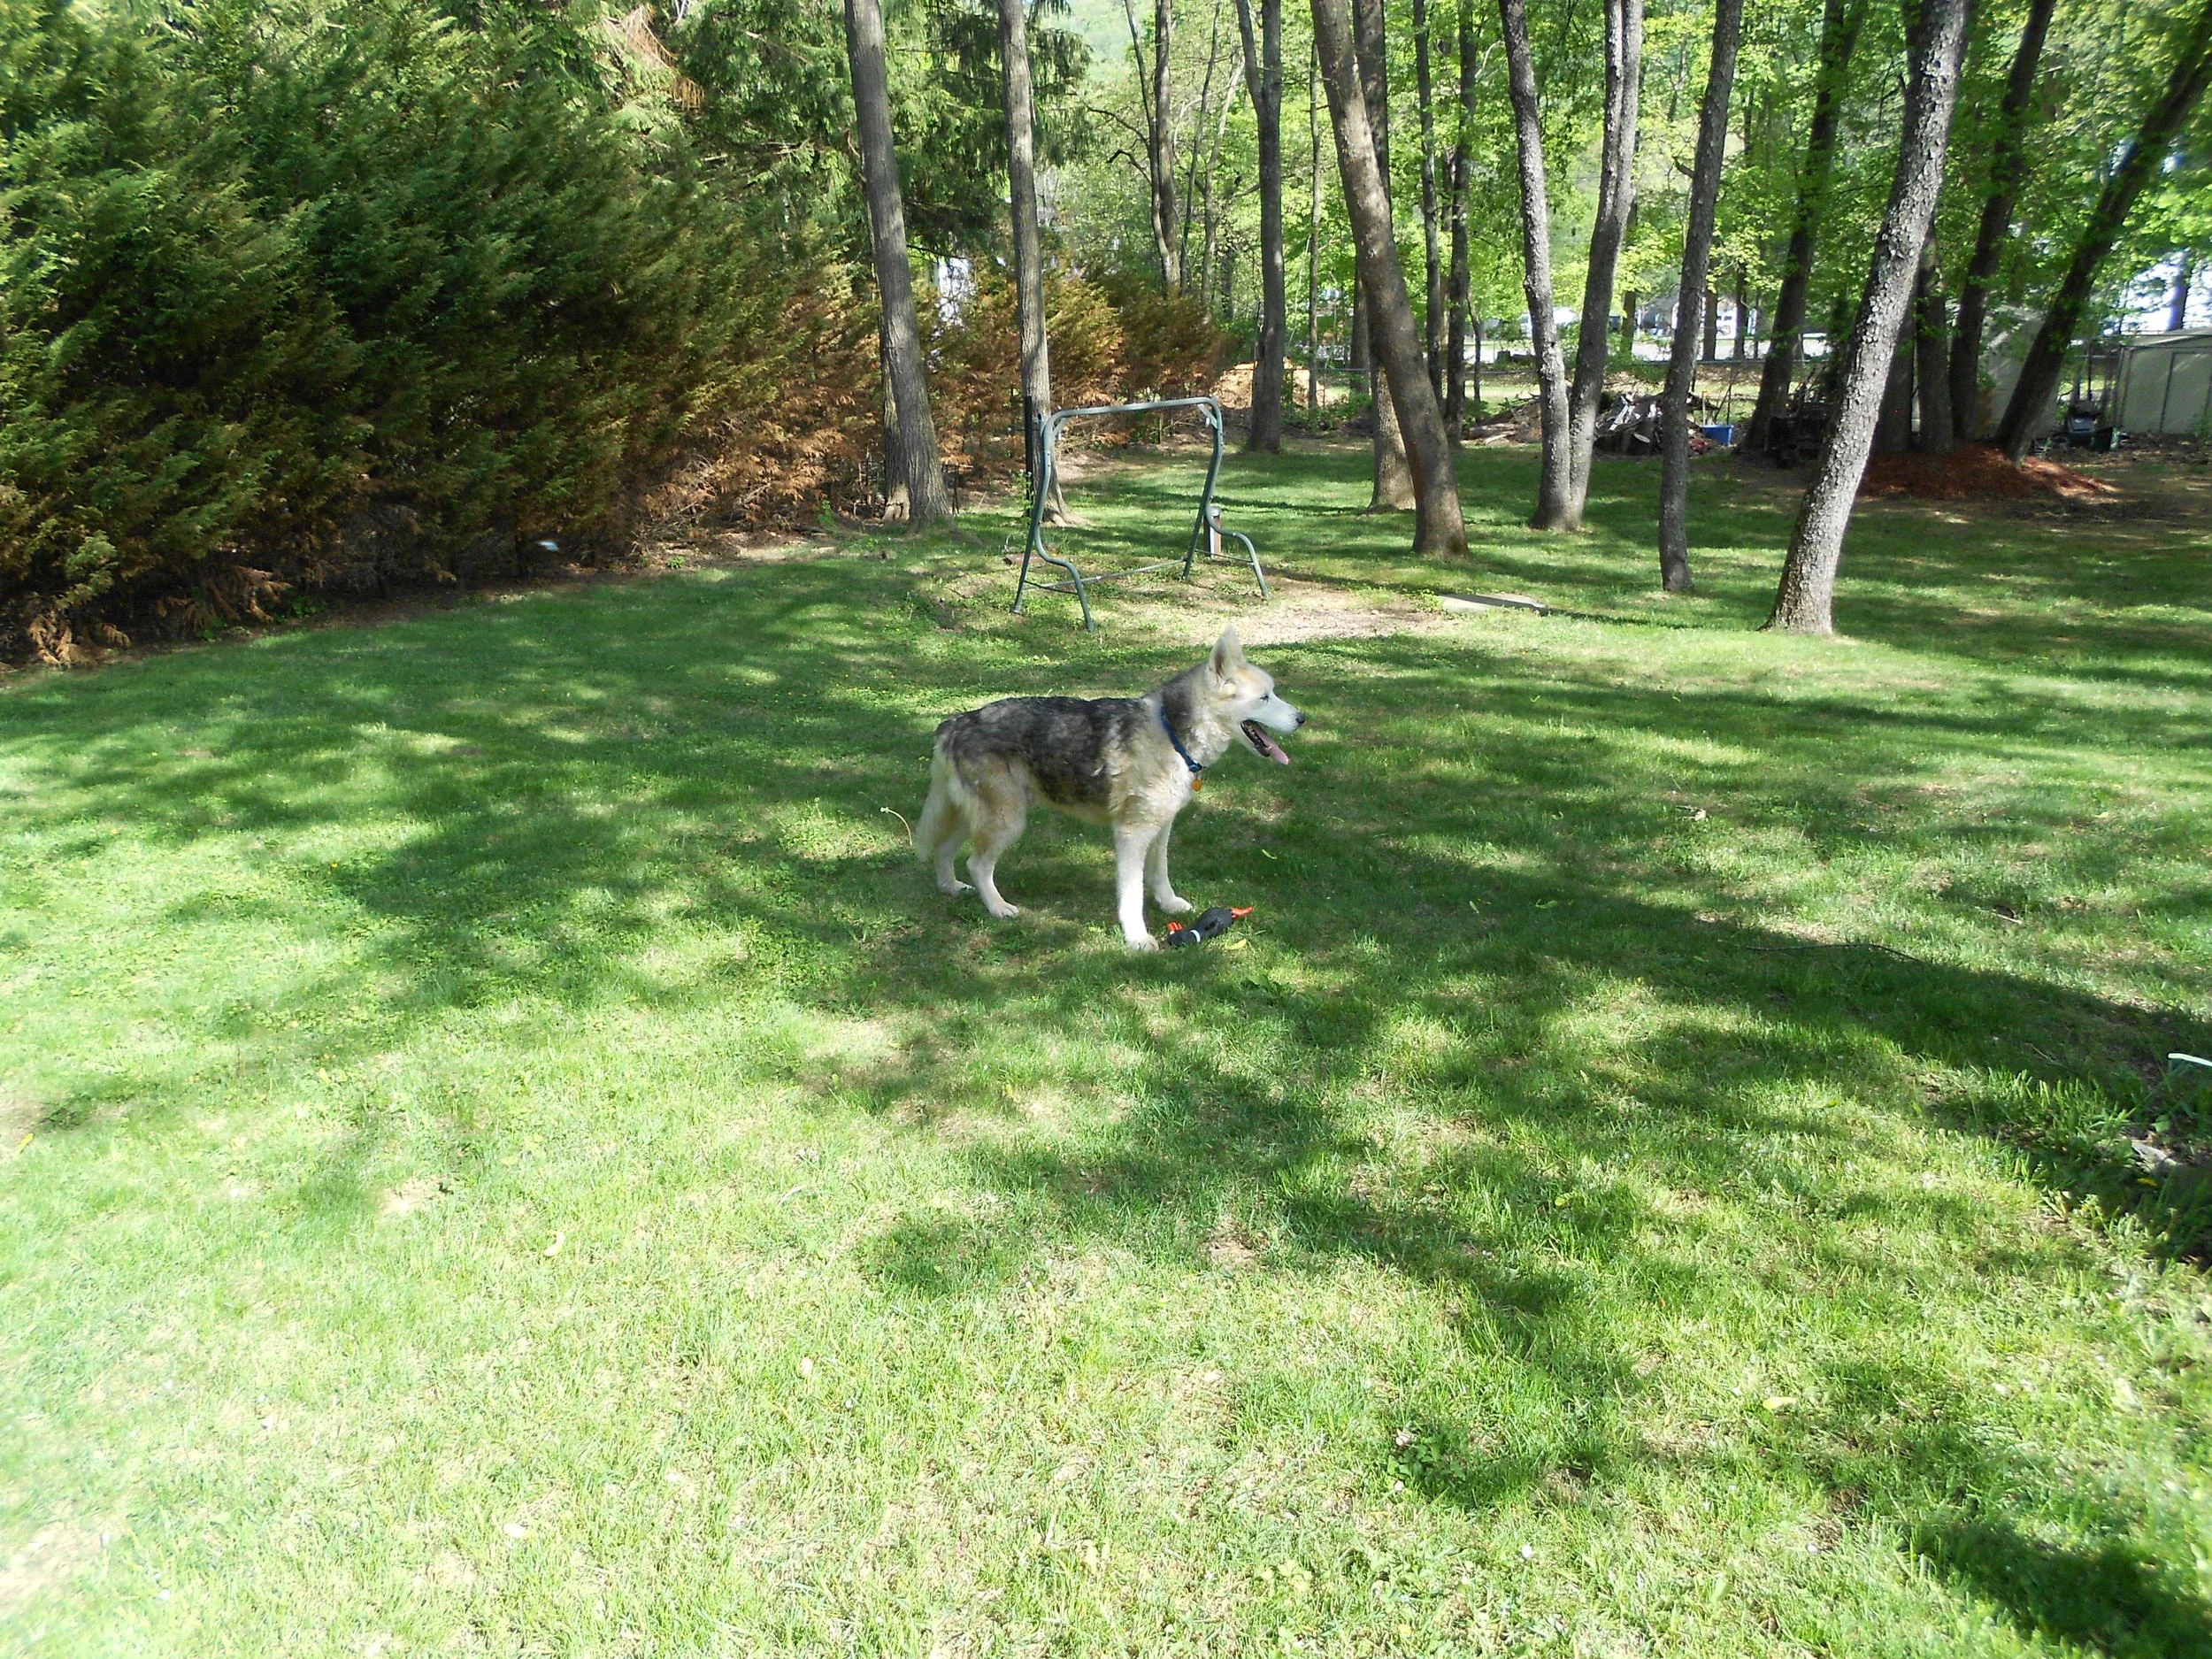
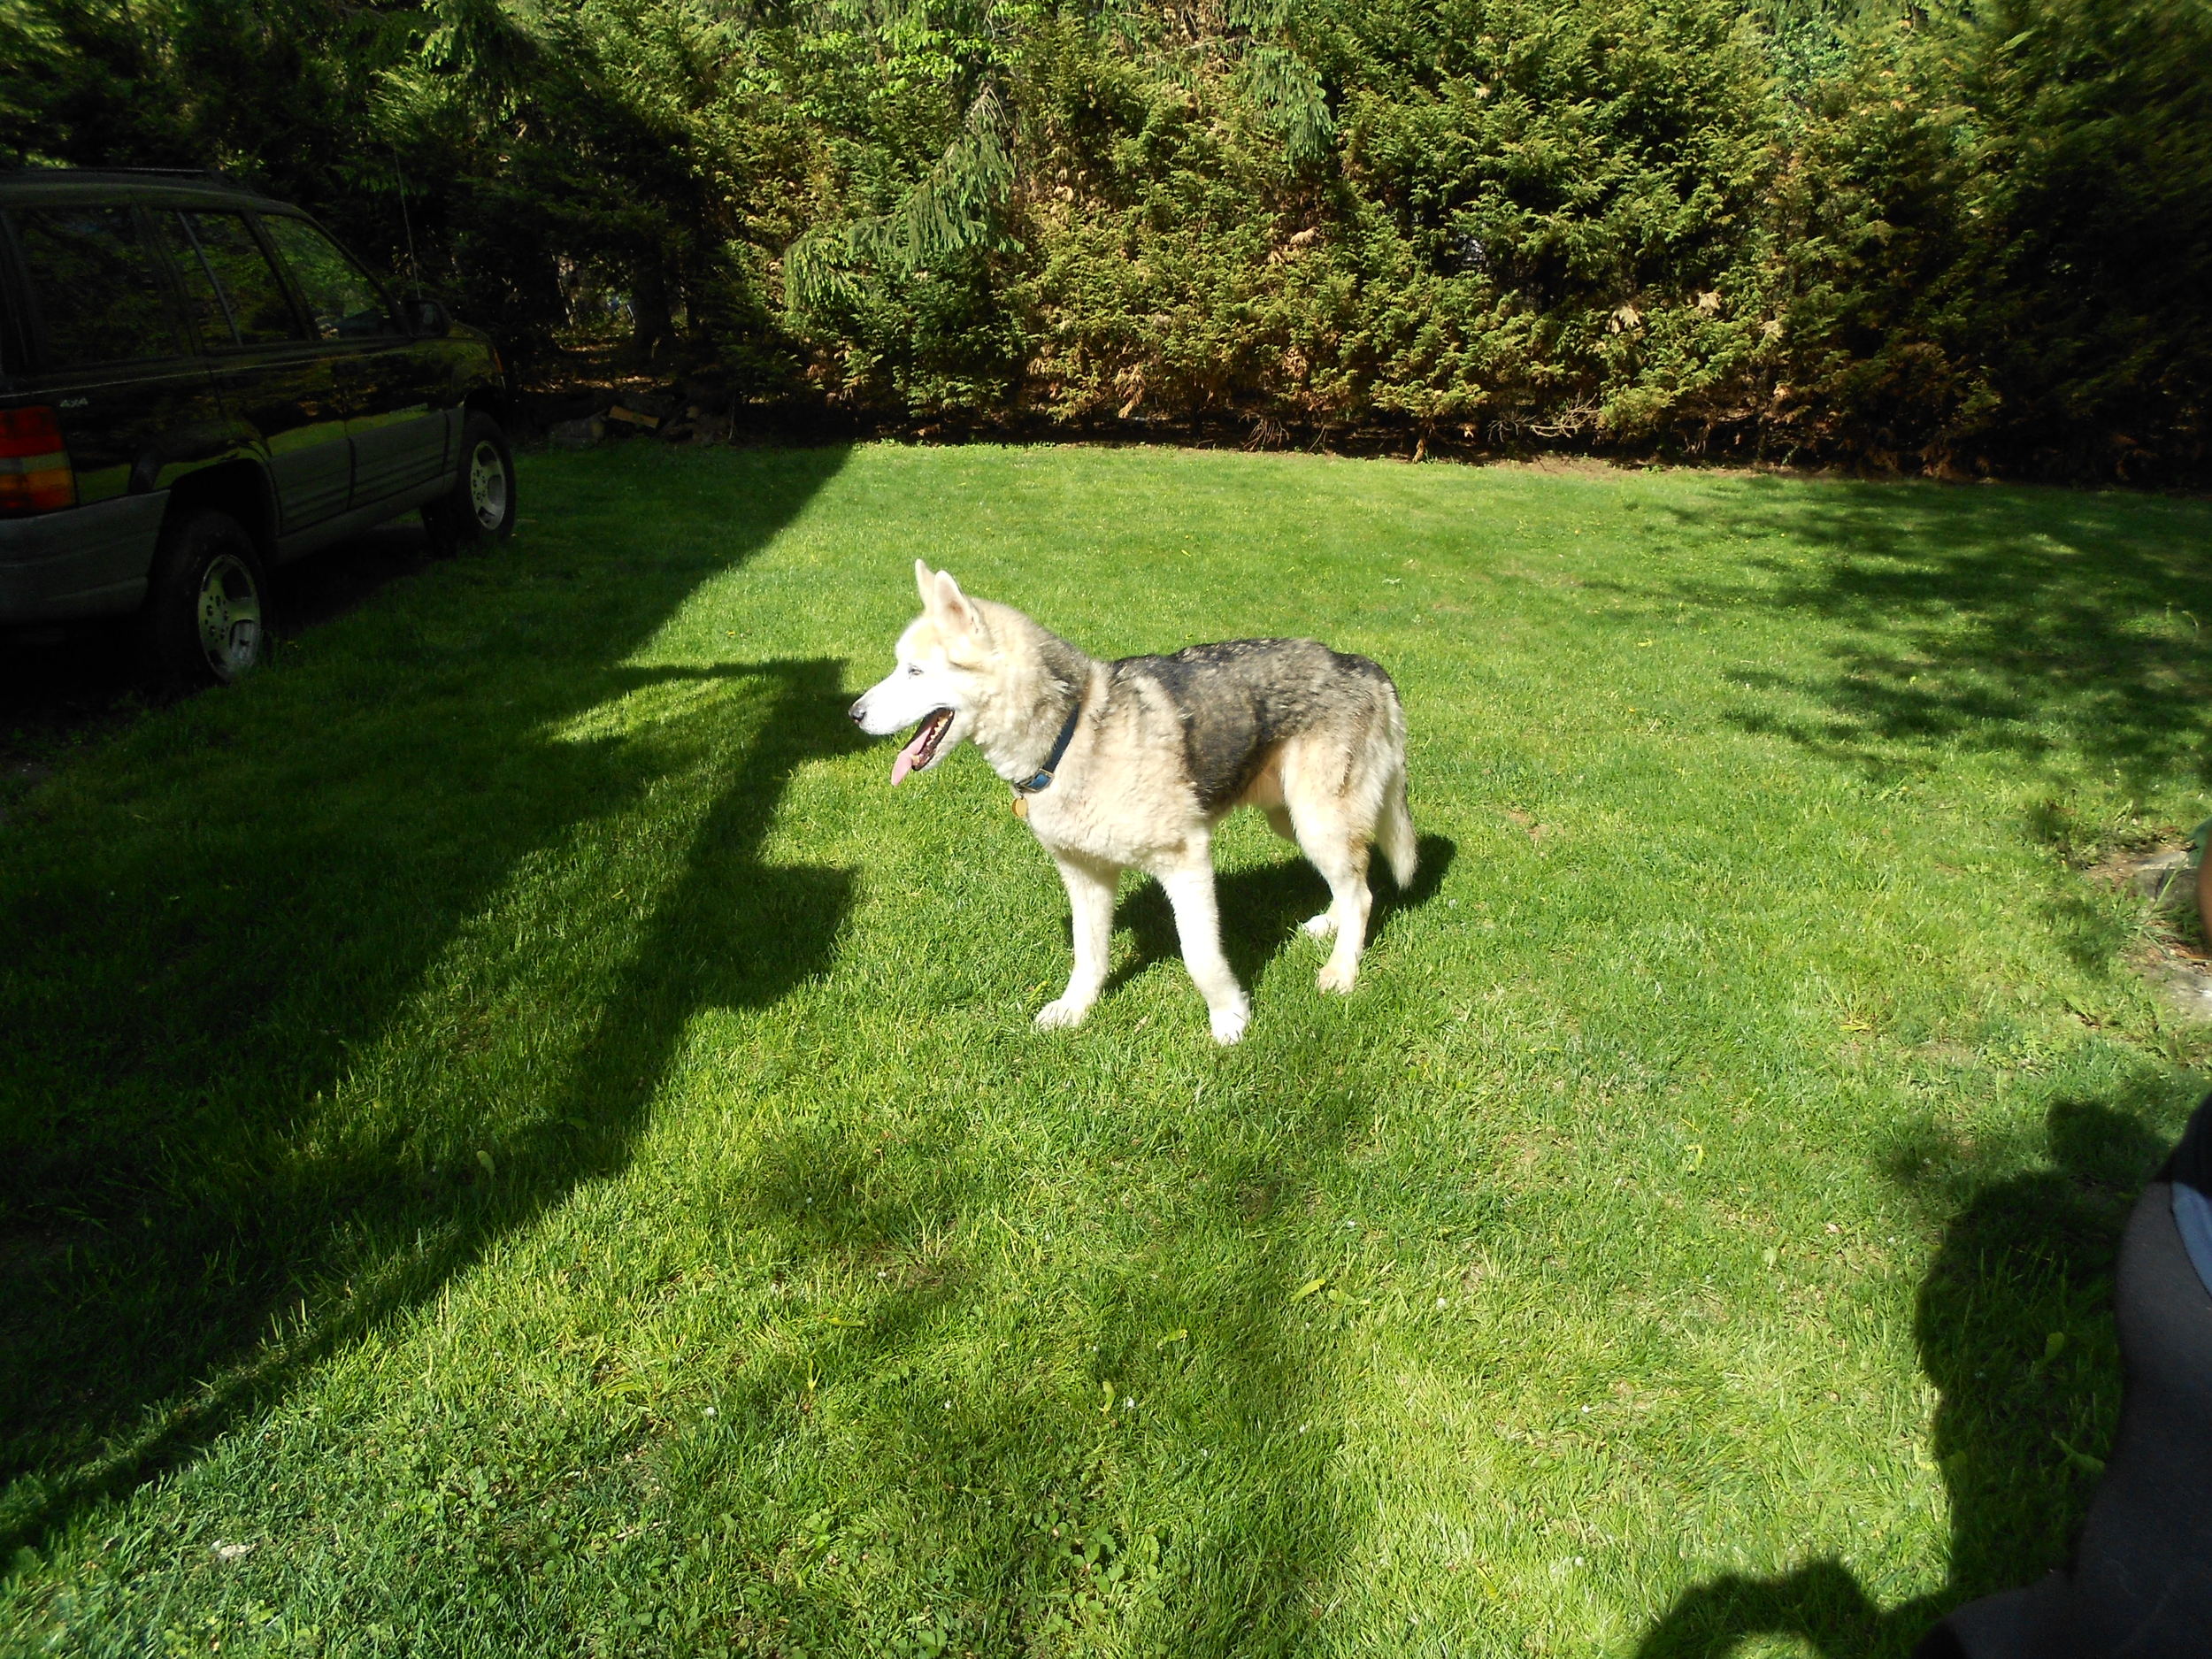
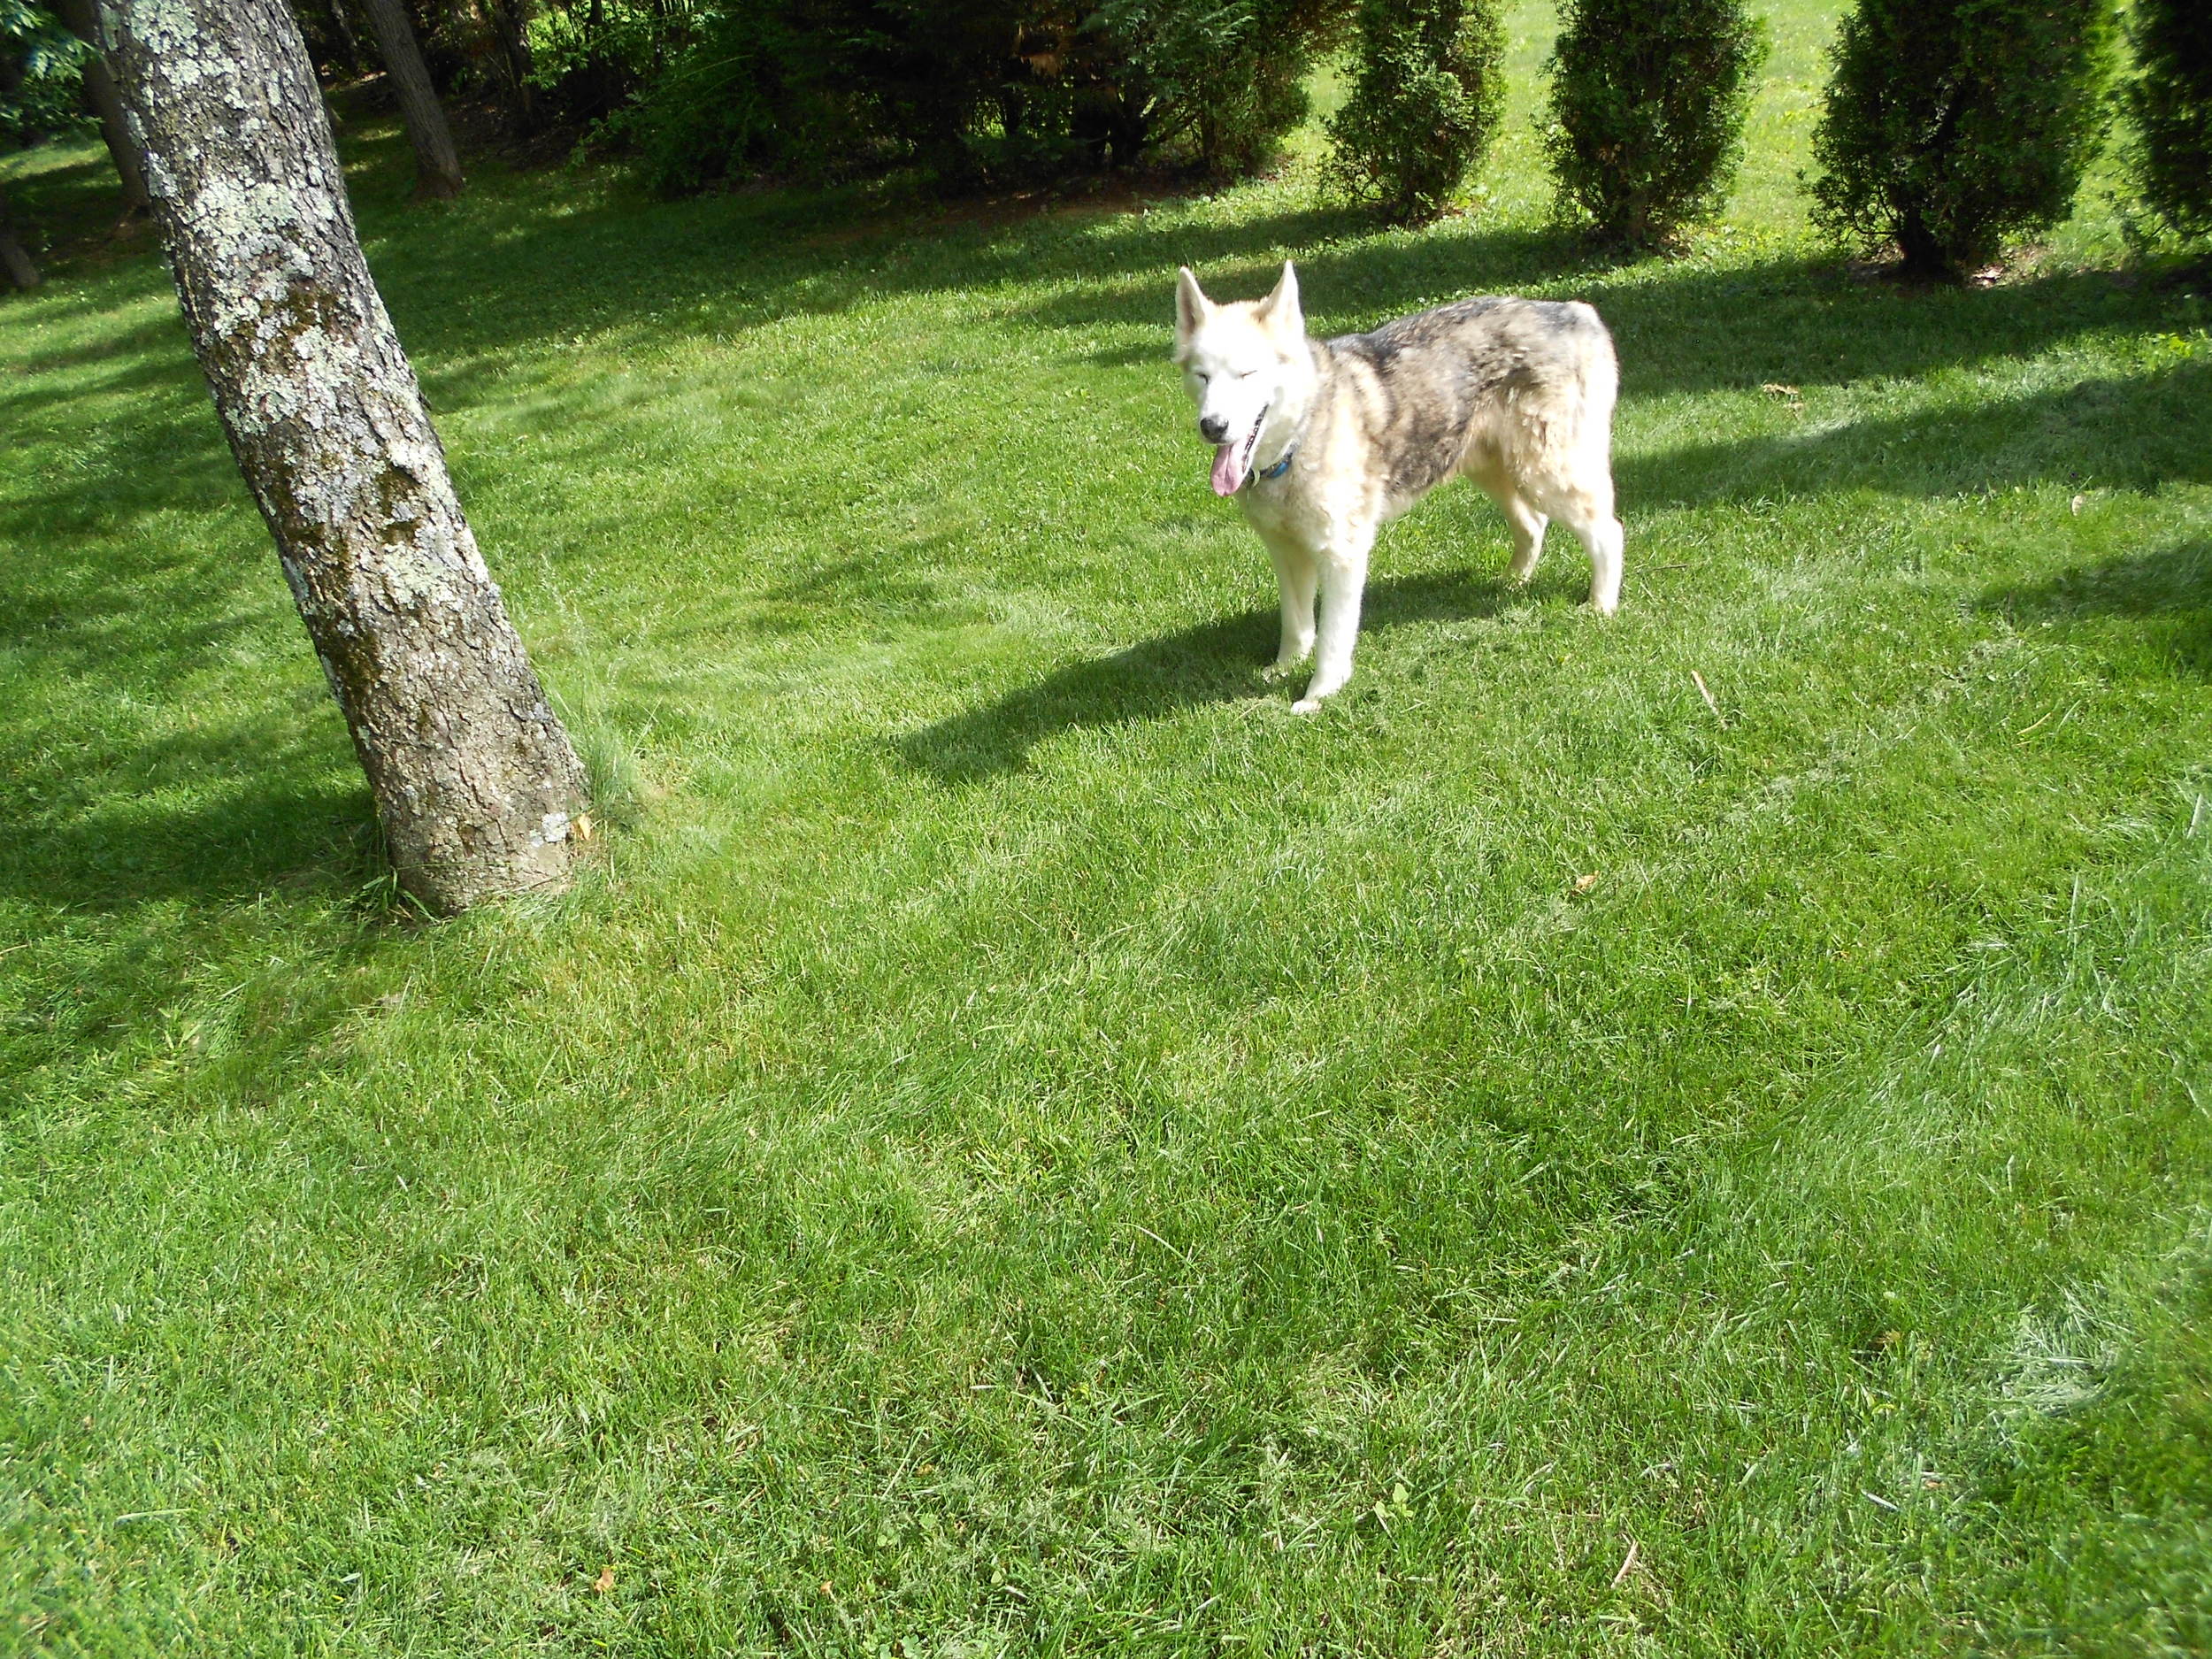
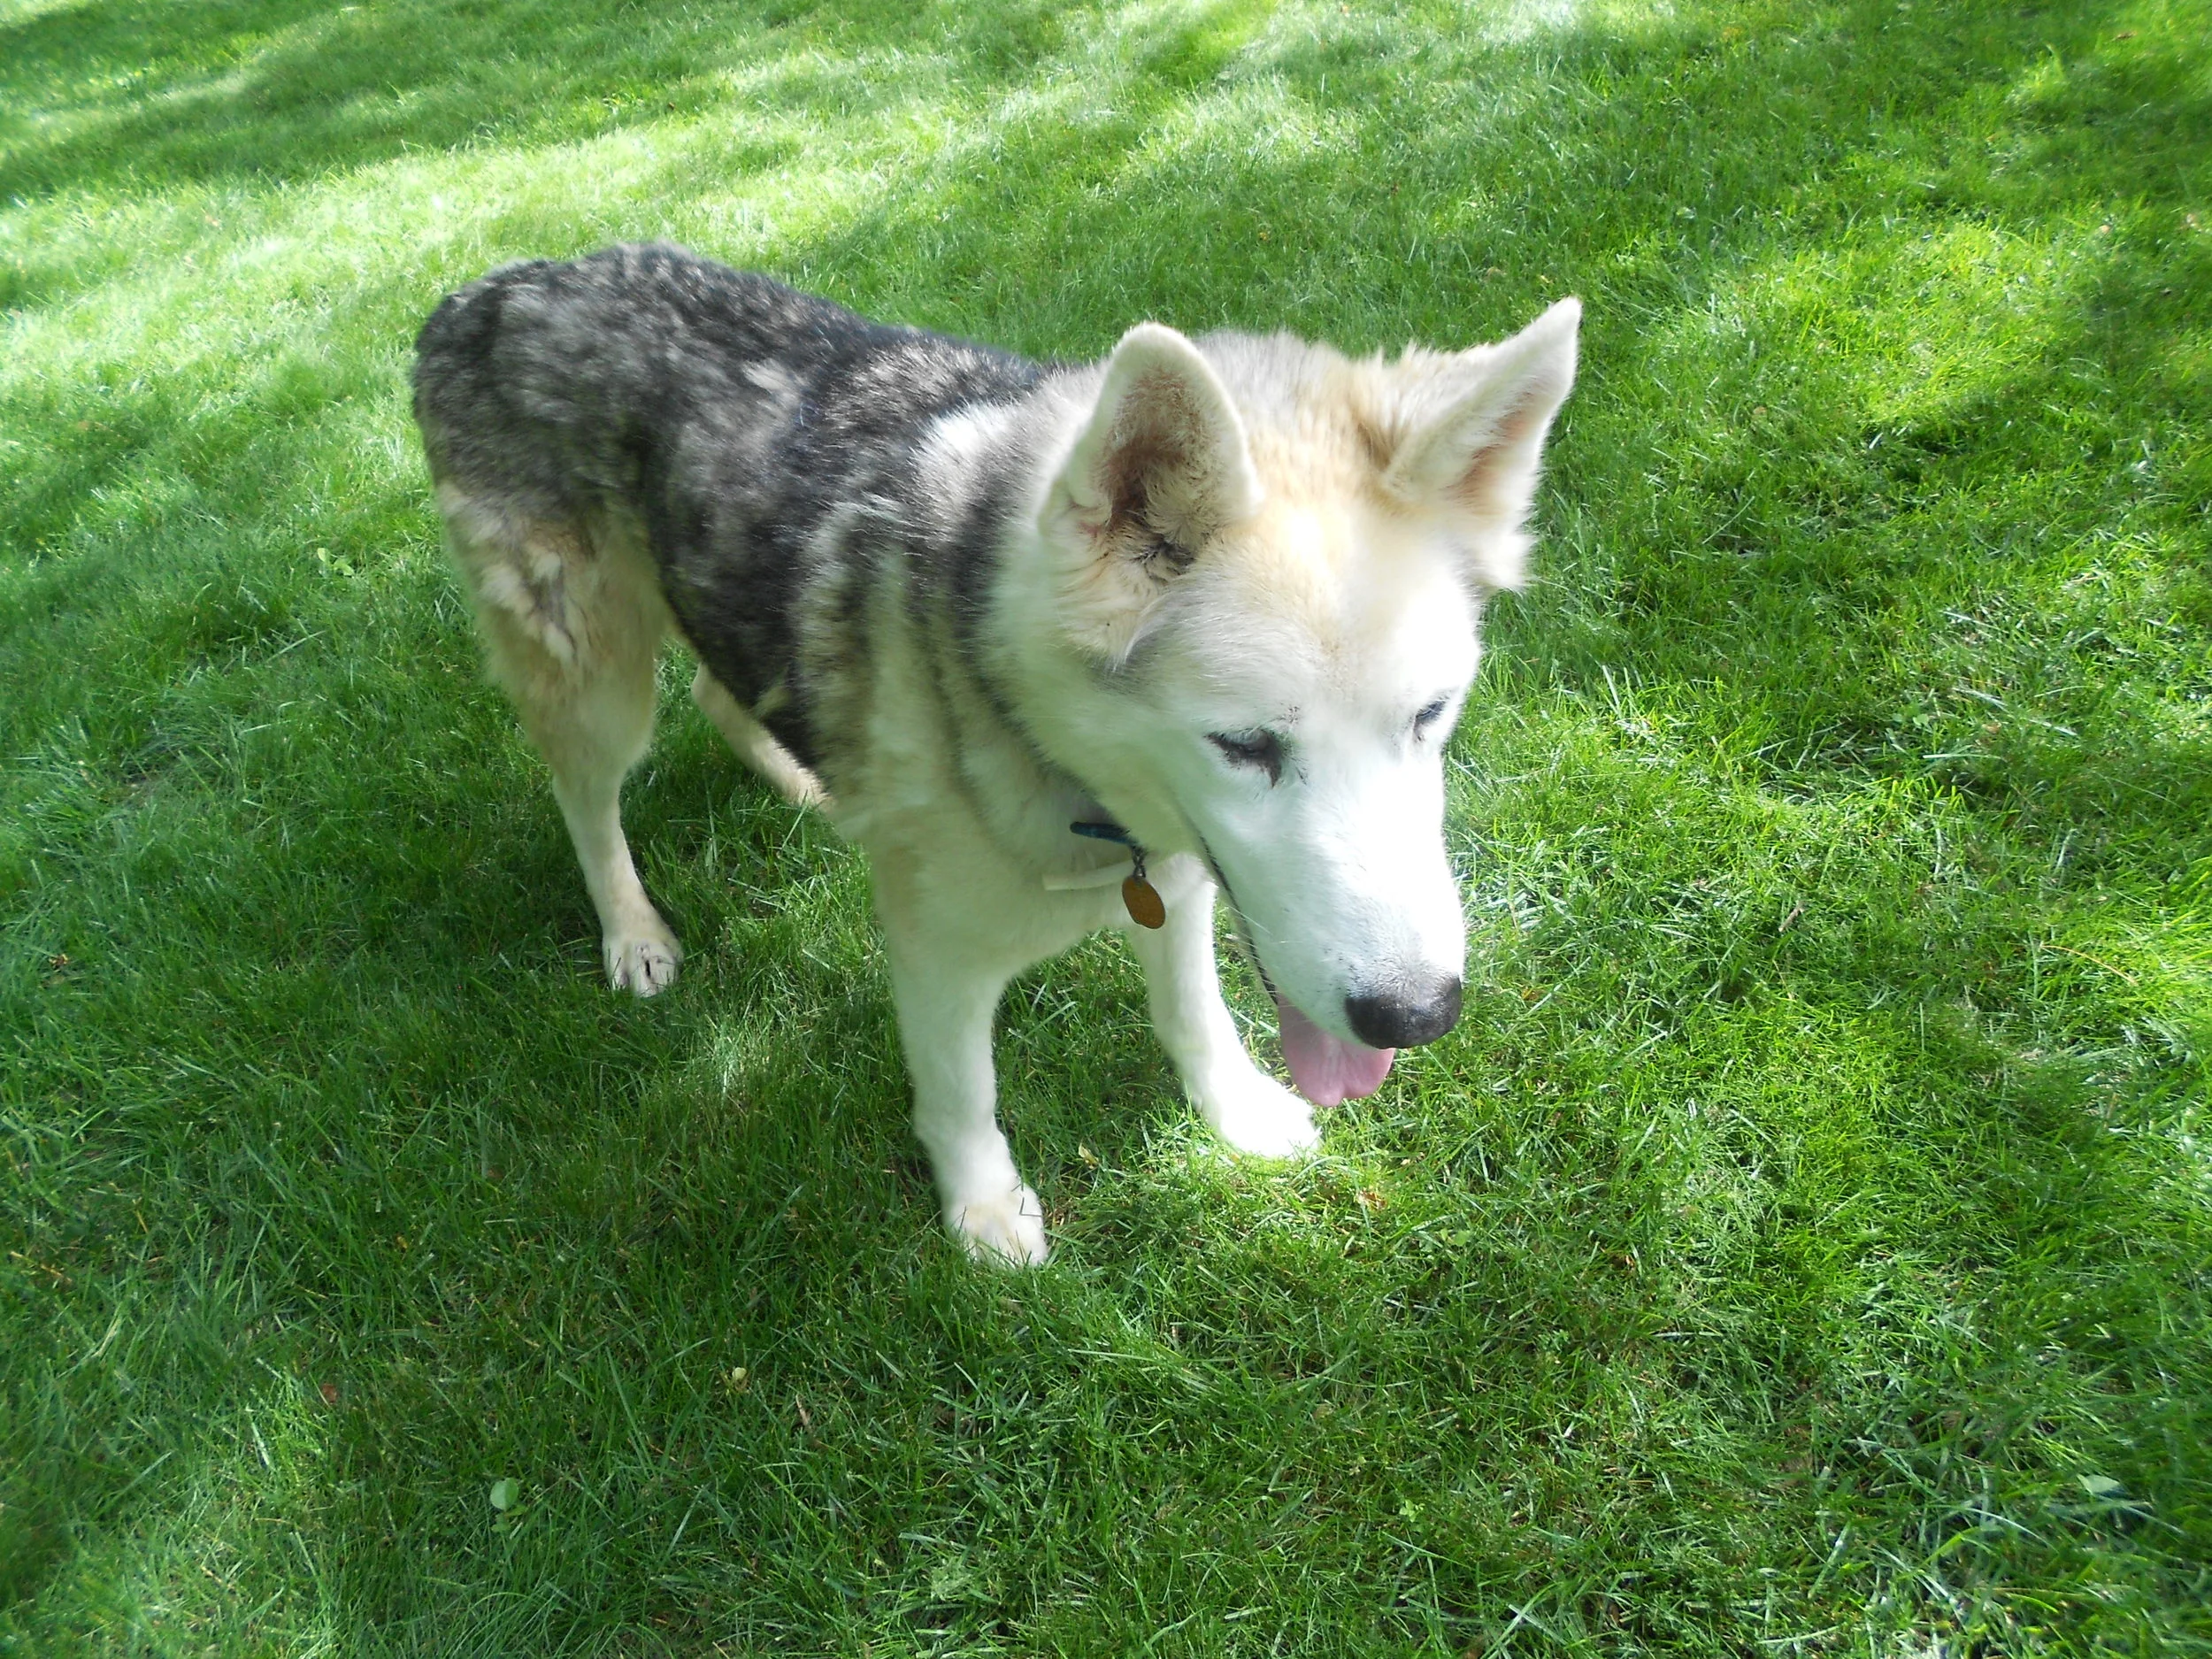
Blue Eyes
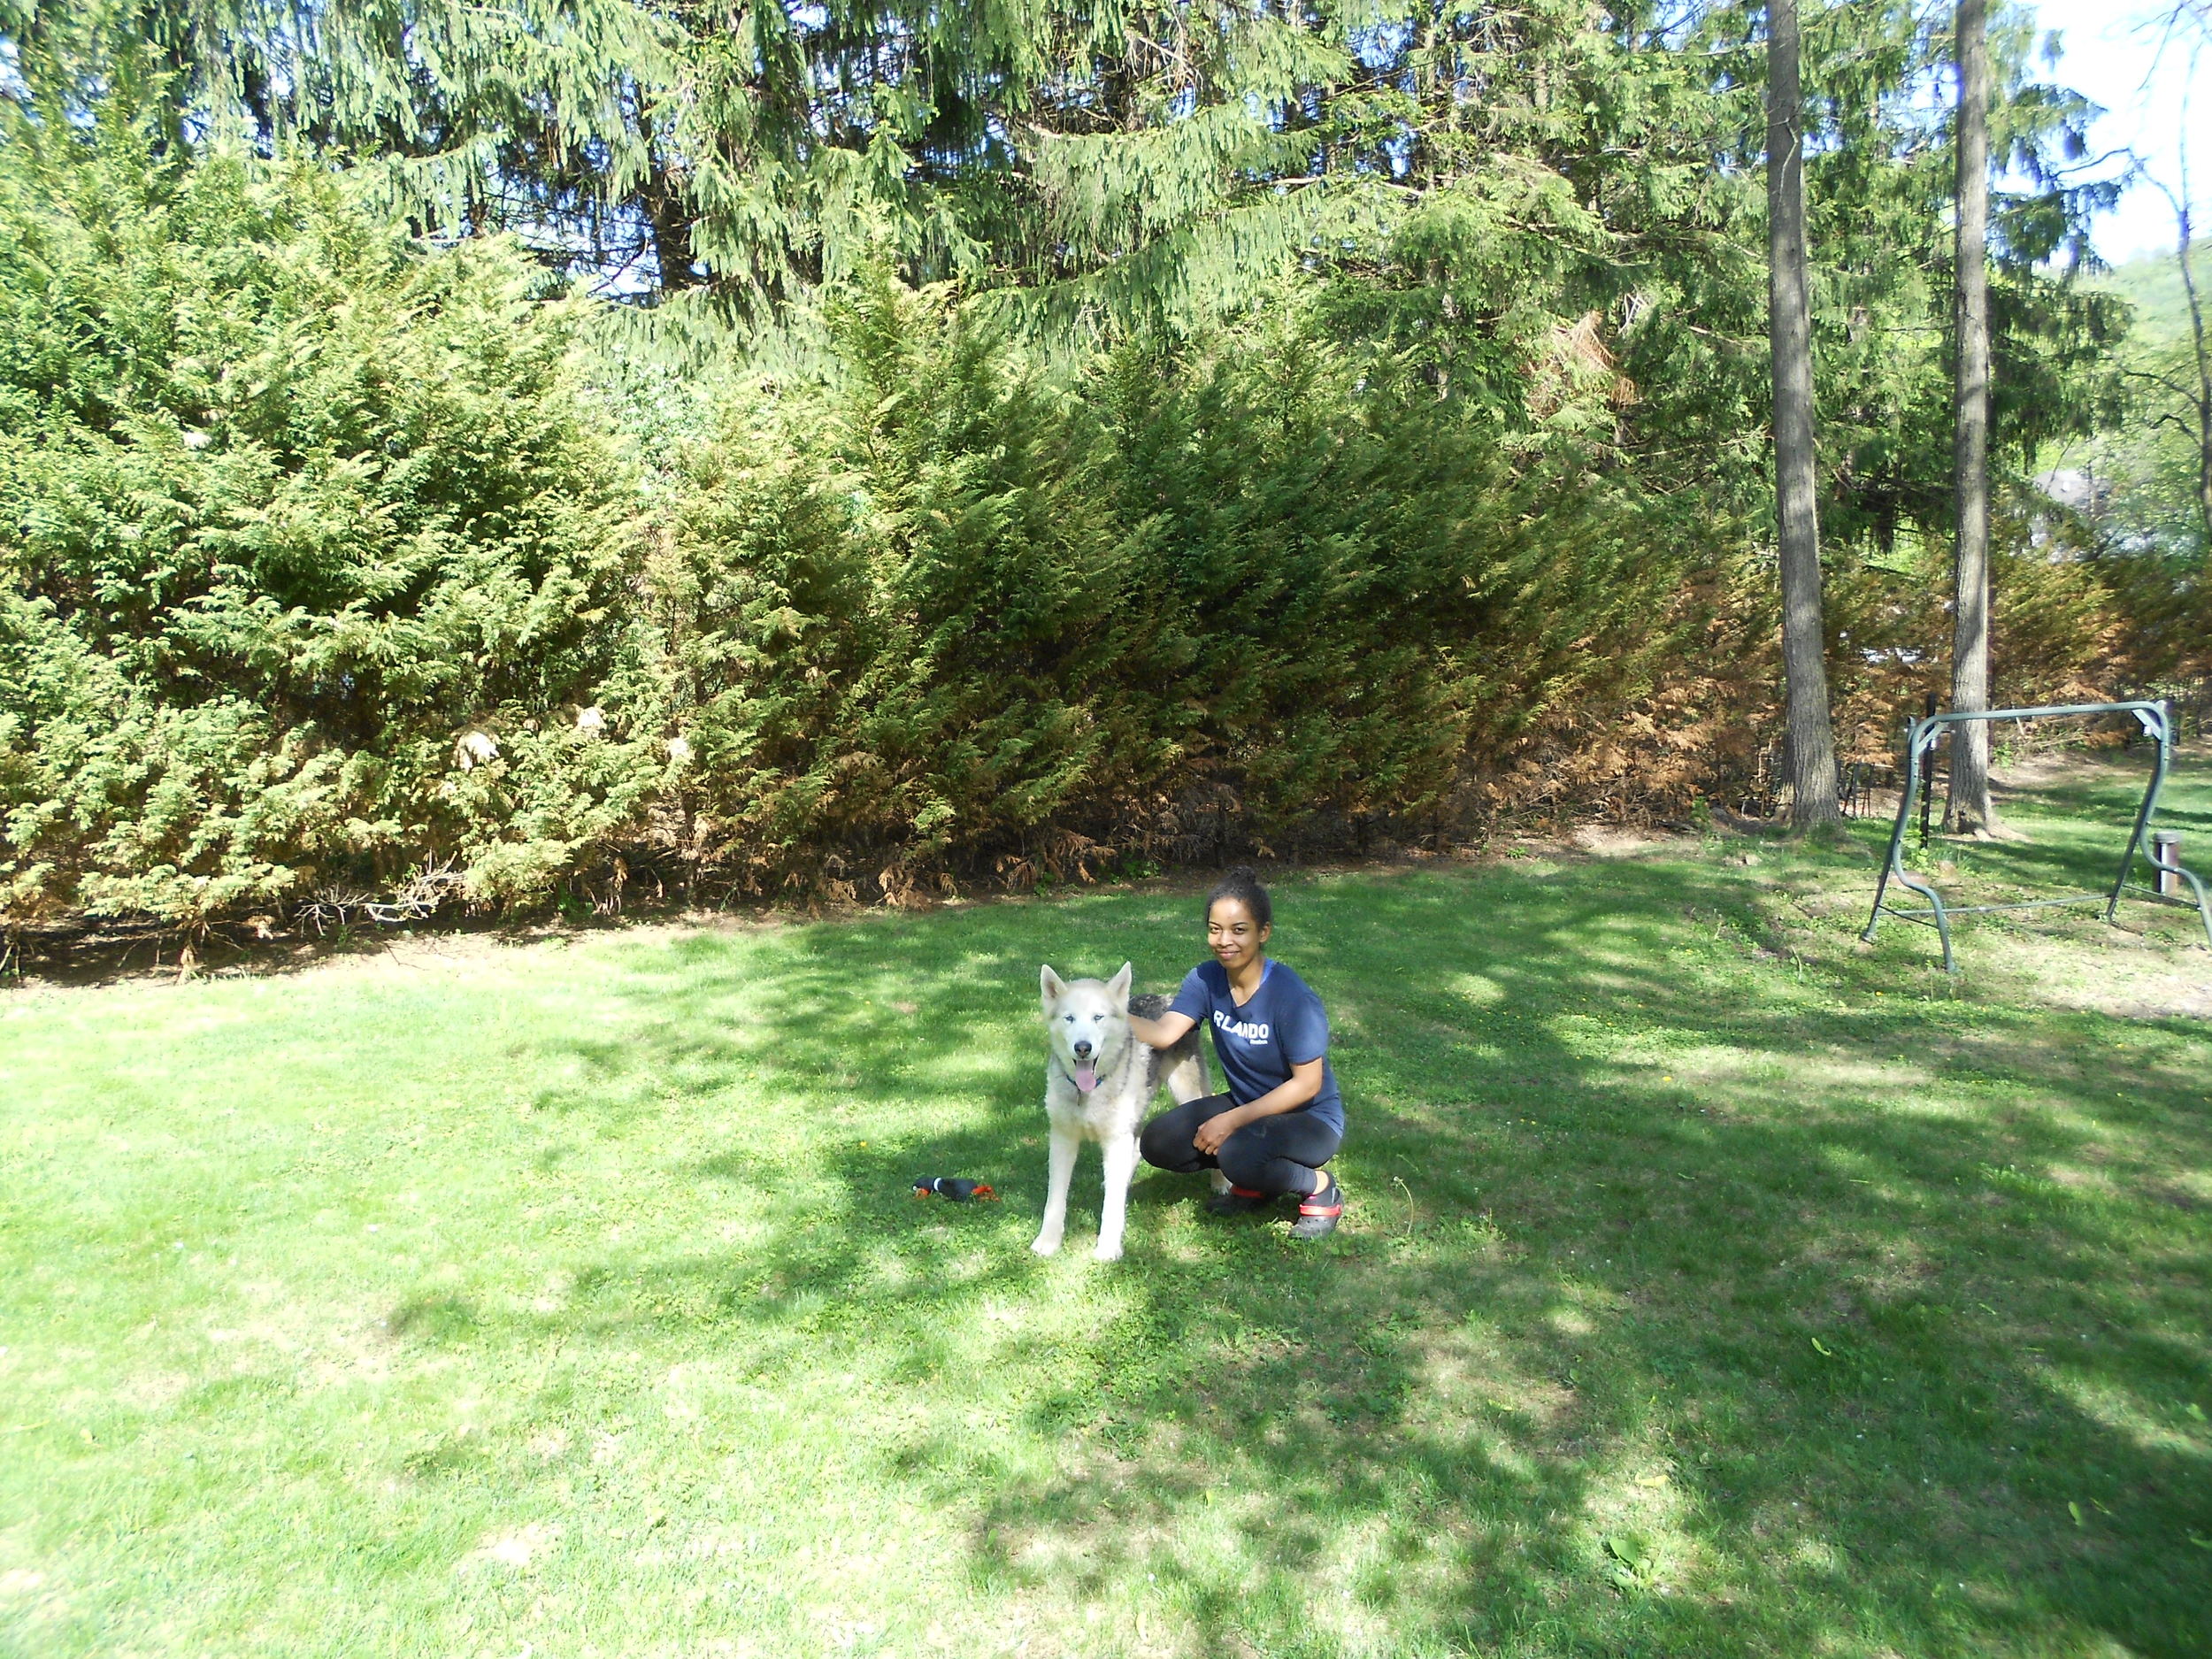
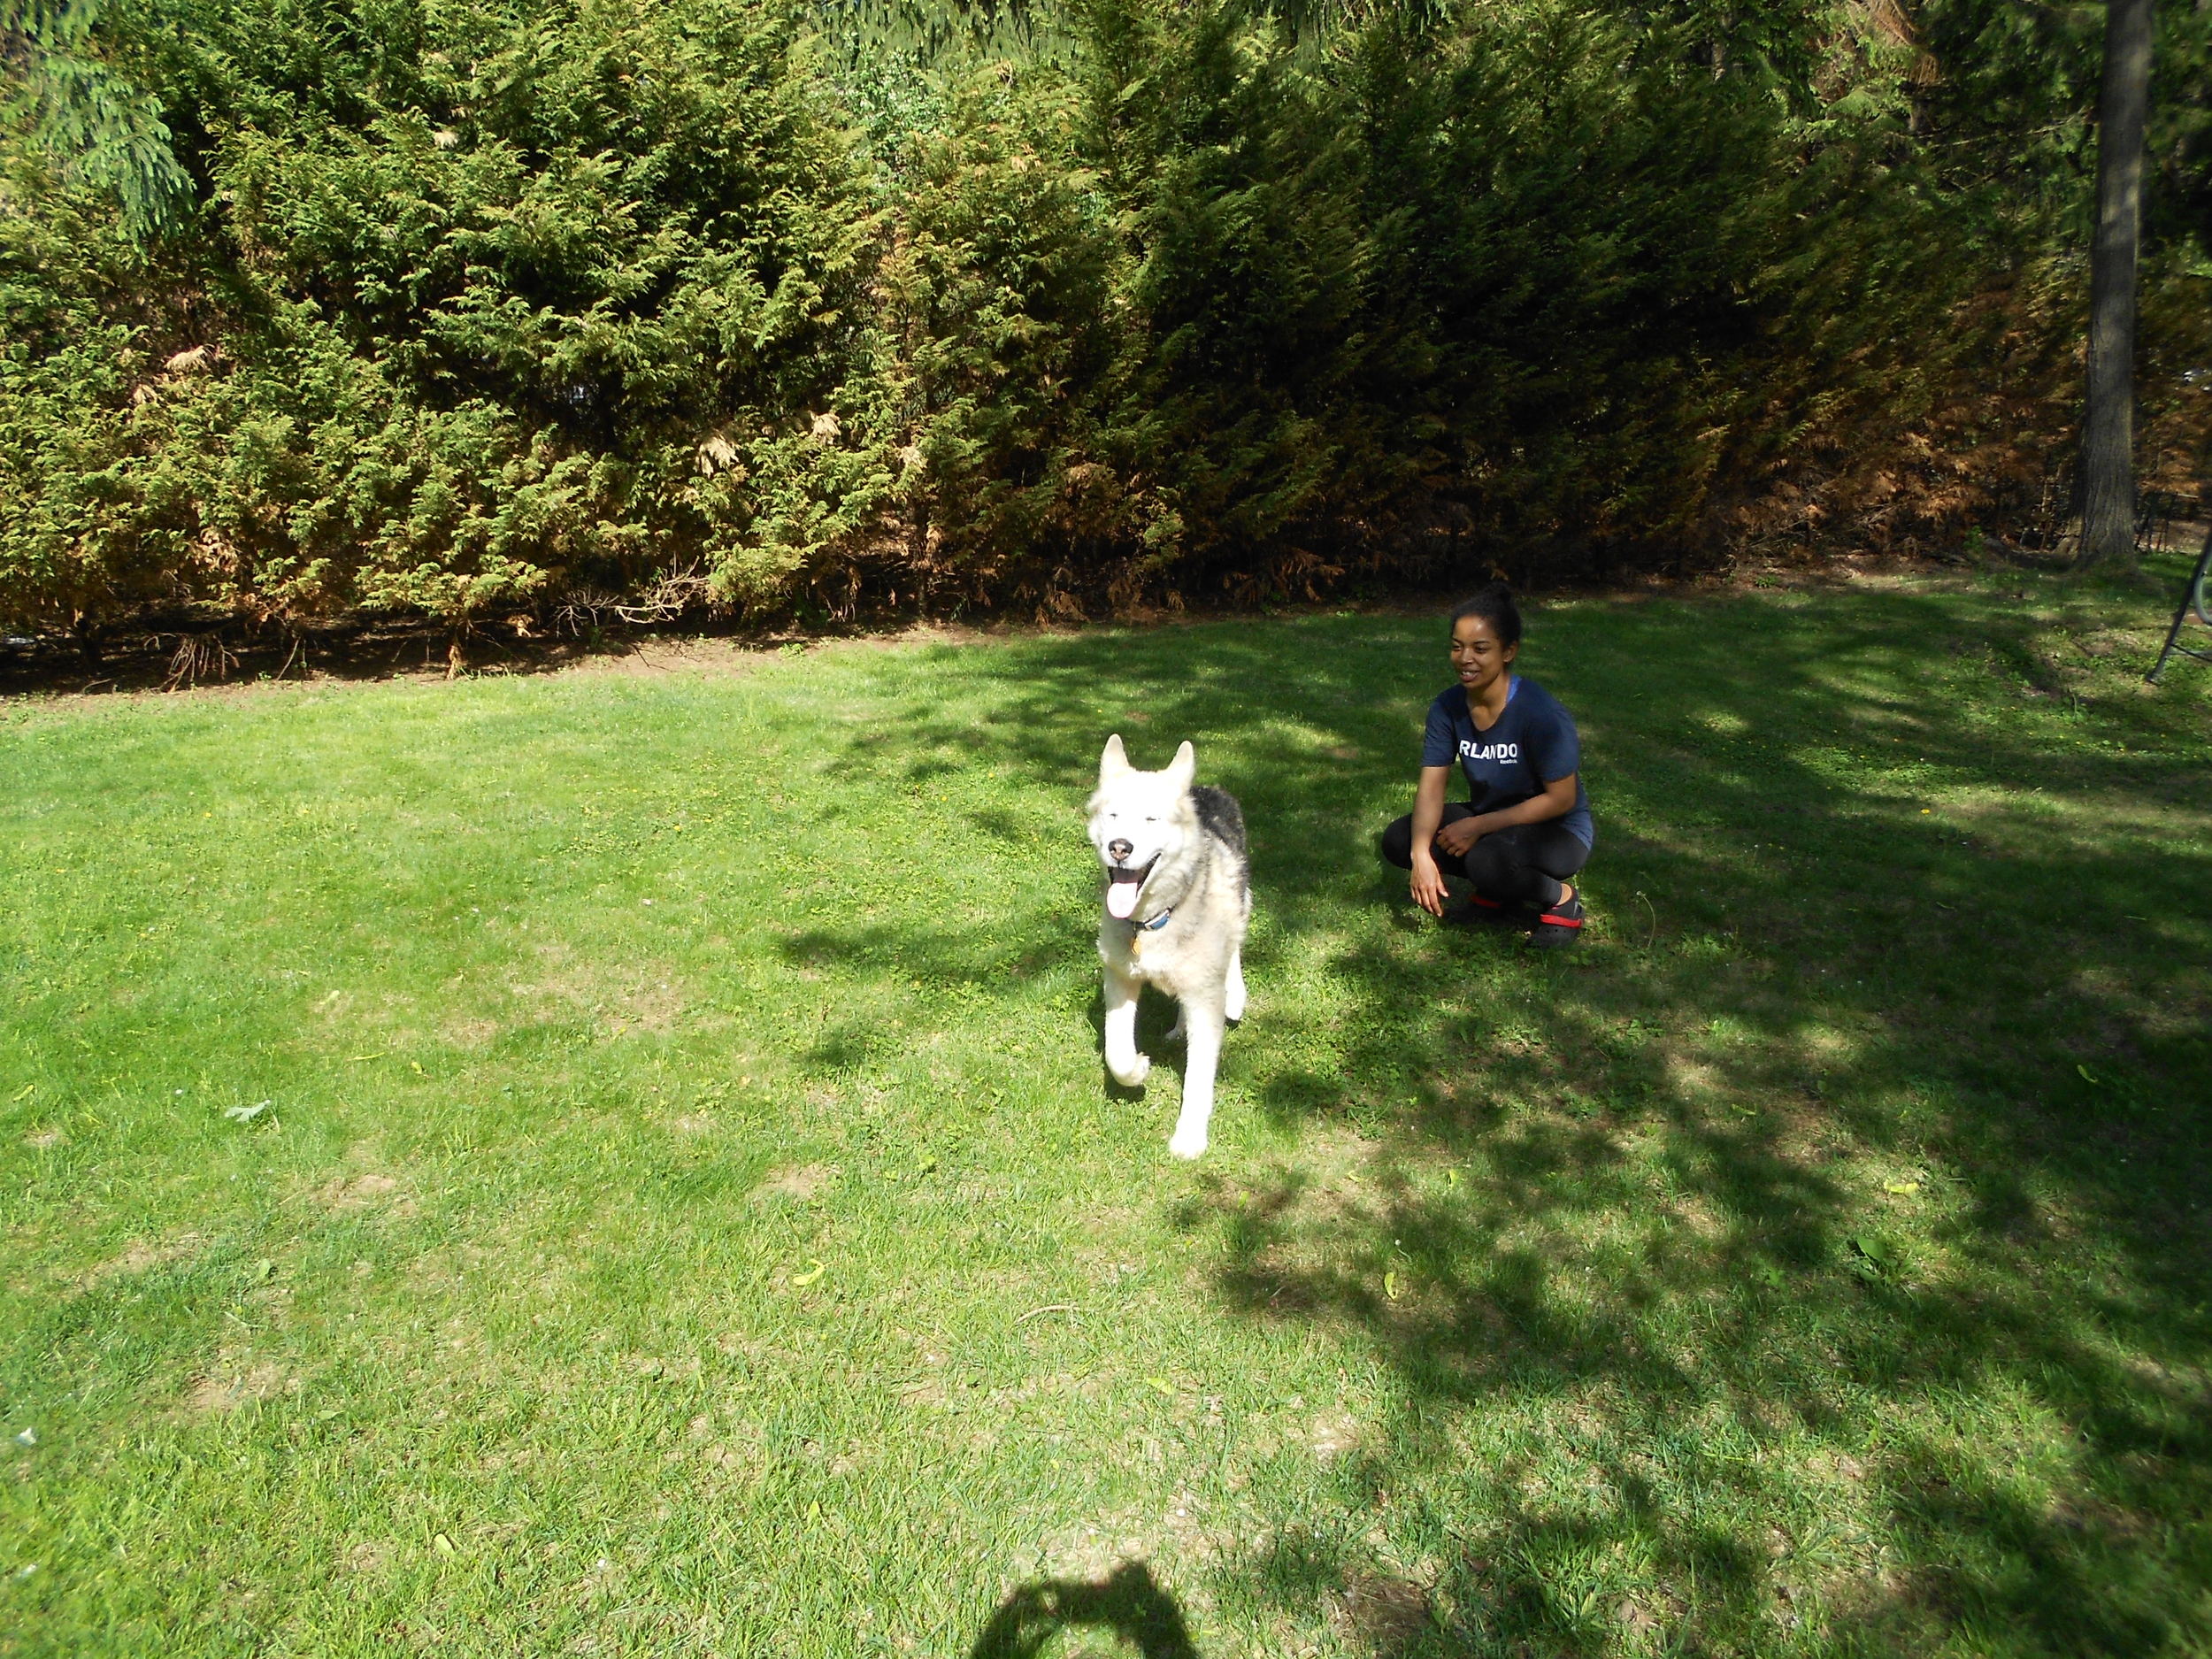
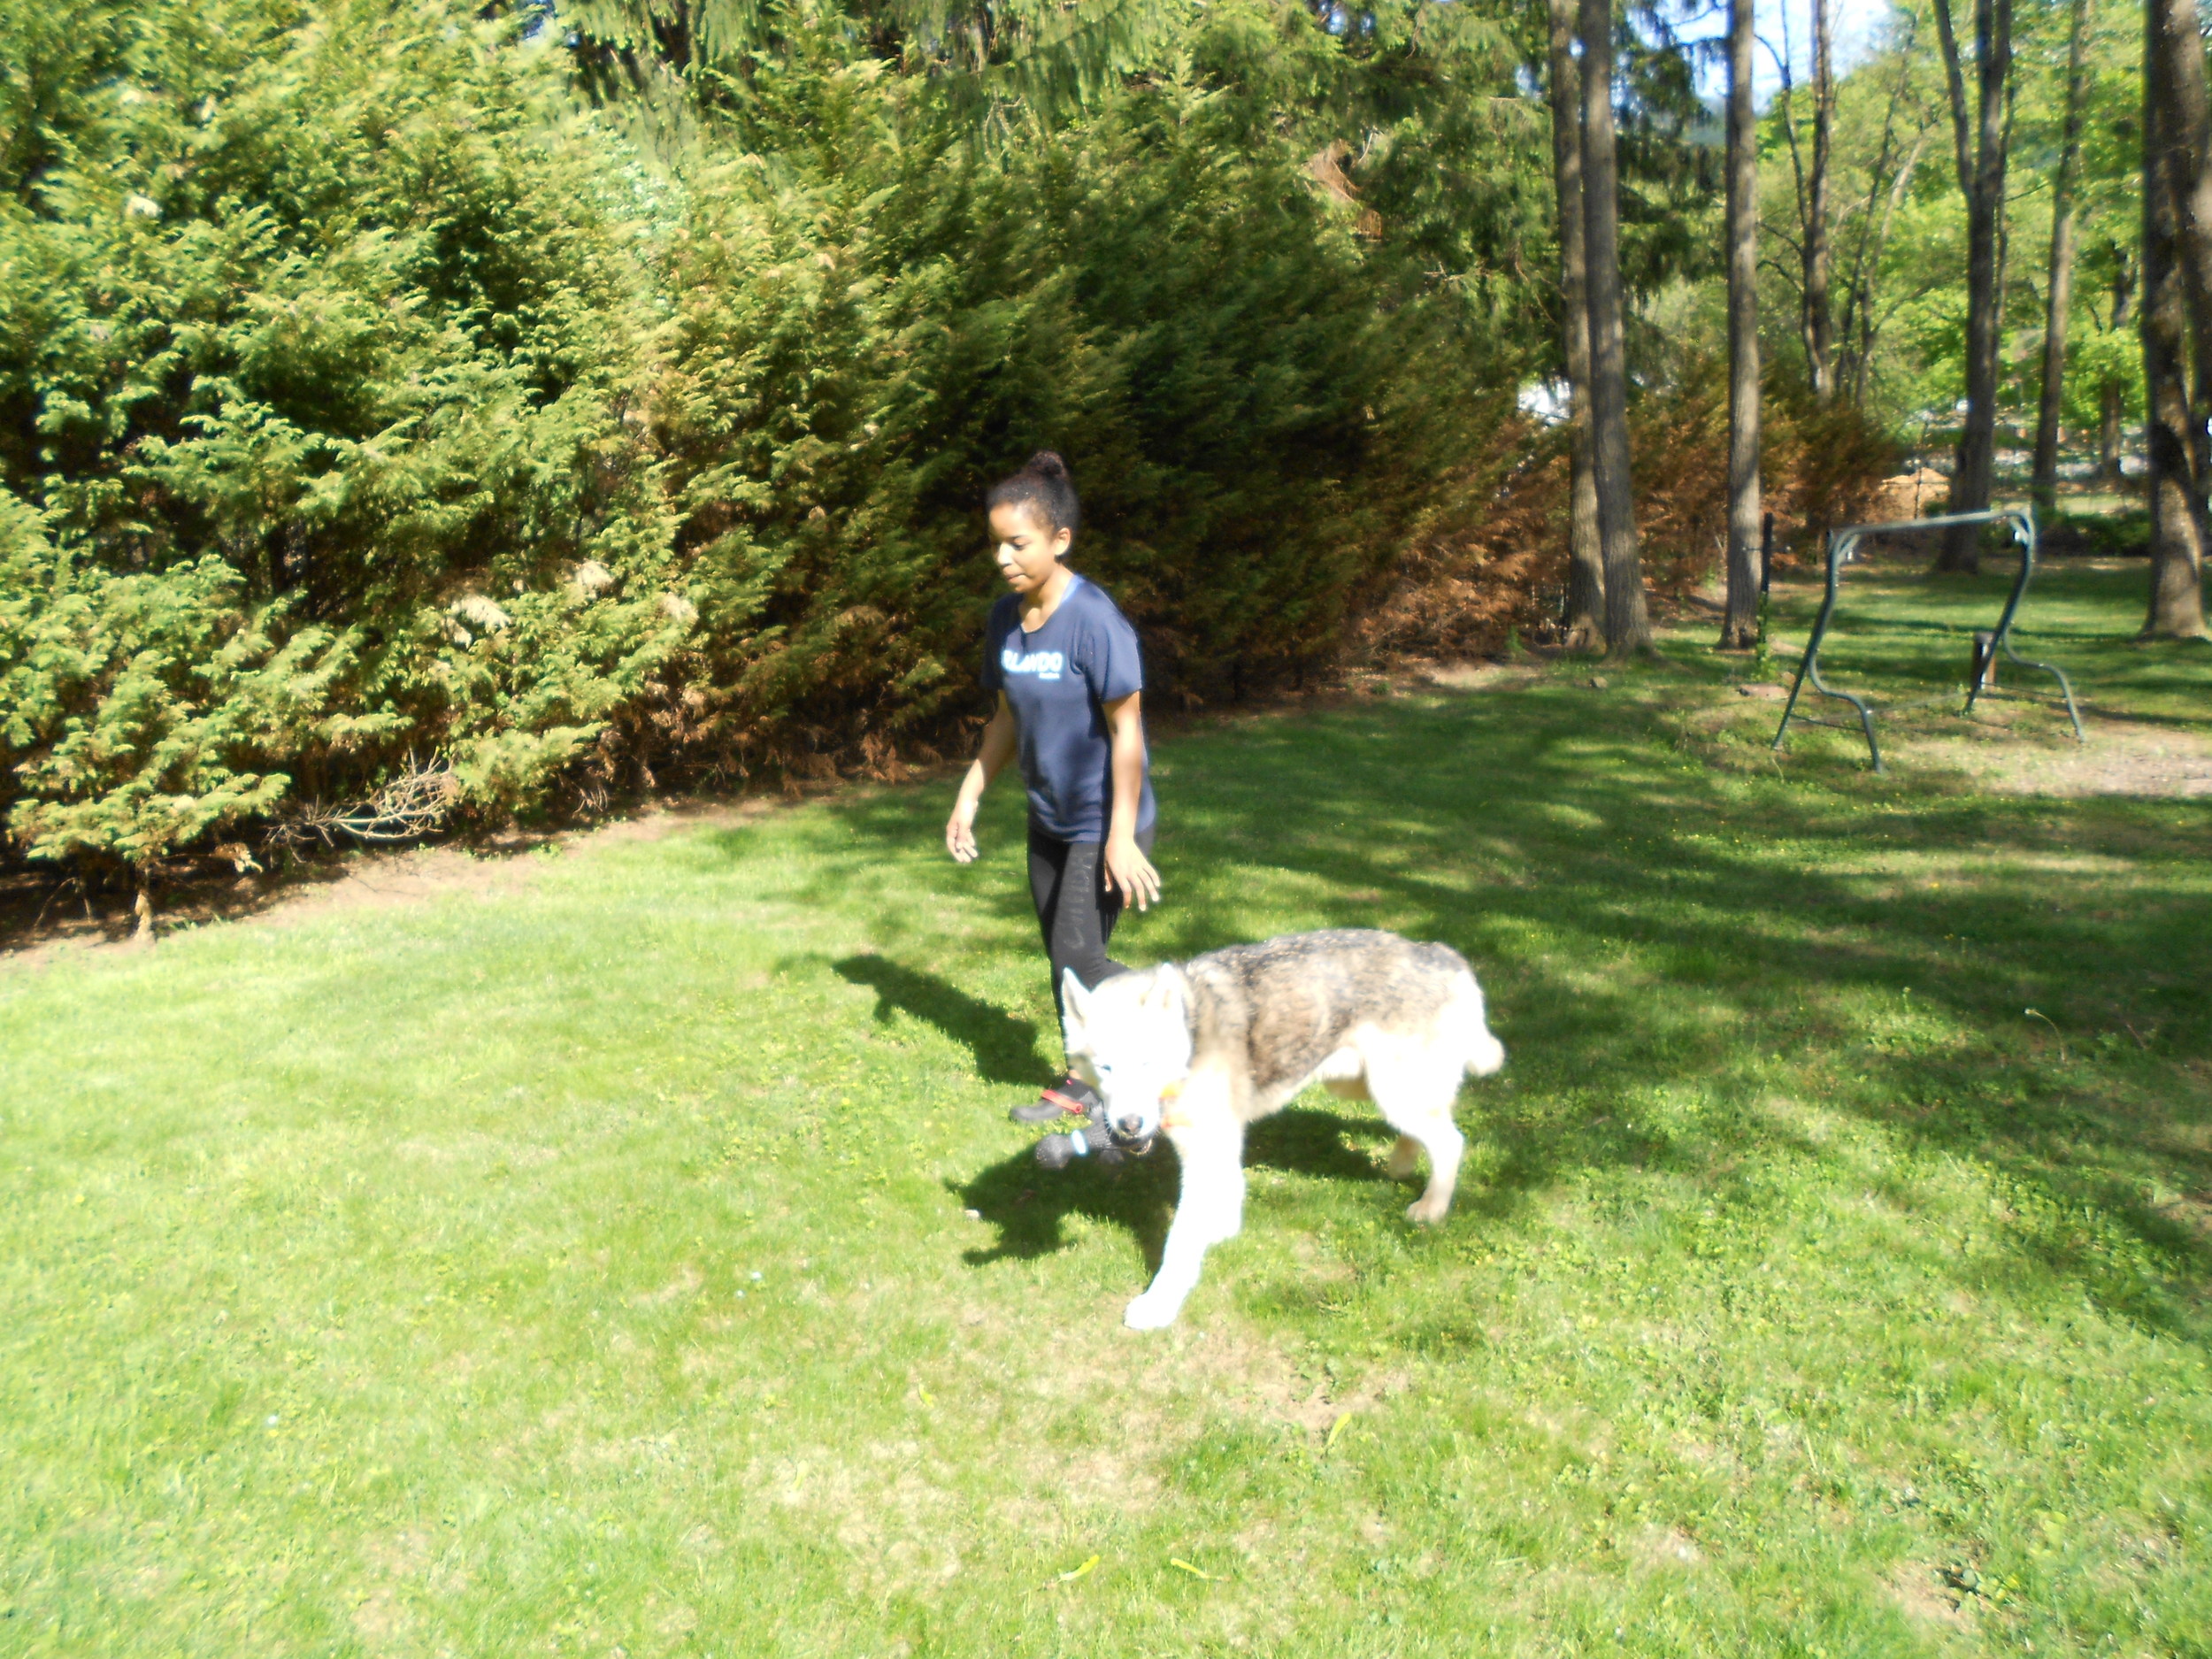
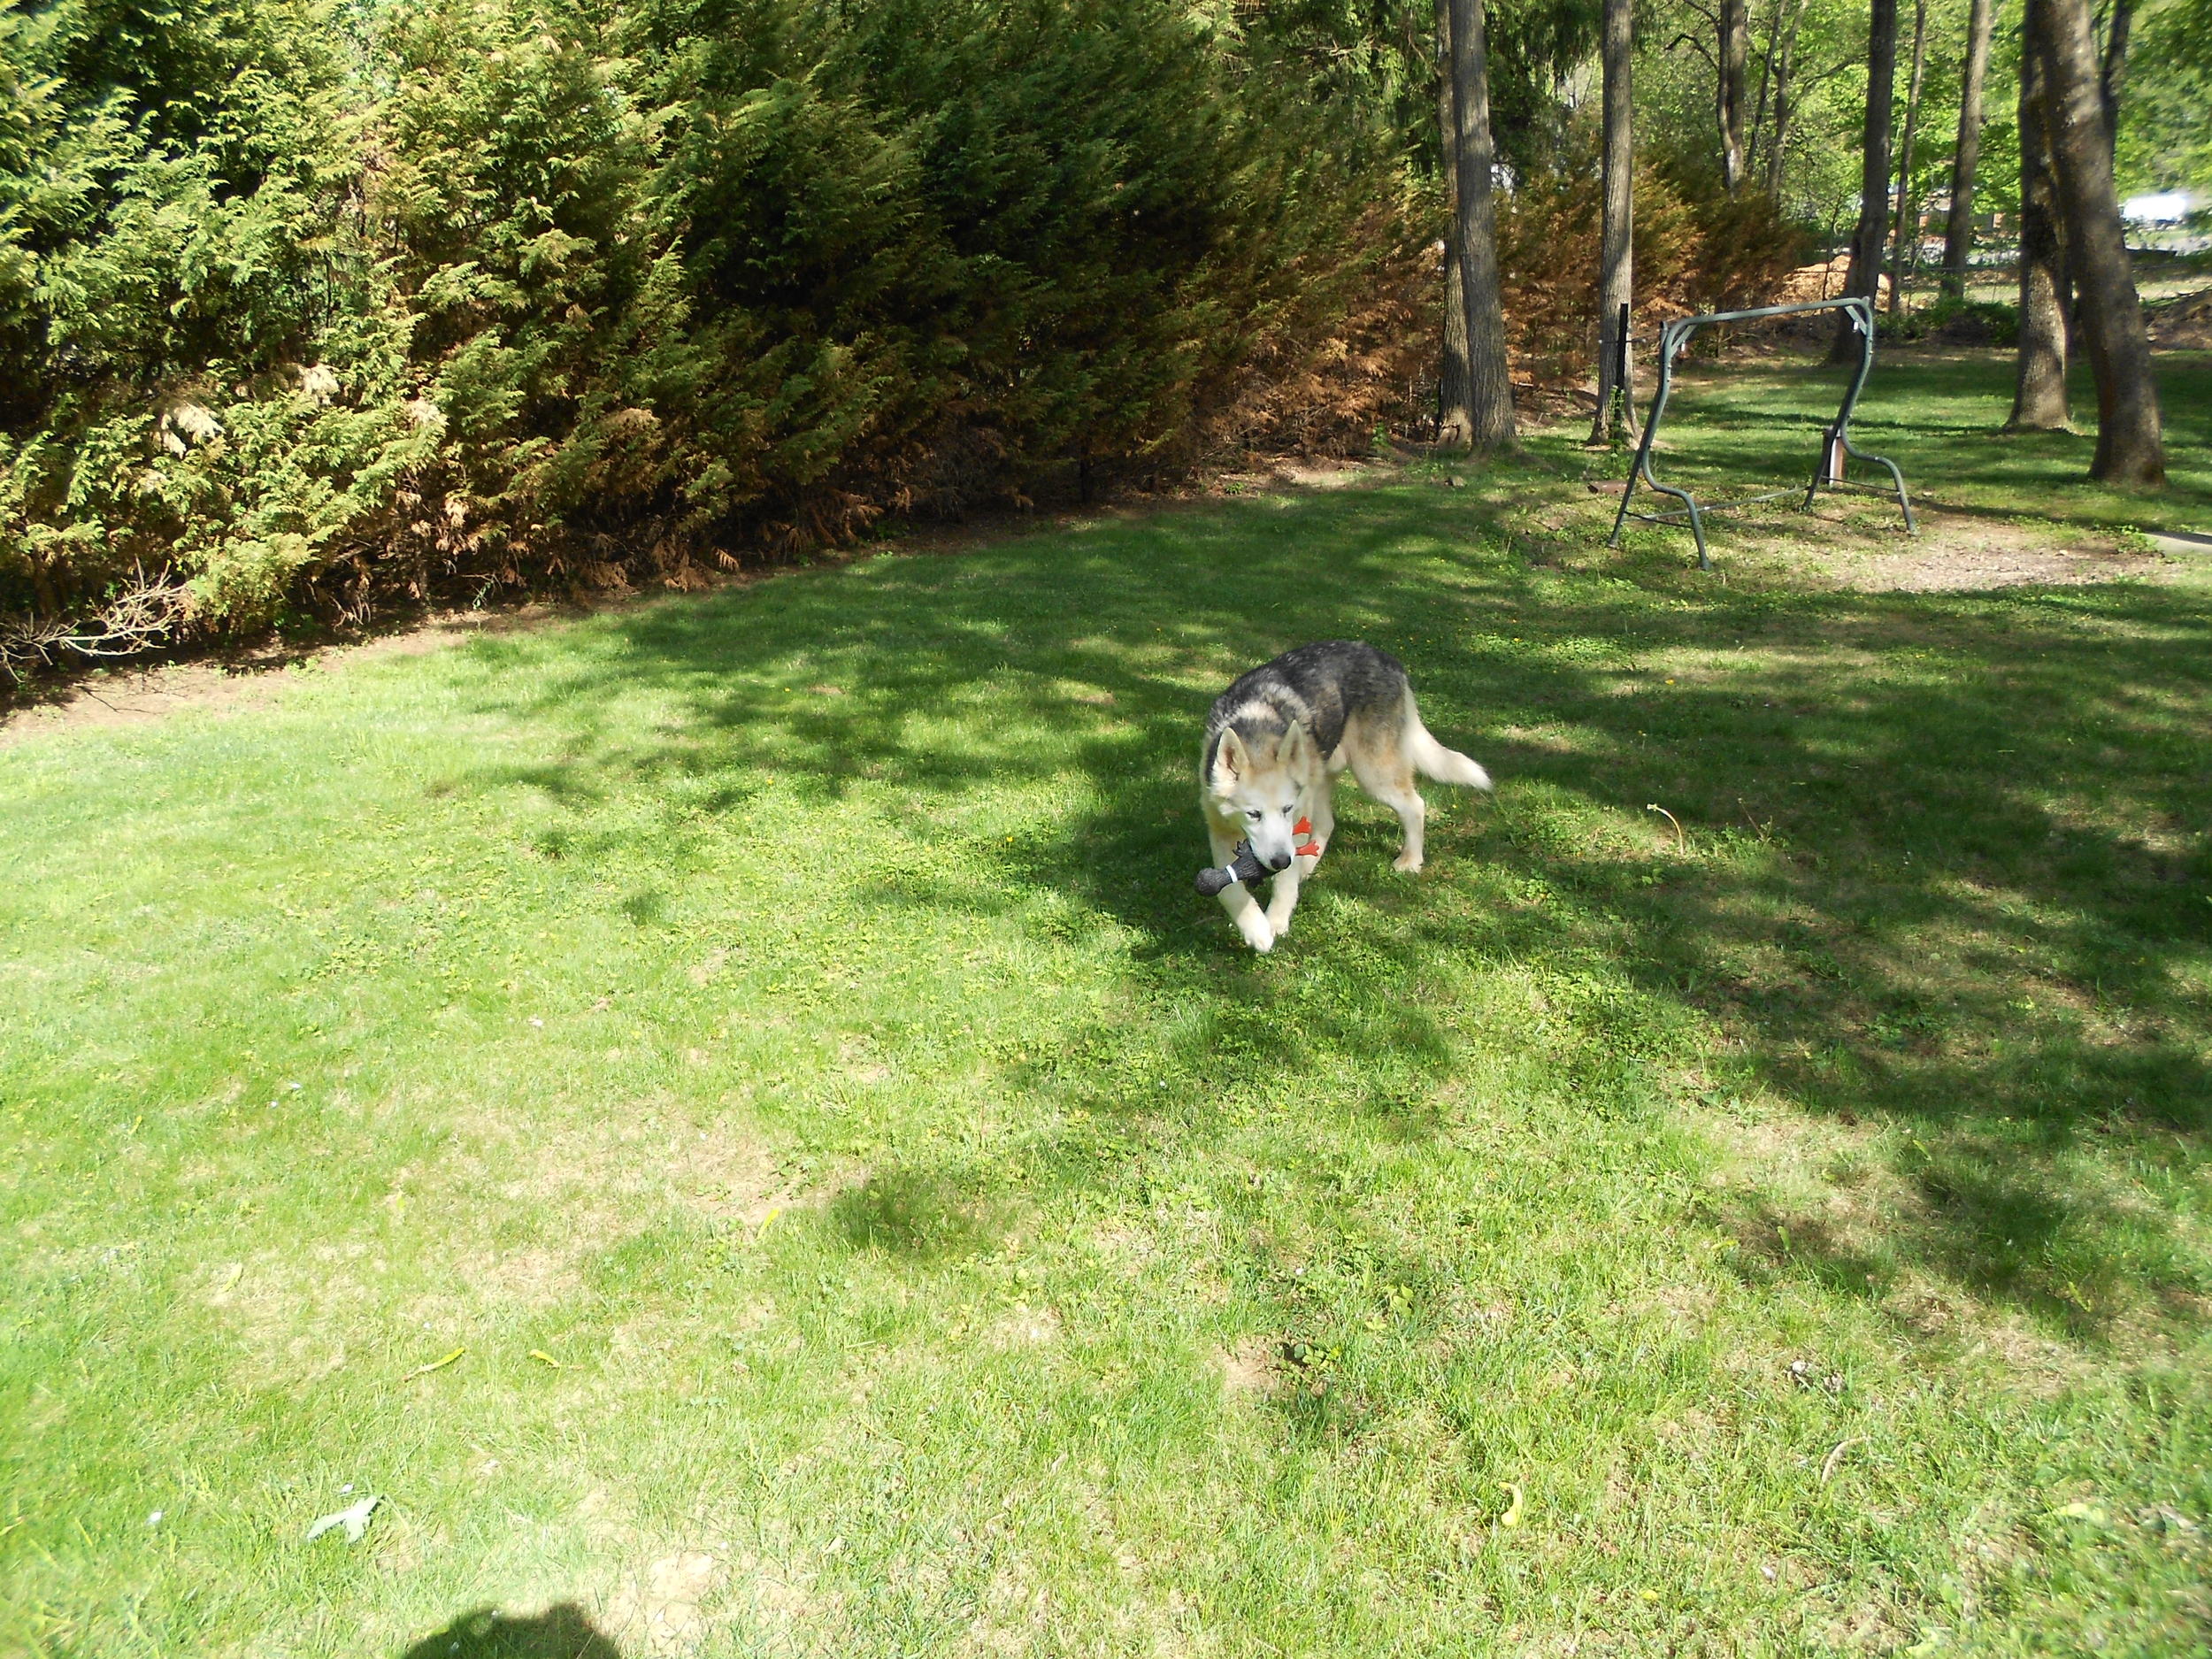
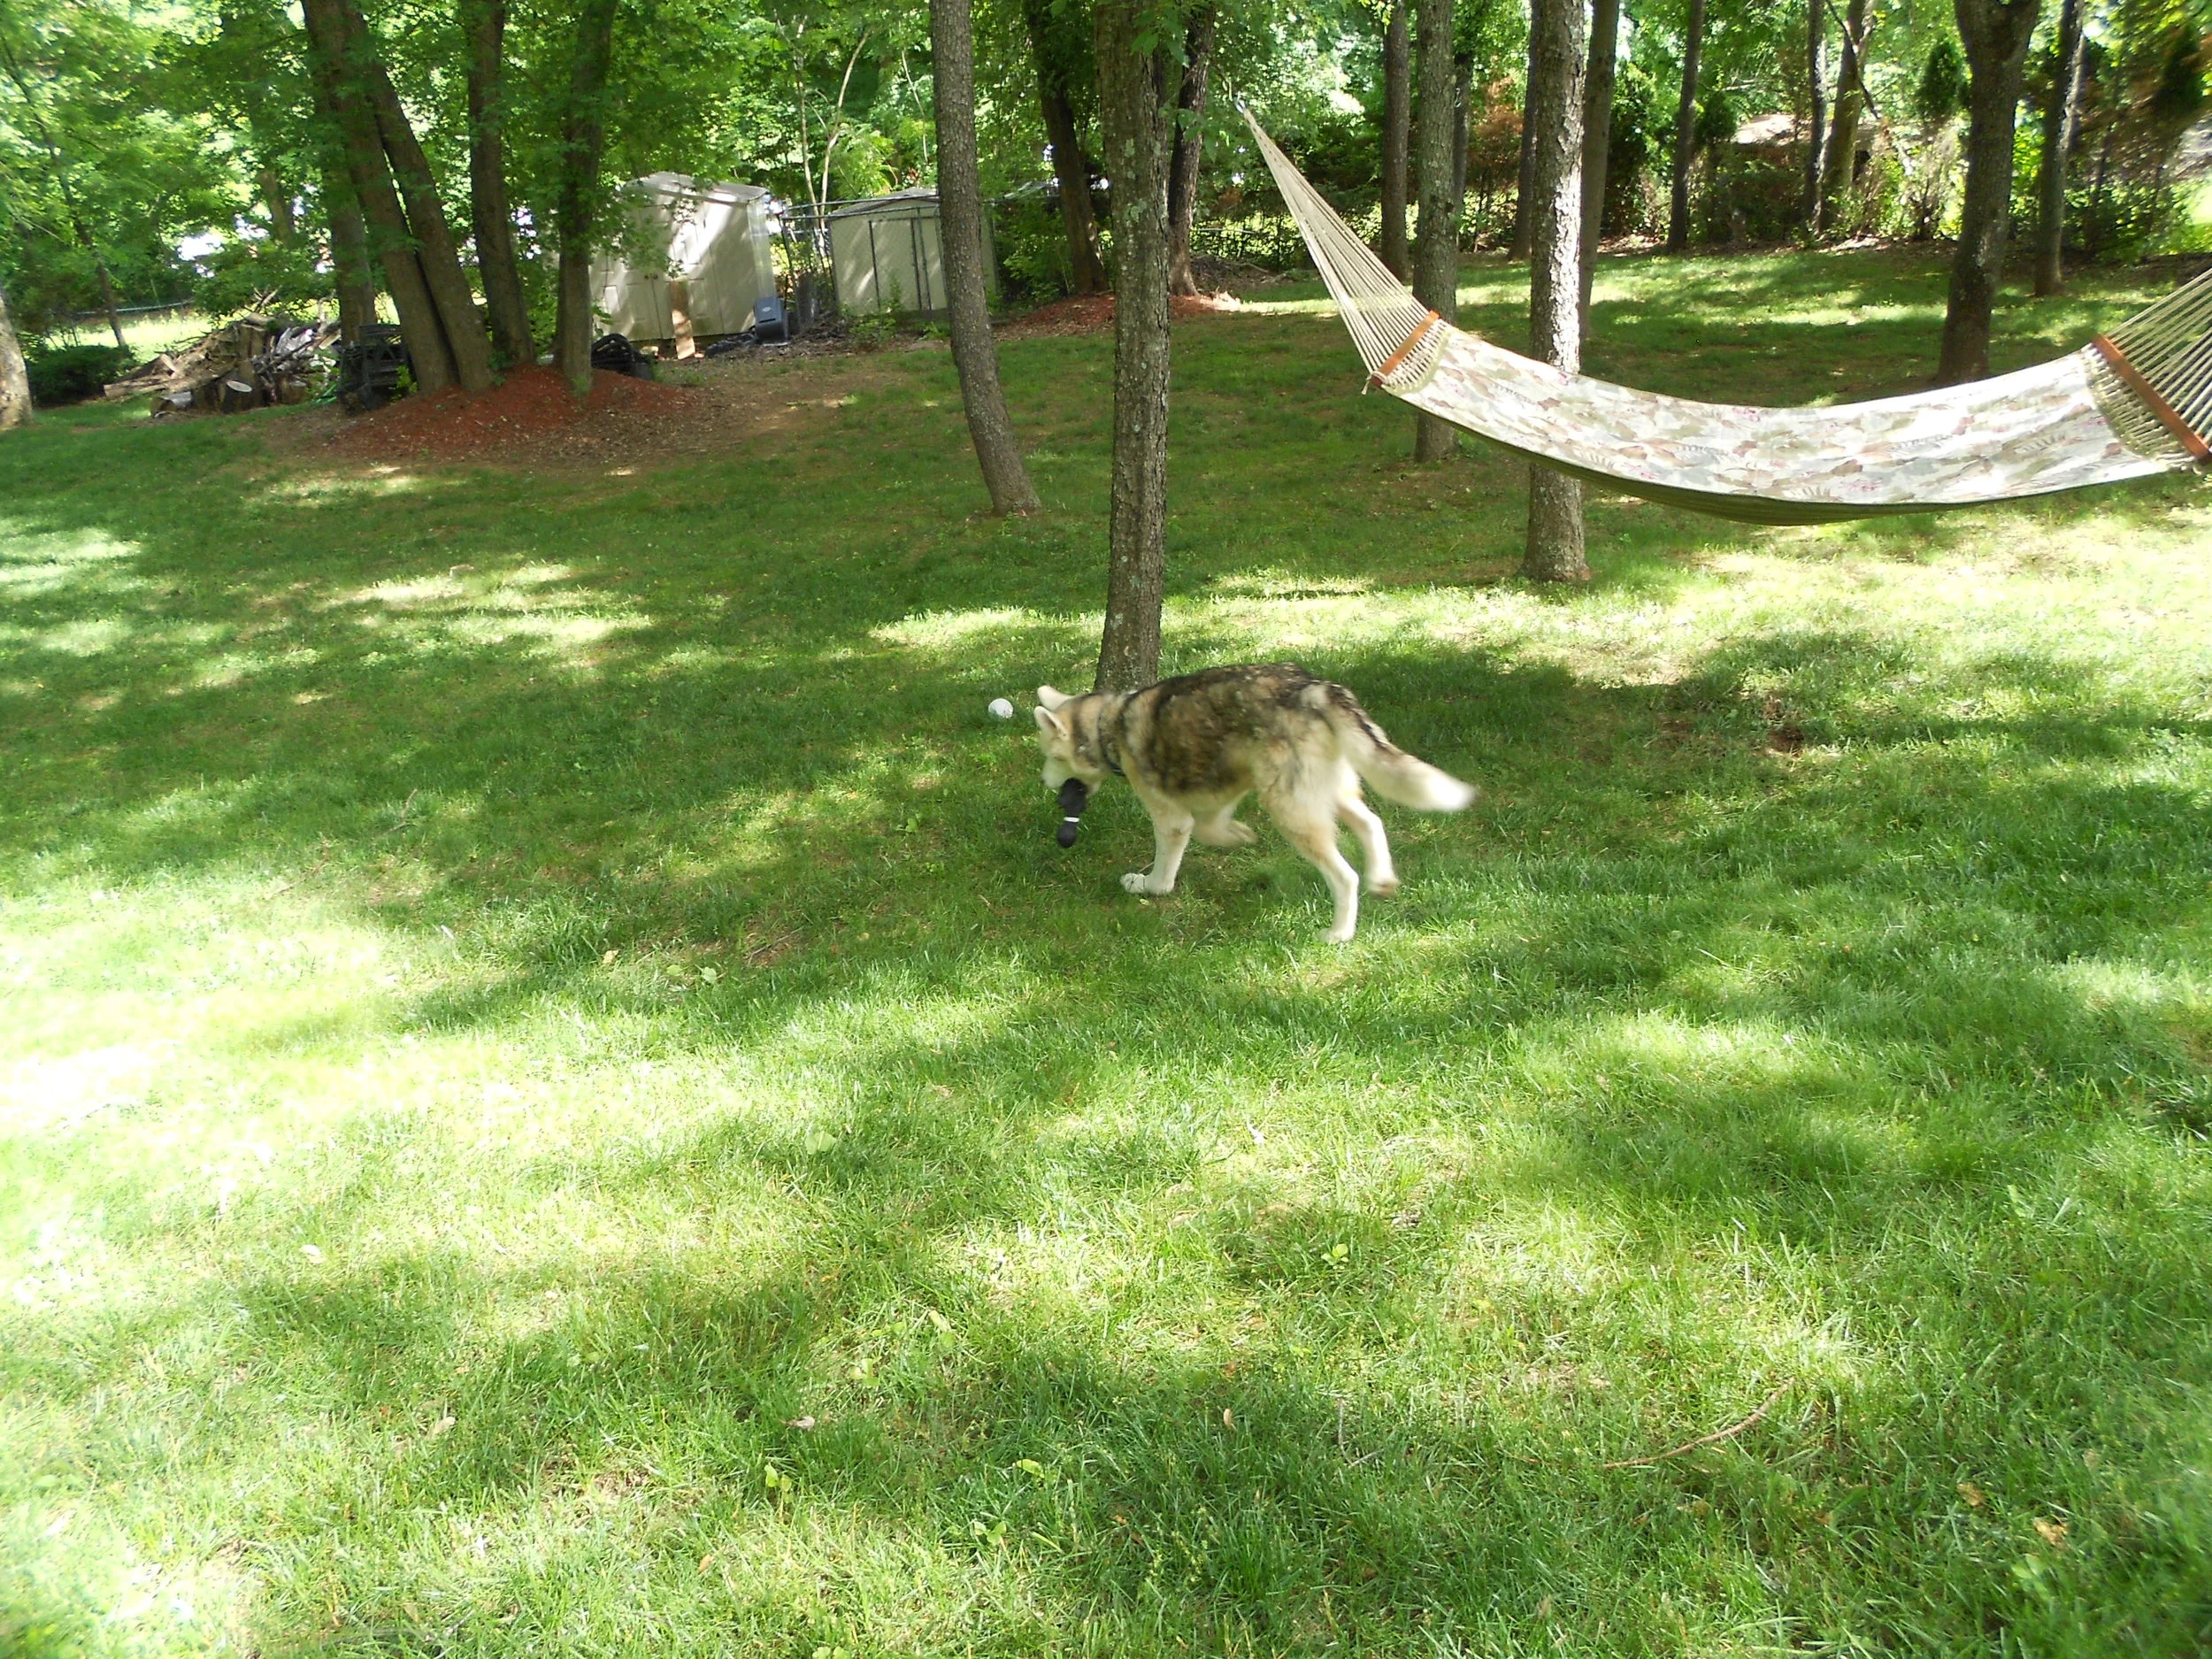
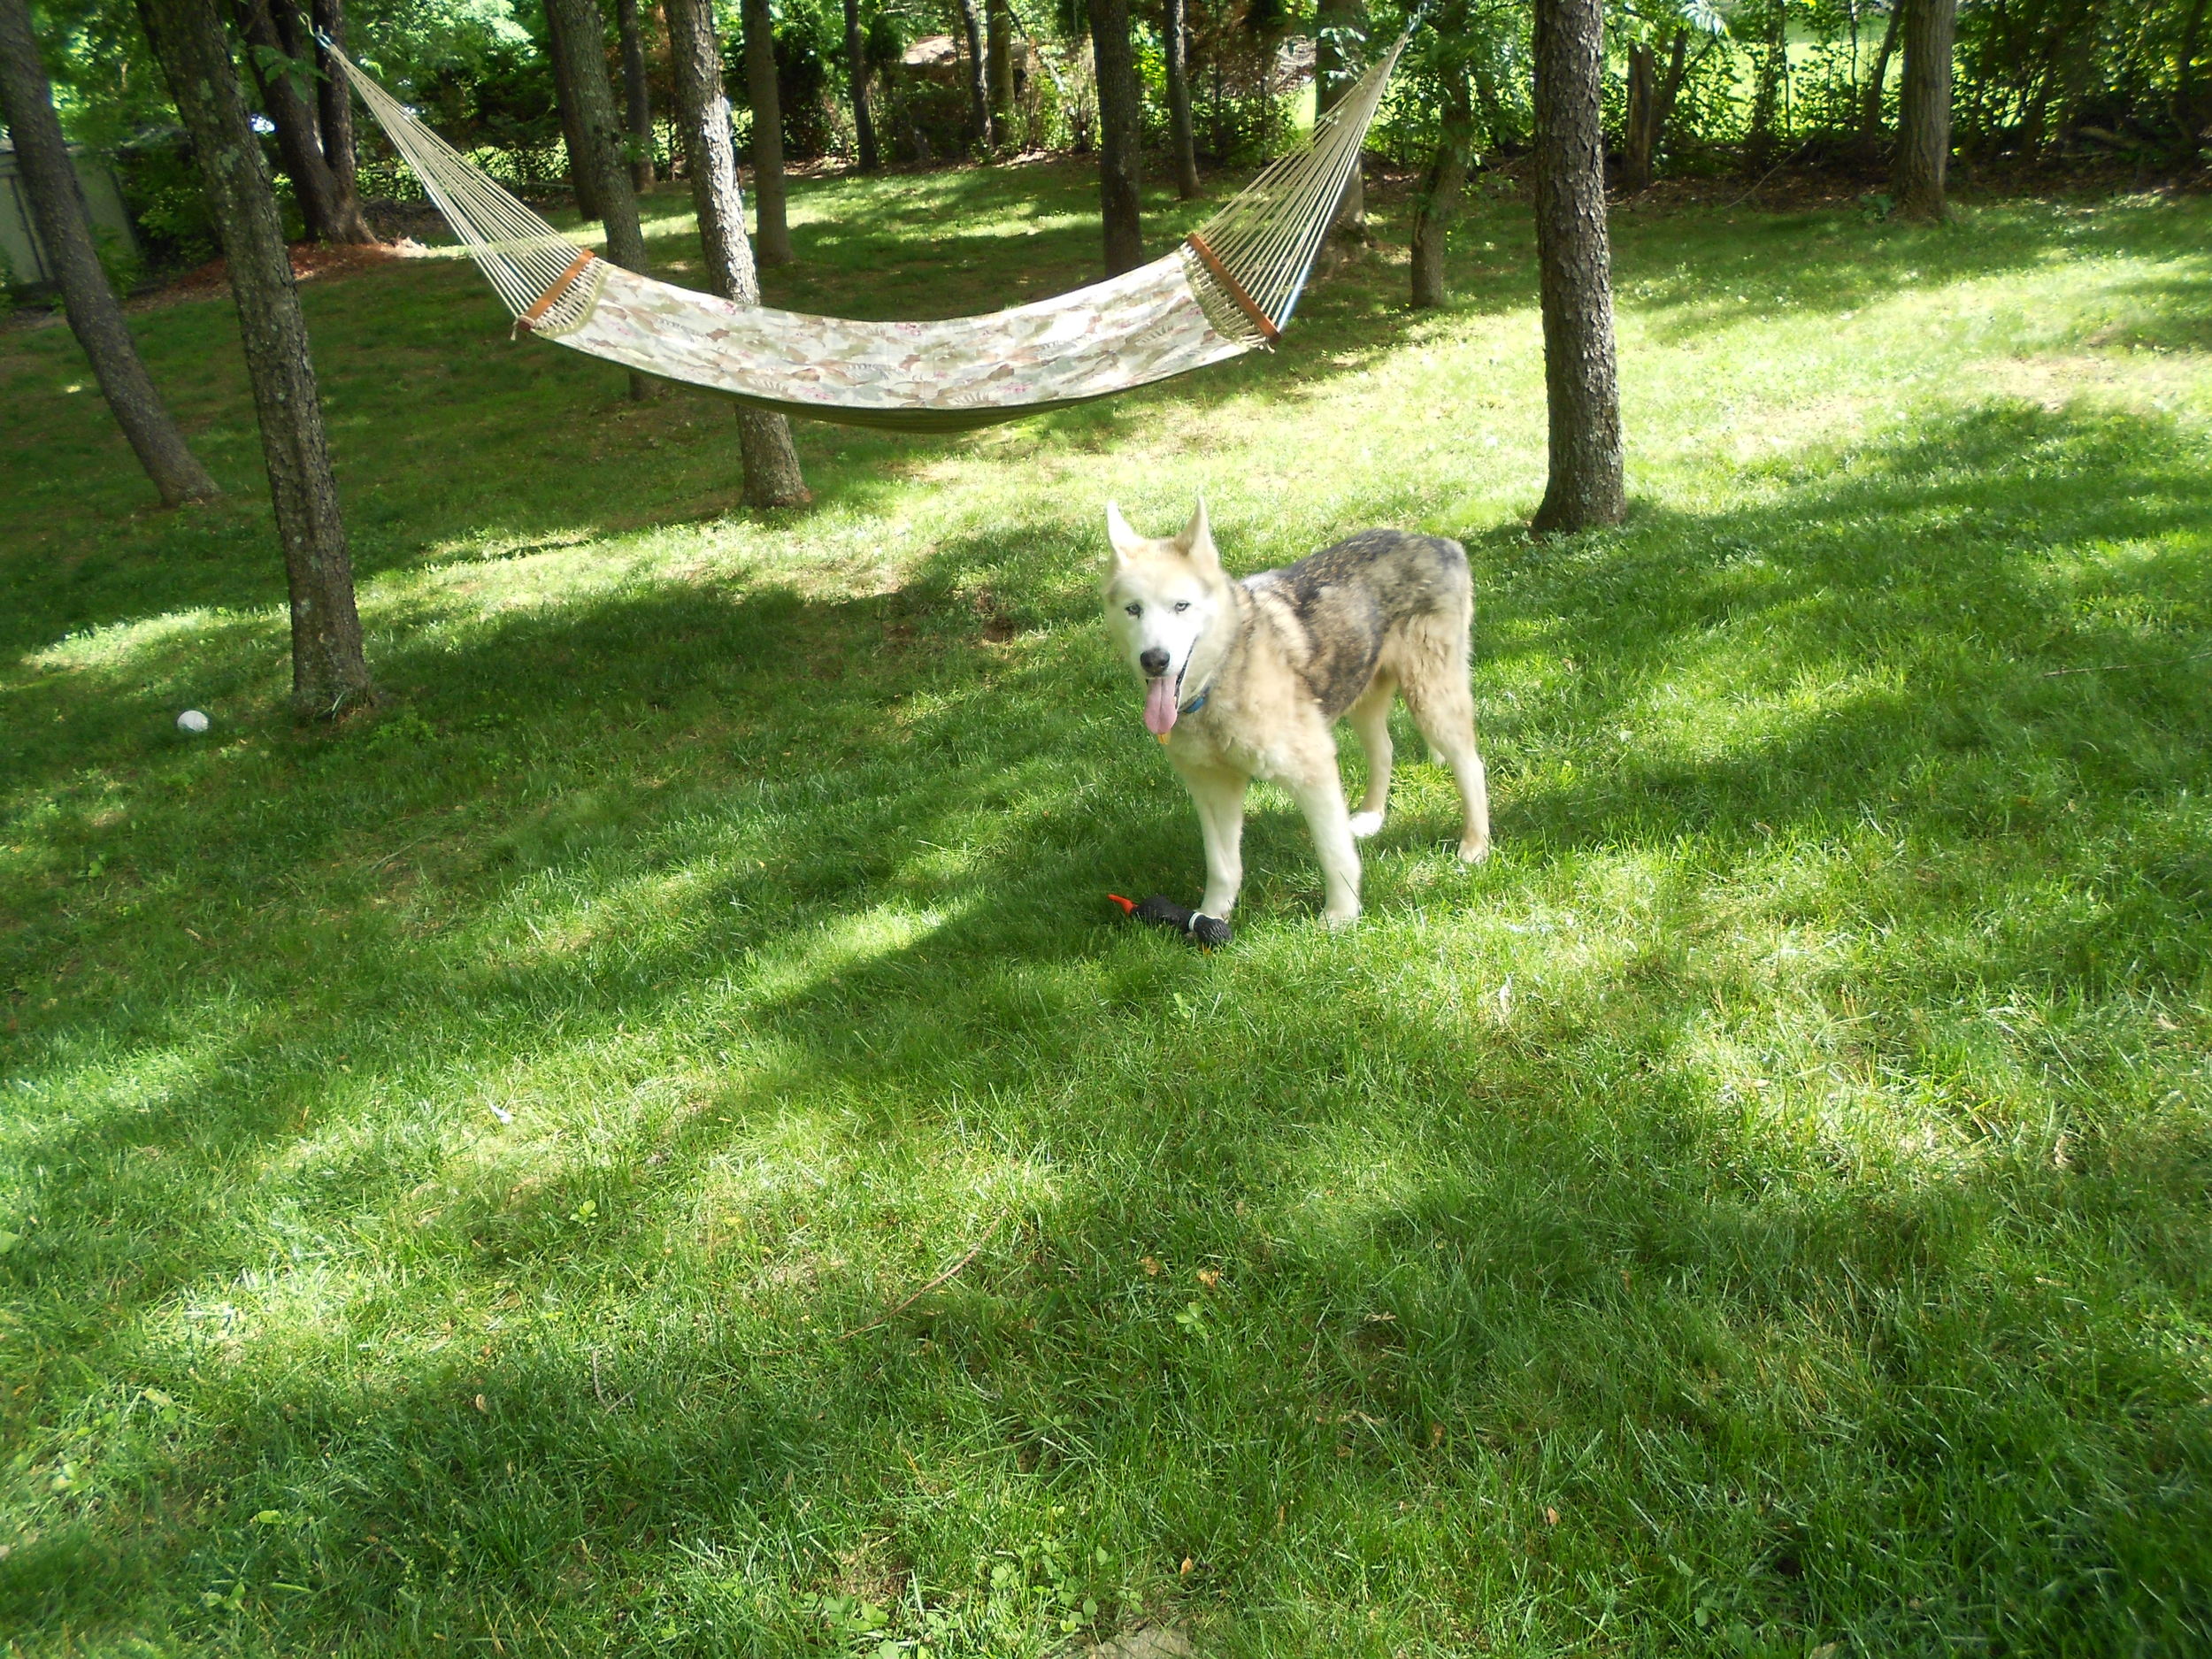
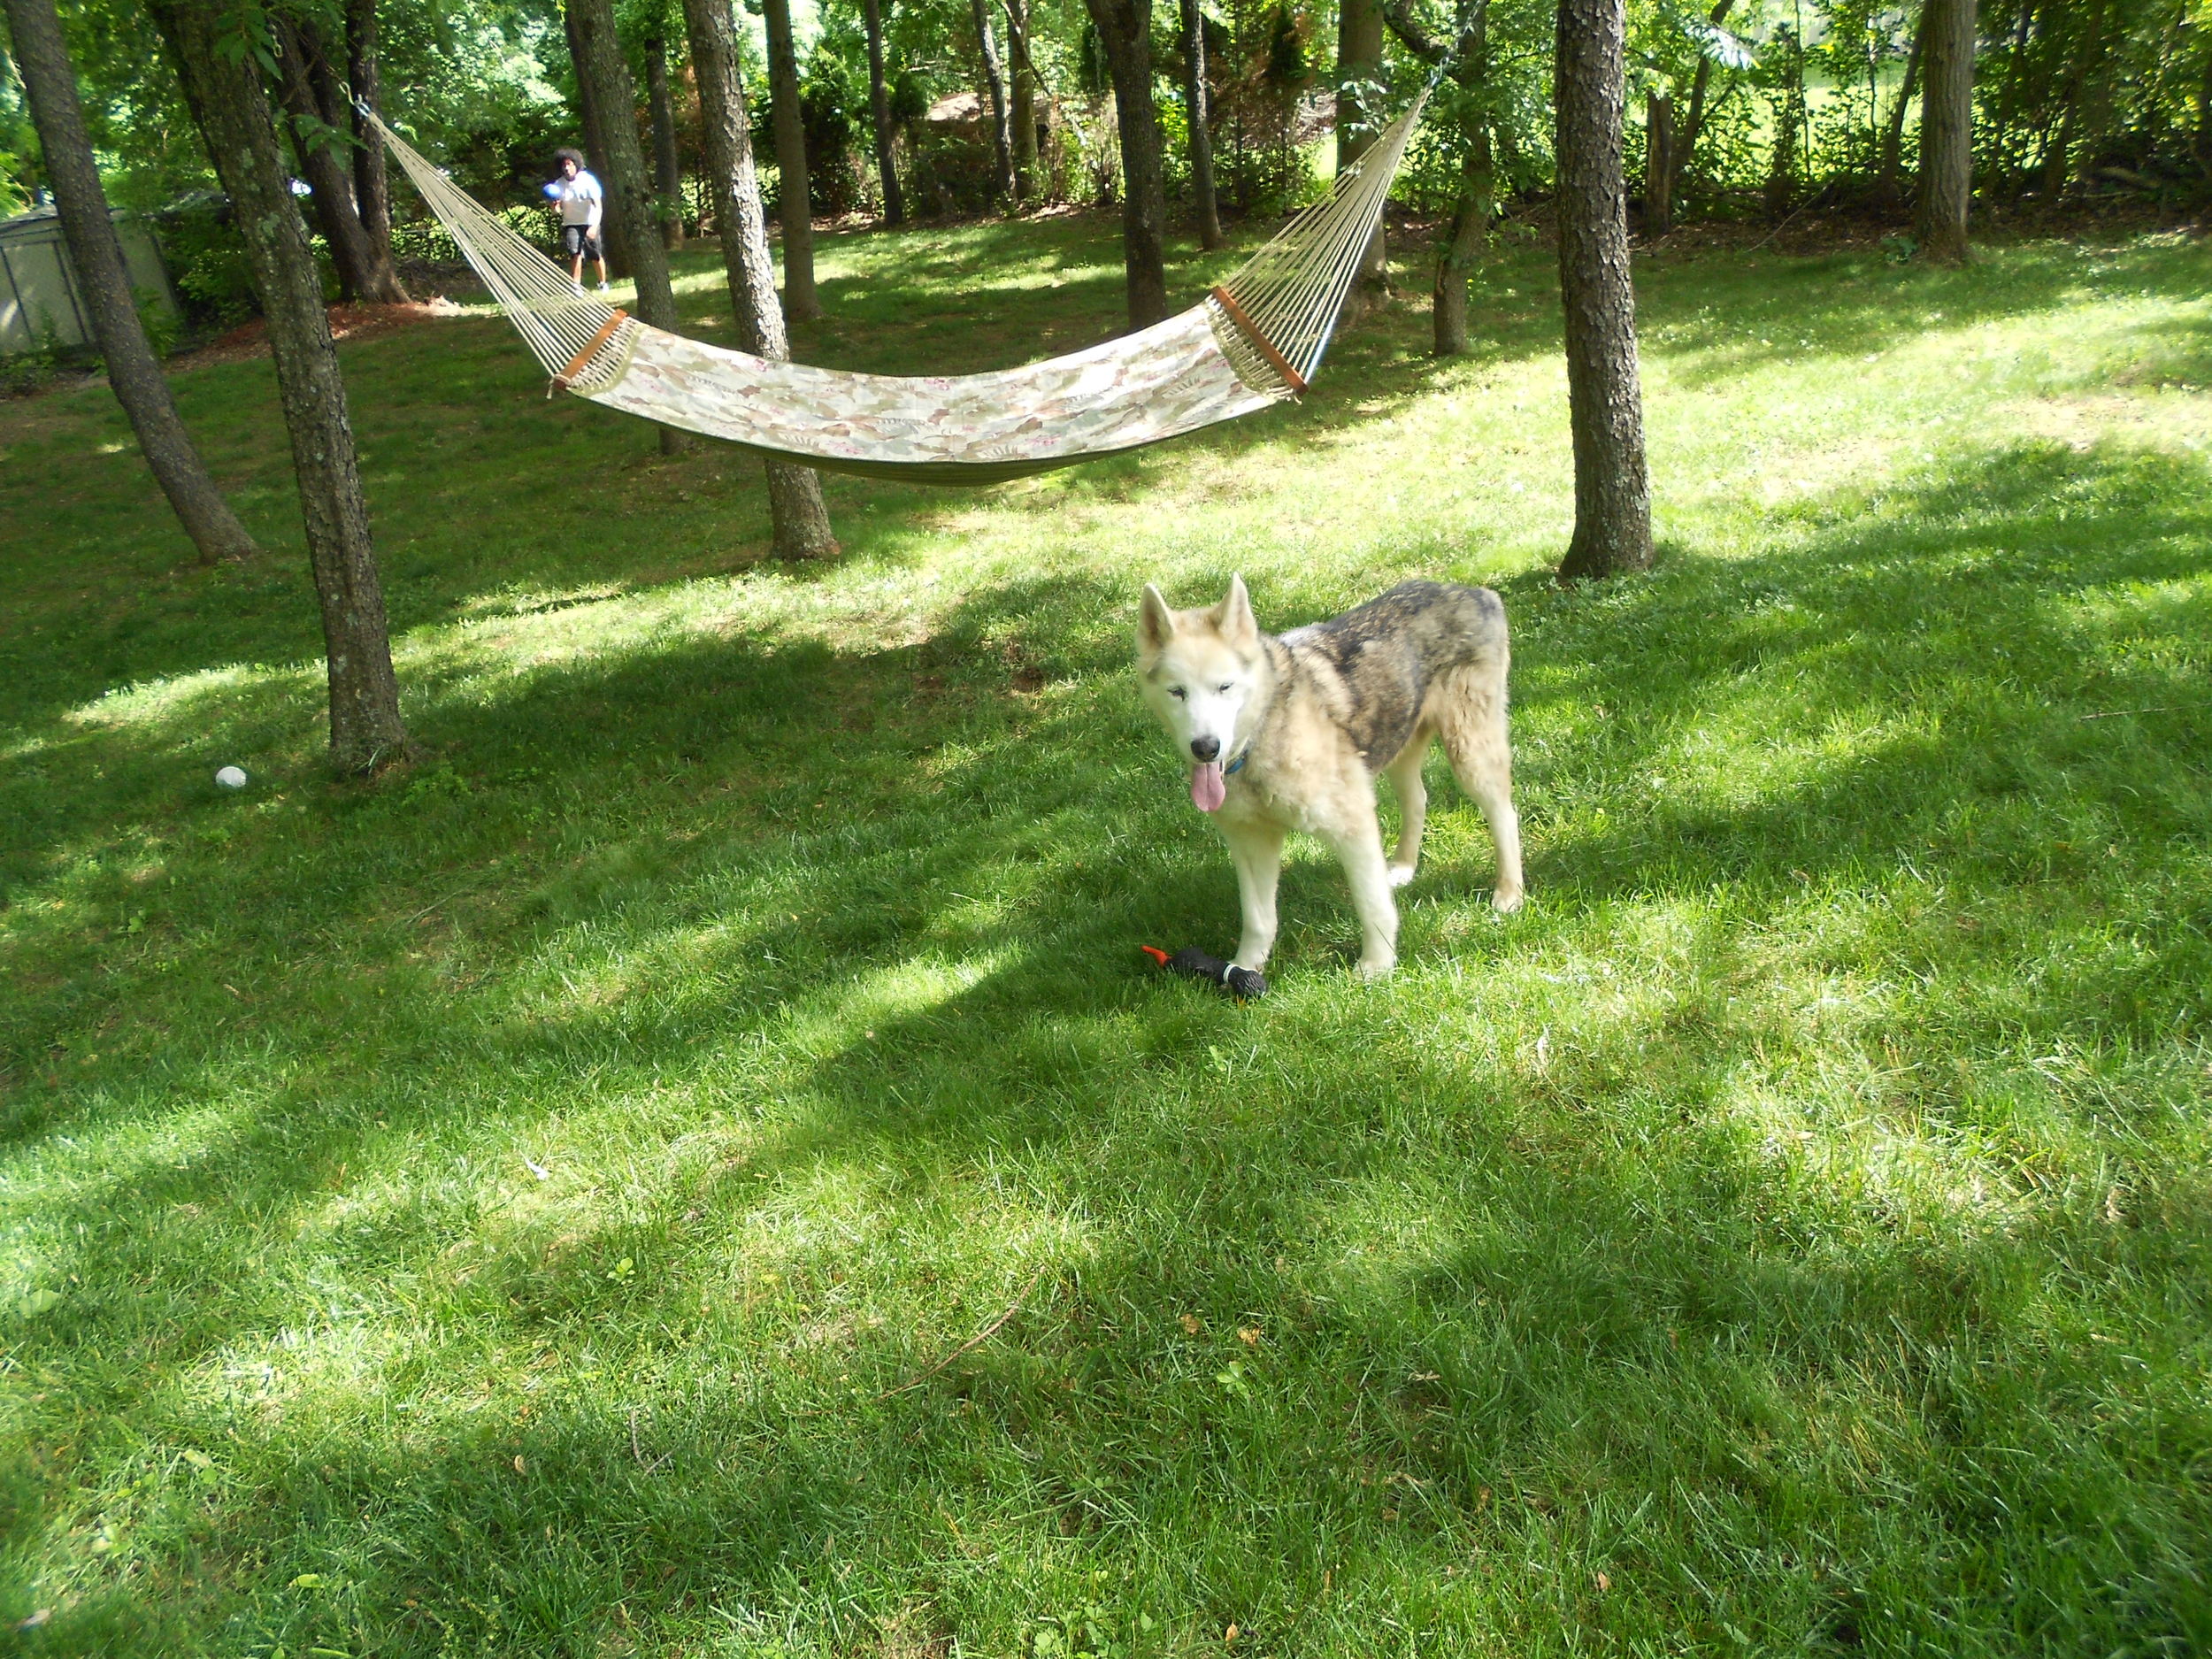
Earlier this month, my dog, Buster passed away after a full (dog) life of 16 years. Having grown up with him and caring for him as he got older and as his health deteriorated, I was devastated. I was also relieved that he no longer had to struggle day by day and could finally rest easy. He naturally left us in his sleep on March 3rd, 2016 and will forever be remembered as the greatest addition to my family.
Just a few weeks prior to his passing, I had created a print from an illustration of his beautiful blue eyes on performance pique. This fabric has since arrived and I have created a structured wrap crop top lined with black stretch jersey ITY knit, which is also used to create the loose tie bands attached to the back bodice. Both of these fabrics have a lot of stretch to them, however in an effort to make this top more structured and sturdy, I added interfacing to all pieces of the front and back bodice between the main fabric and the lining. Doing so removed all the stretch this fabric once had, so I therefore found it best to add tie bands (reminiscent of a wrap blouse) as the closure to this piece. I am pleased with the outcome, as I think the closure adds a romantic flare and the exposed back contrasting with the high neckline of the front of the top is a look that I have always been fond of: still a bit sexy, but not revealing. The top is also more easily adjustable.
I paired this top with deep royal blue stretch polyester knit pique high waist, wide leg pants. This fabric also has stretch and has a subtle texture to it that I think contrasts nicely against the smooth surface of the crop top.
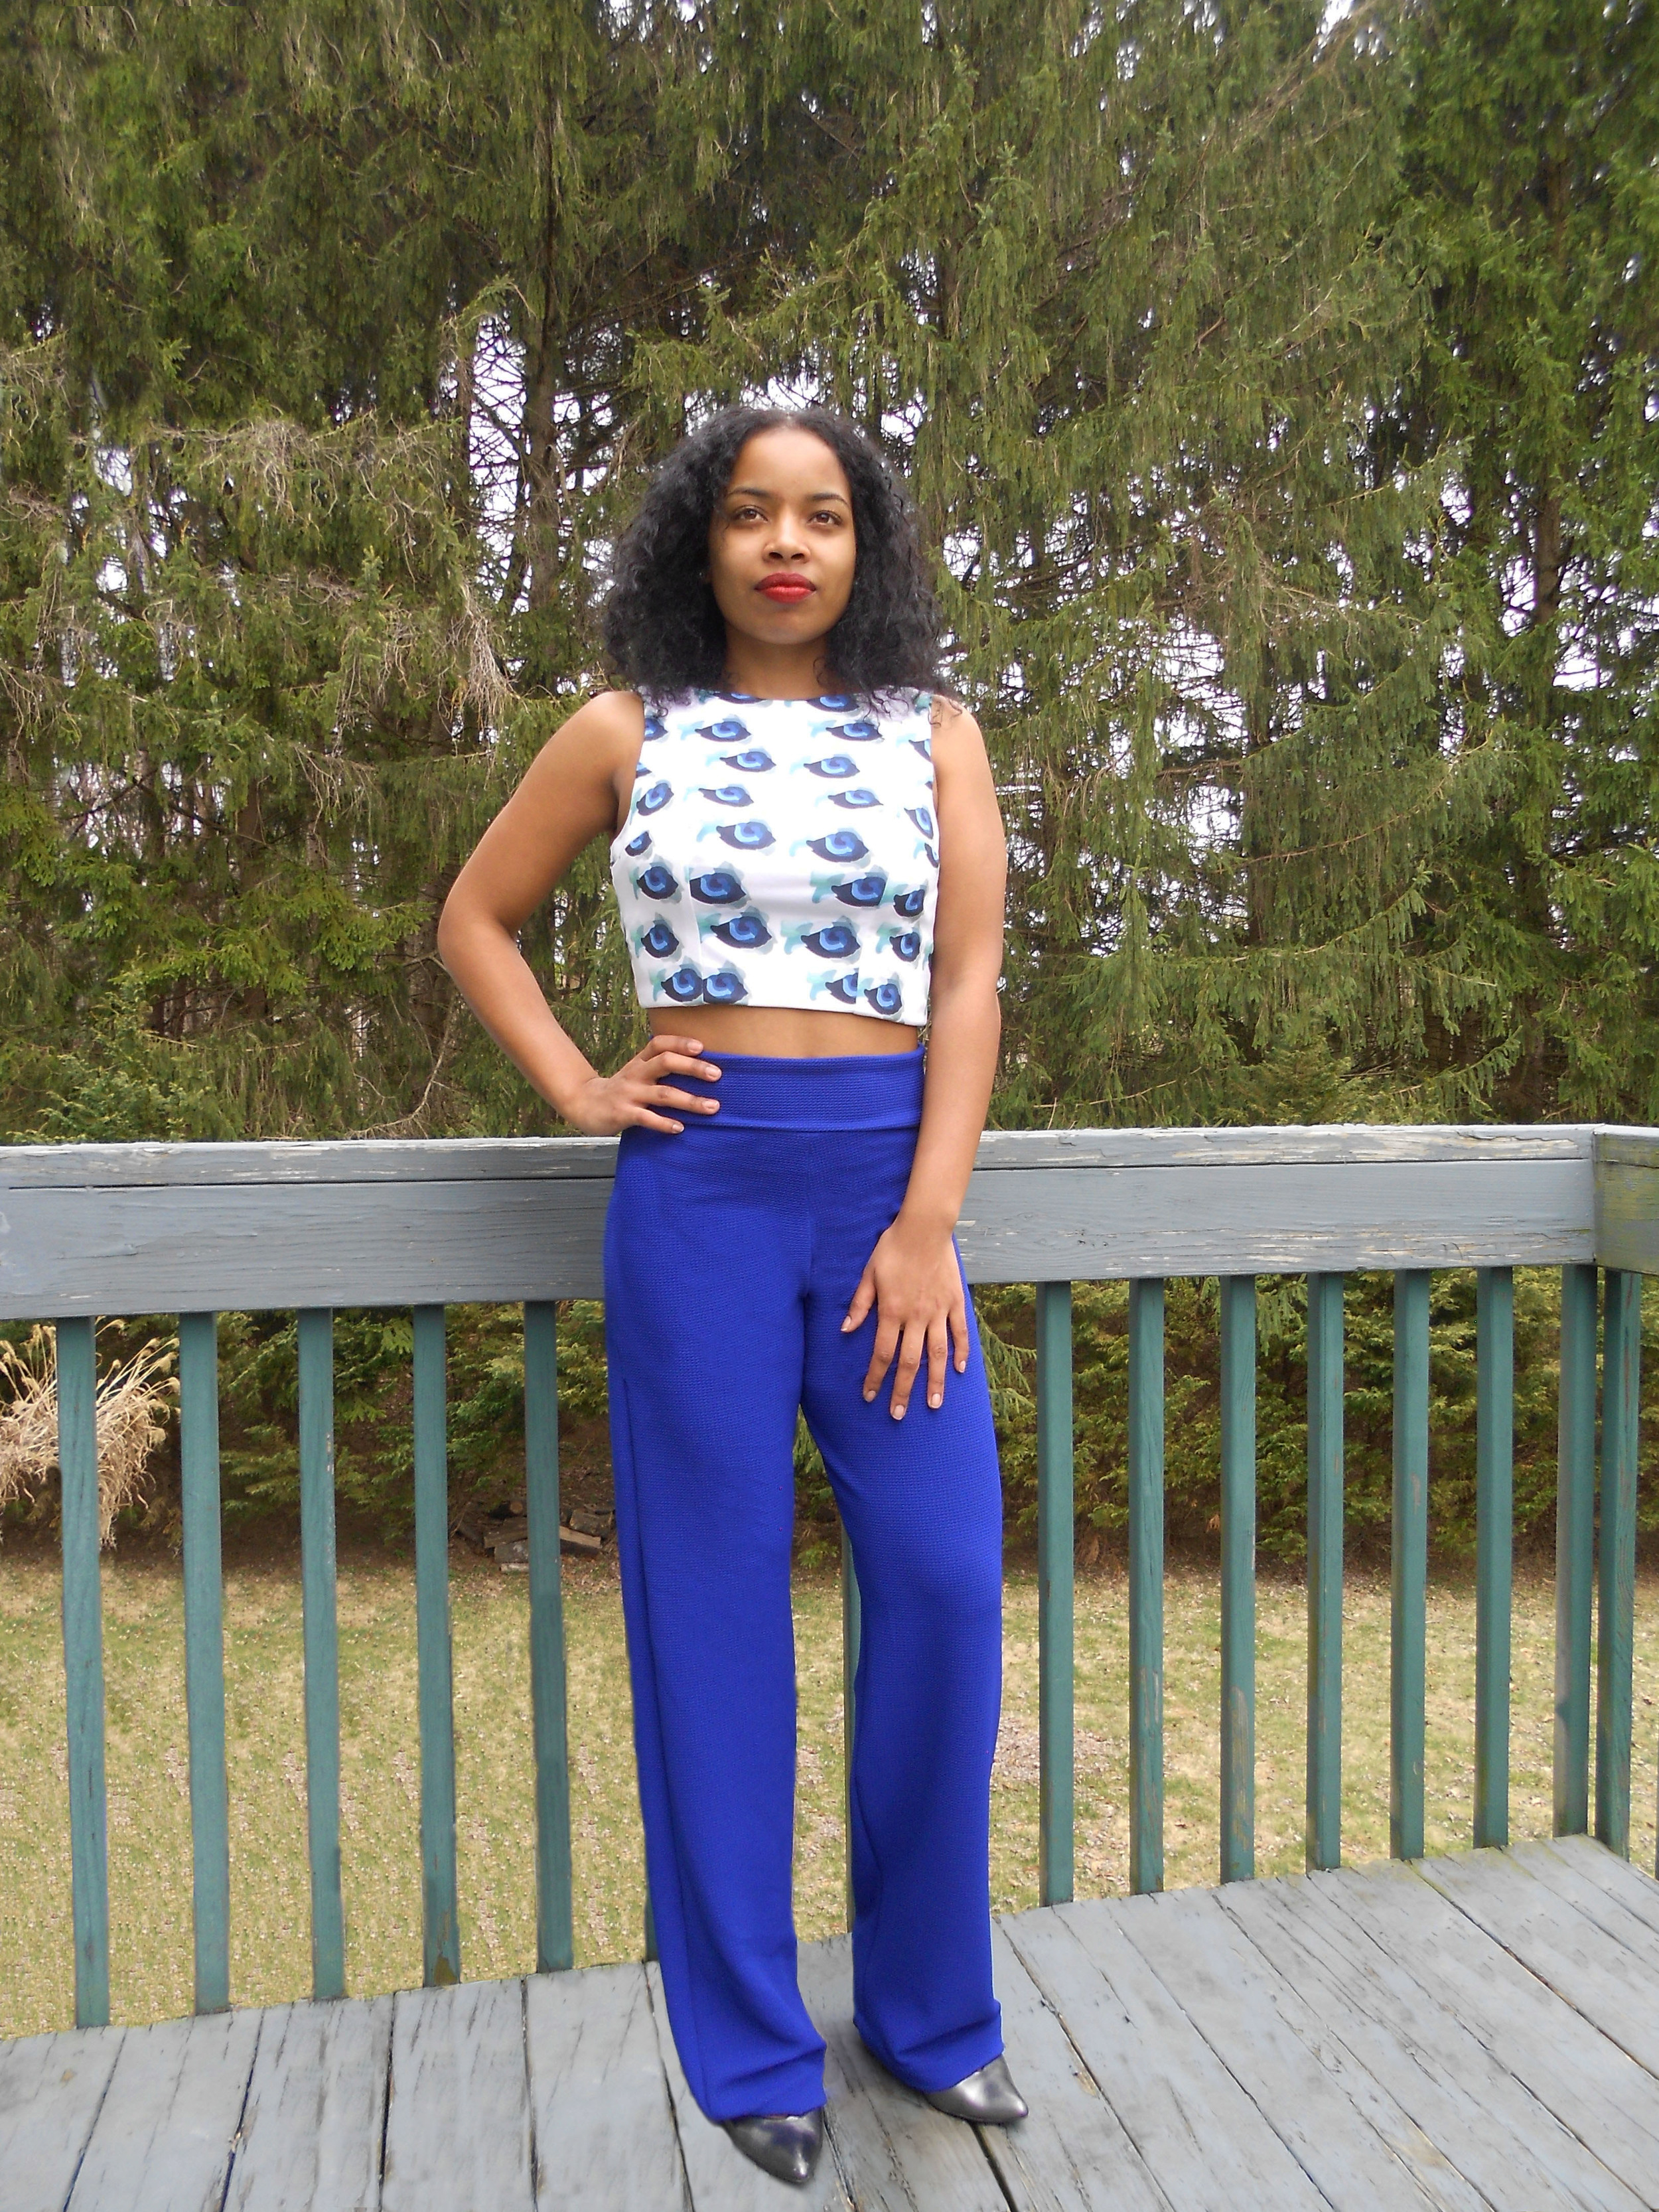
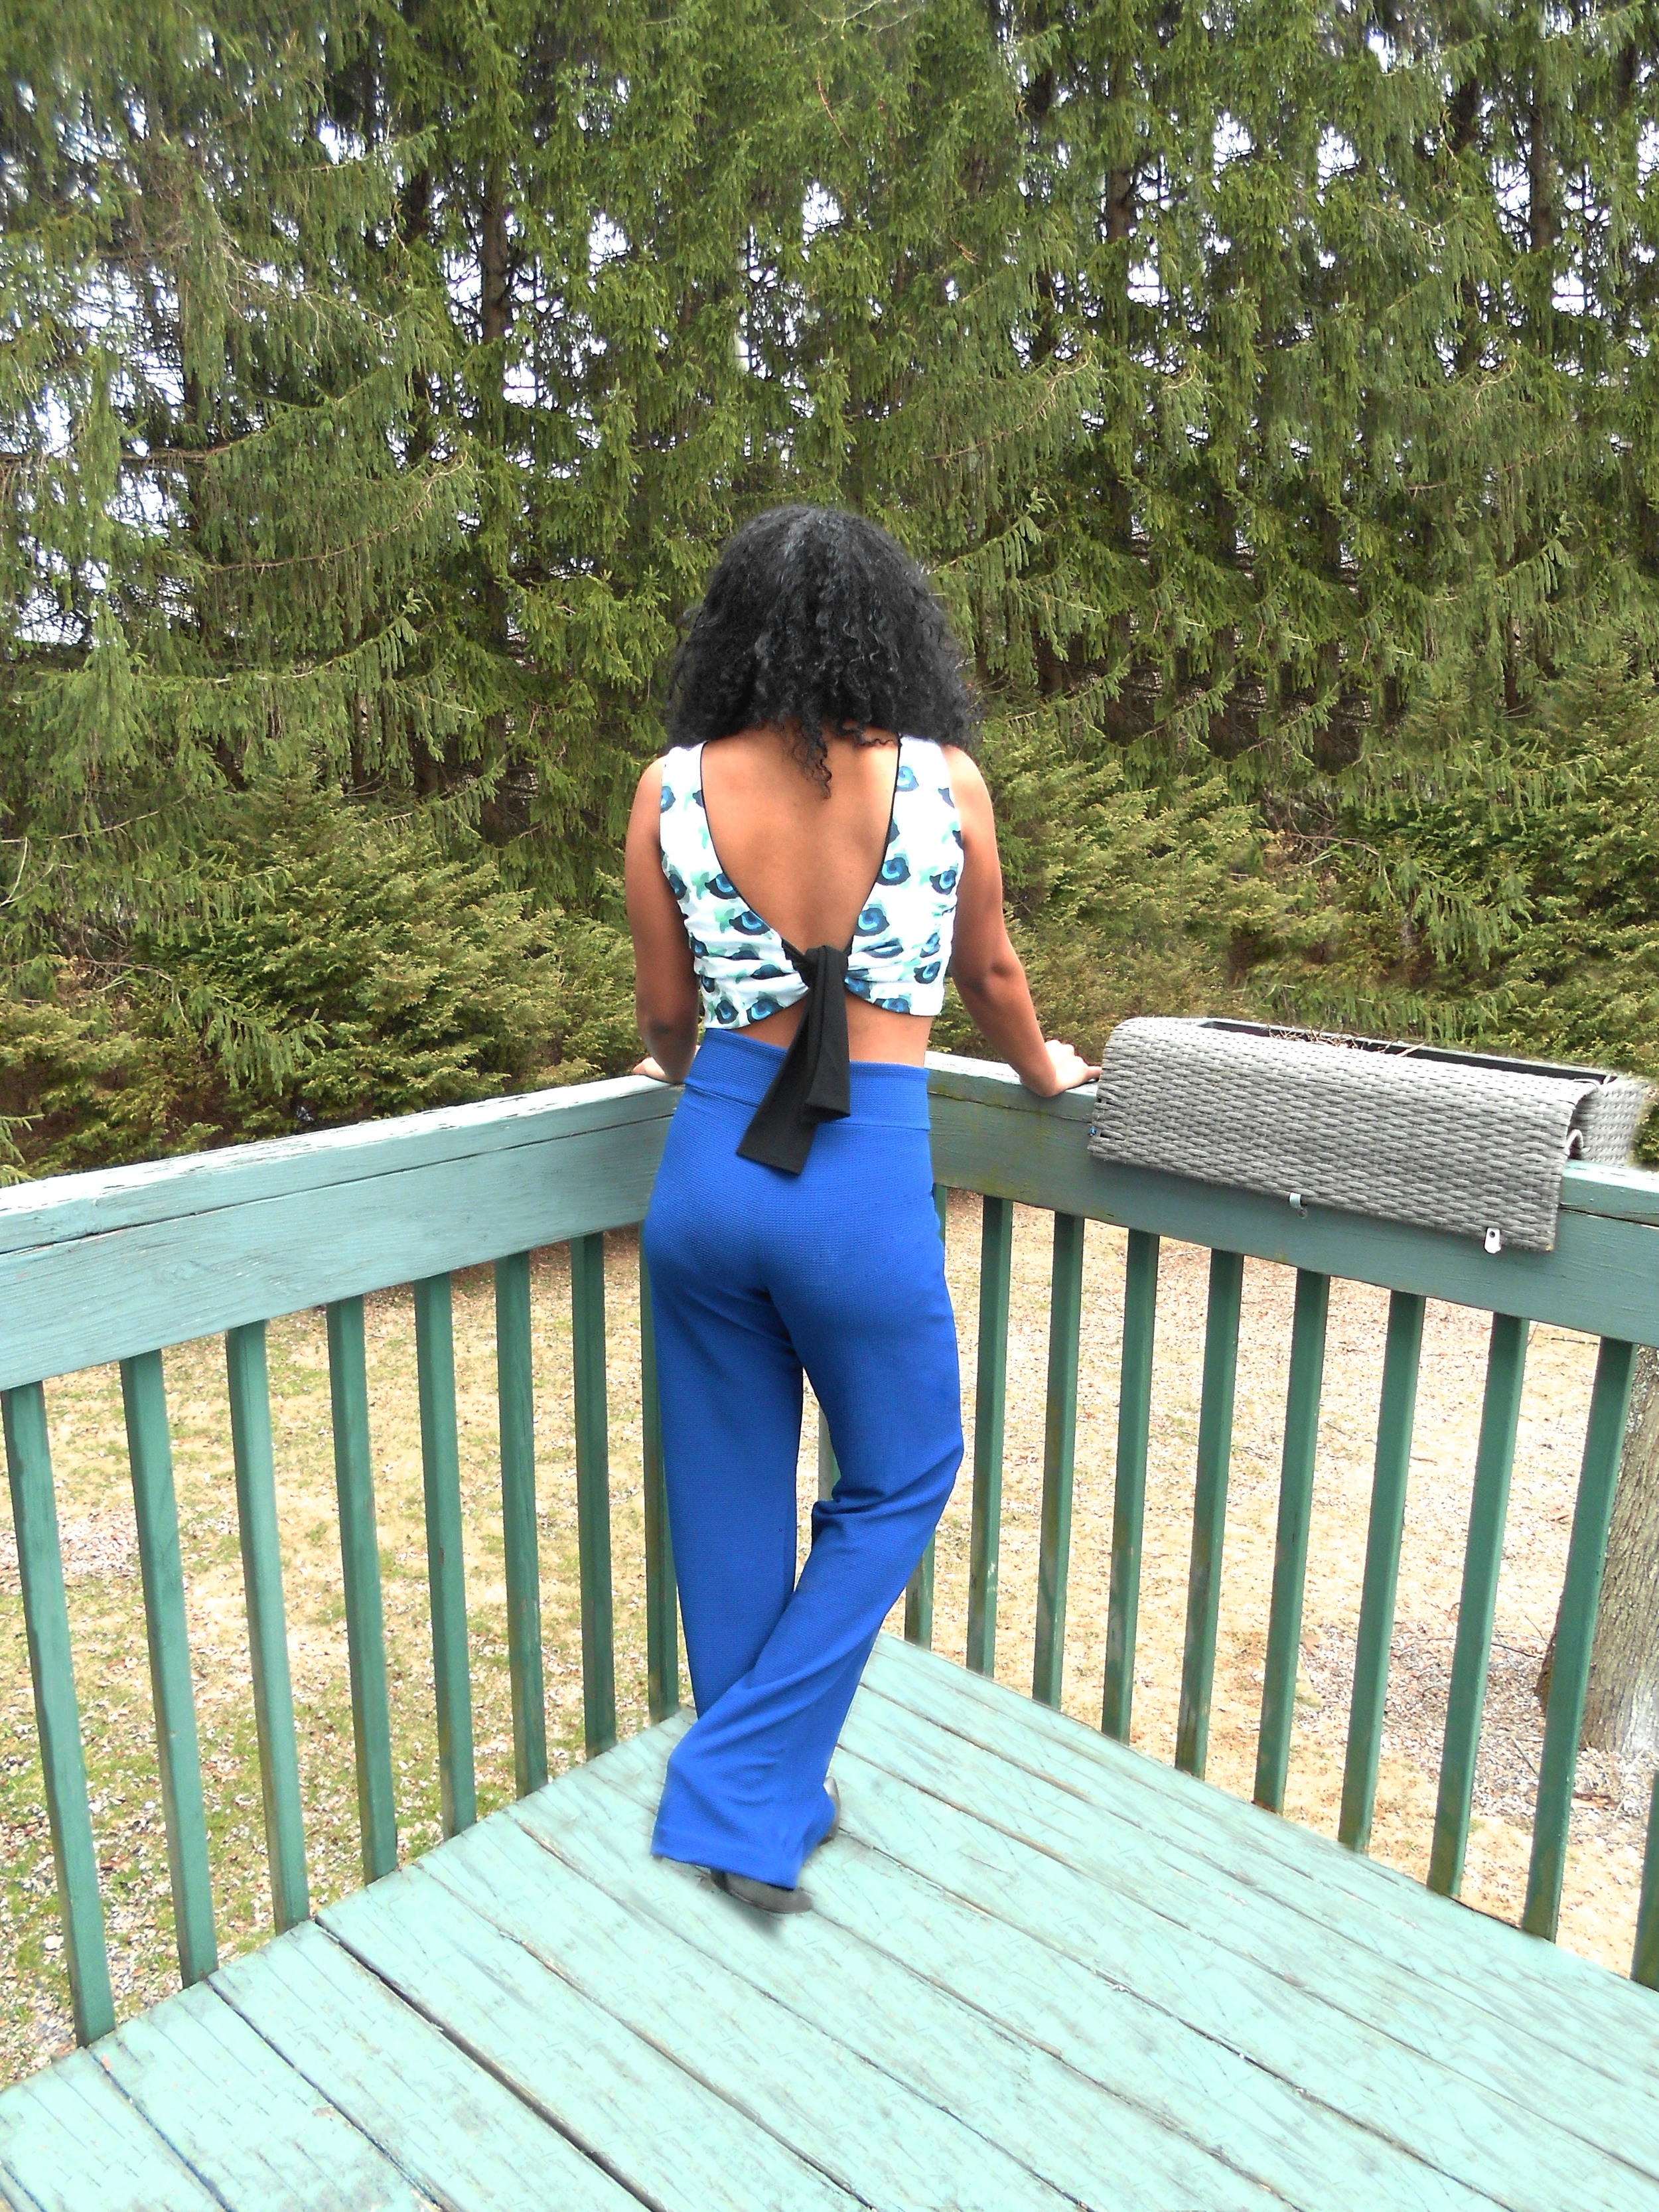
Top fabric: created through Spoonflower | Pants fabric: Mood Fabrics
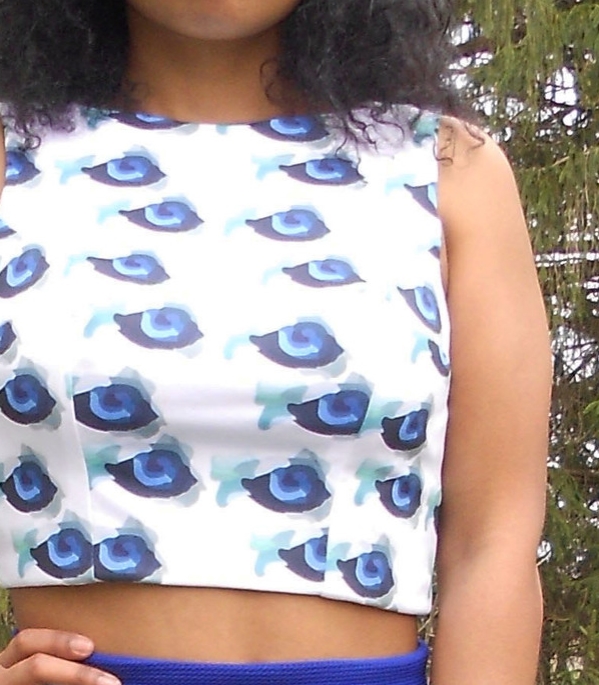
The eyes that inspired this print and look.
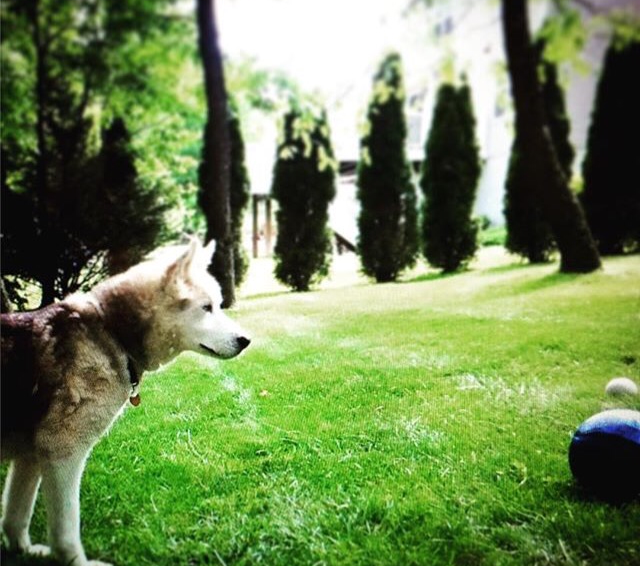
This outfit was created prior to Busters passing and the fact that I was inspired by his beautiful blue eyes, may have been his way of saying bye and ultimately further leaving his mark on my life. Whatever the reason, I am extremely grateful for the impact his presence has had on my life and the level of appreciation, fulfillment, and kindness that develops from caring for not only a pet, but a member of my family. My family and I miss him dearly but take comfort in remembering the amazing memories we shared together.
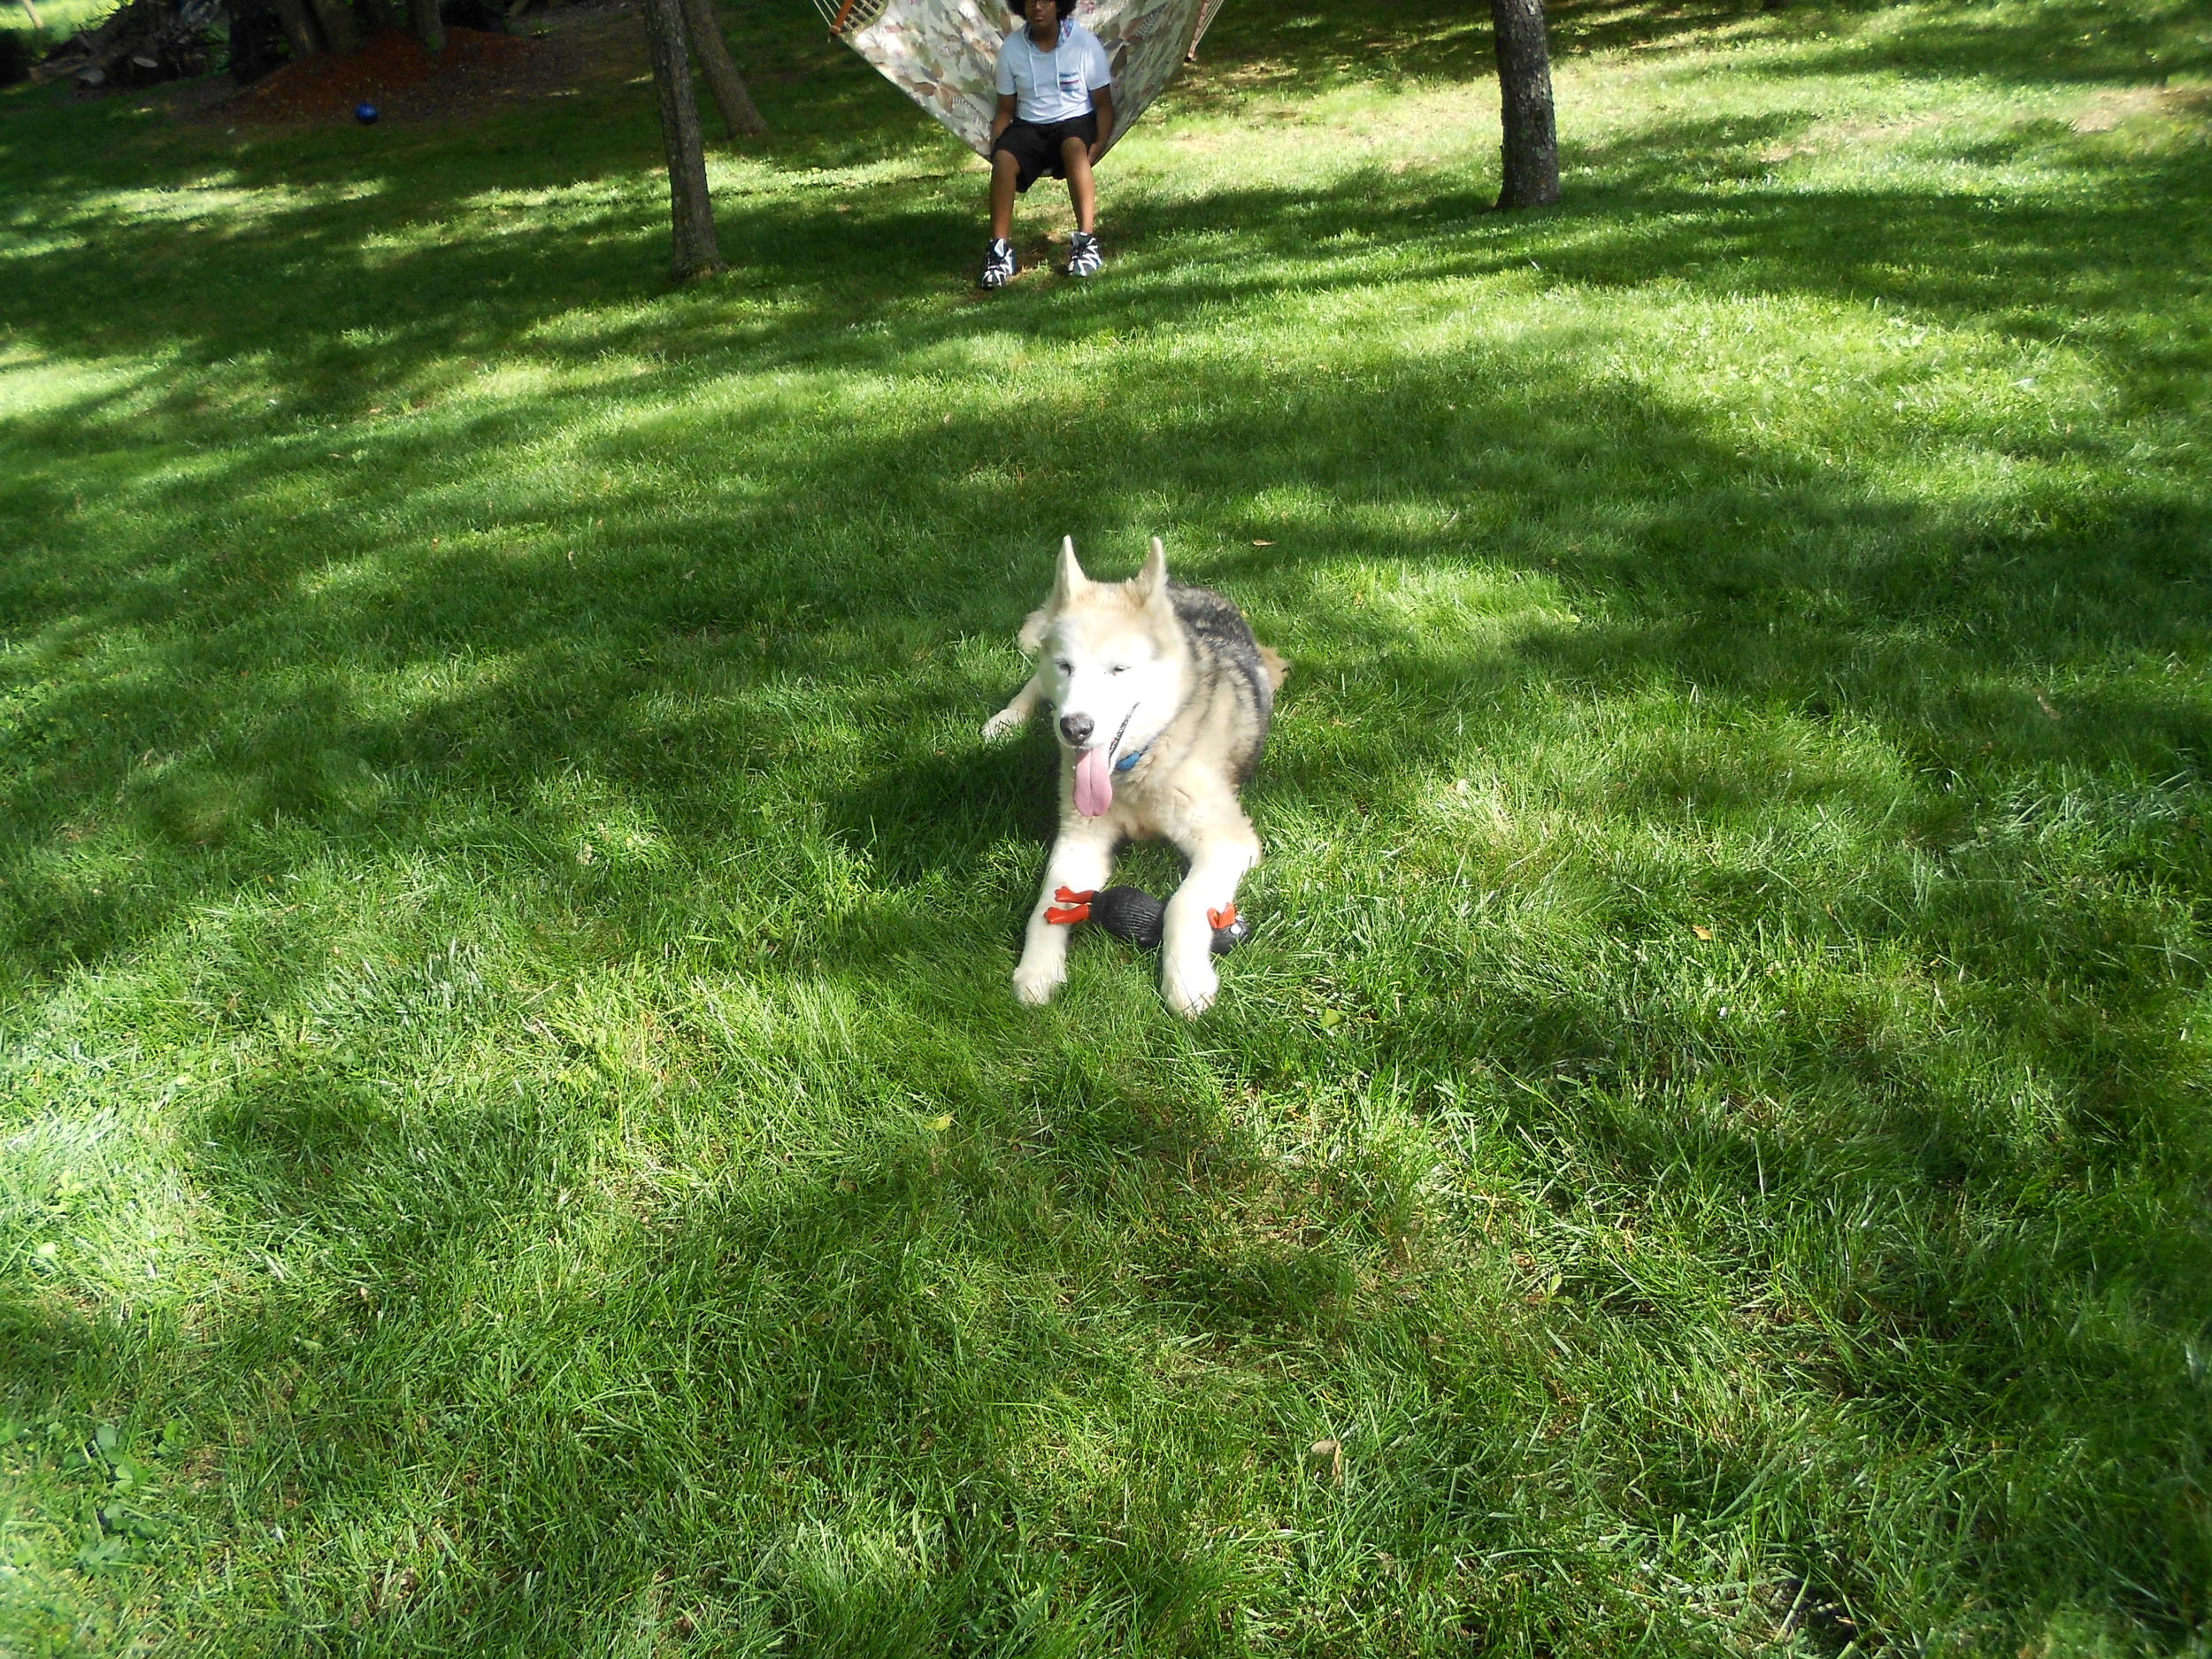
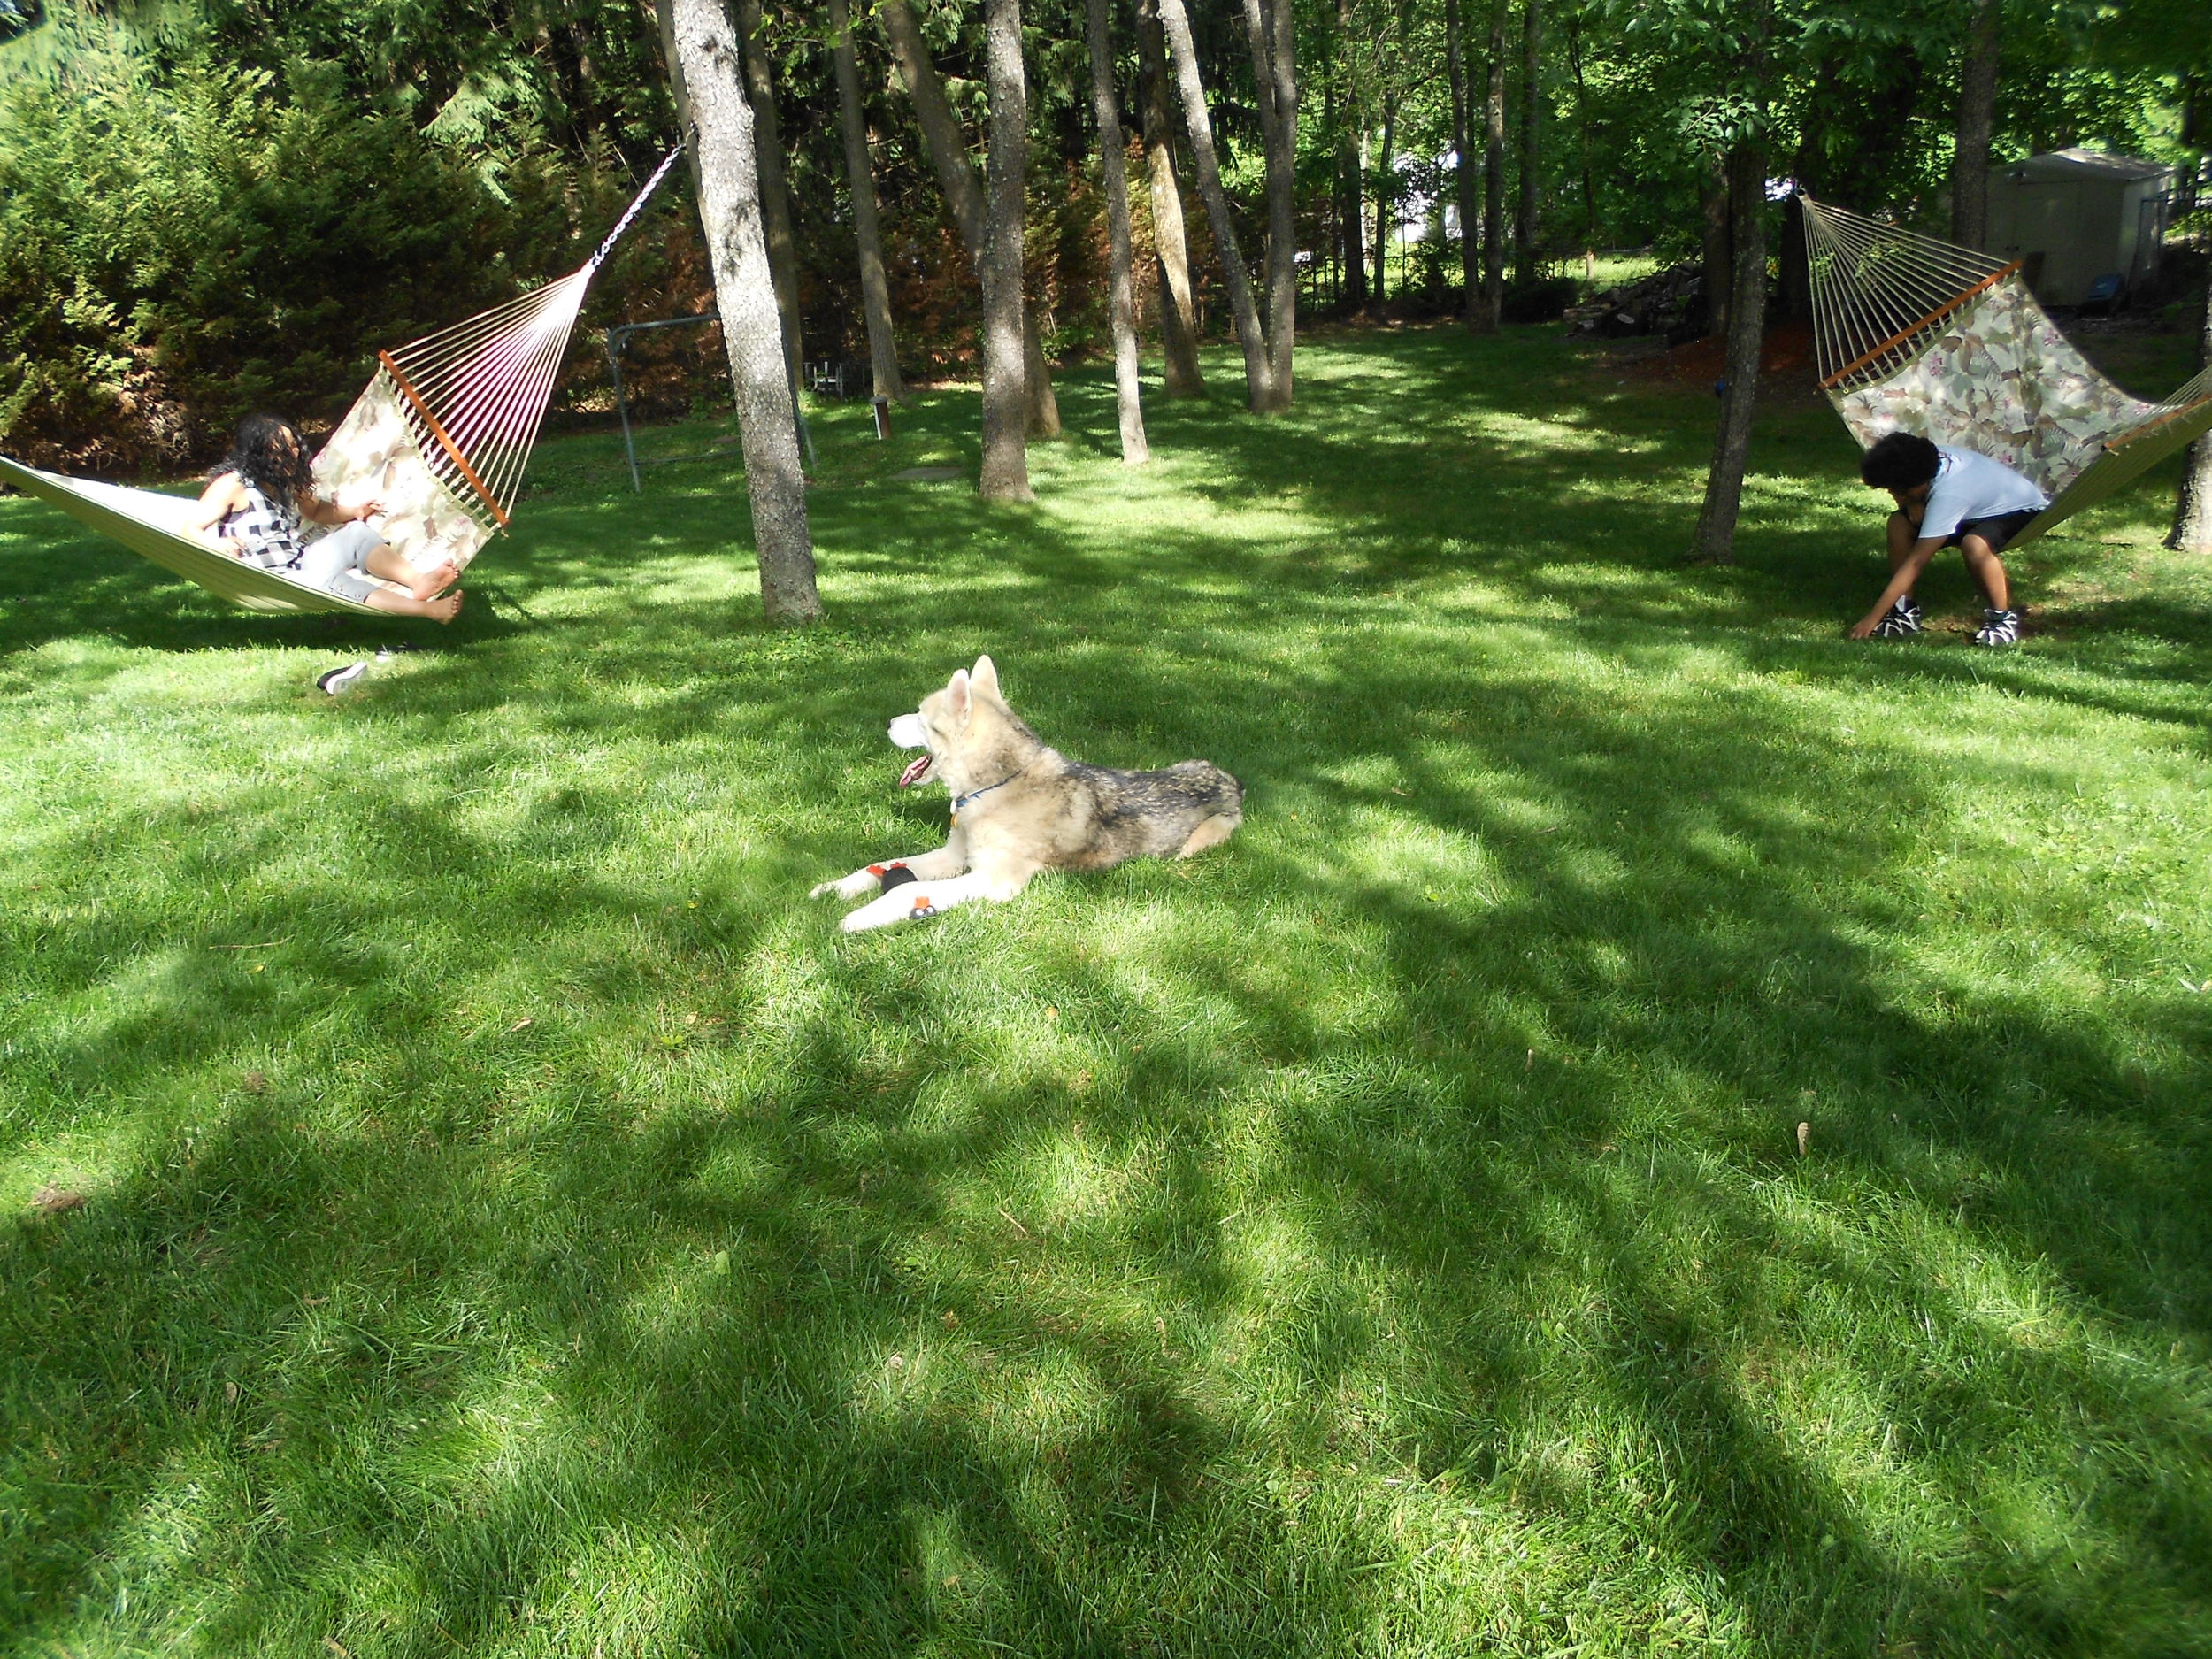
These photographs were taken on a balcony overlooking our backyard where he spent his life exploring, playing, following my dad as he mowed the lawn, and relaxing with us warm spring and summer days. While capturing these photographs, I couldn't help but envision him rolling around in the rich green grass with an expression of pure enjoyment, excitement, and tranquility.
Rest in Peace my blue eyed baby, Buster Lalite.
Miss you.
xo
Winter Blues
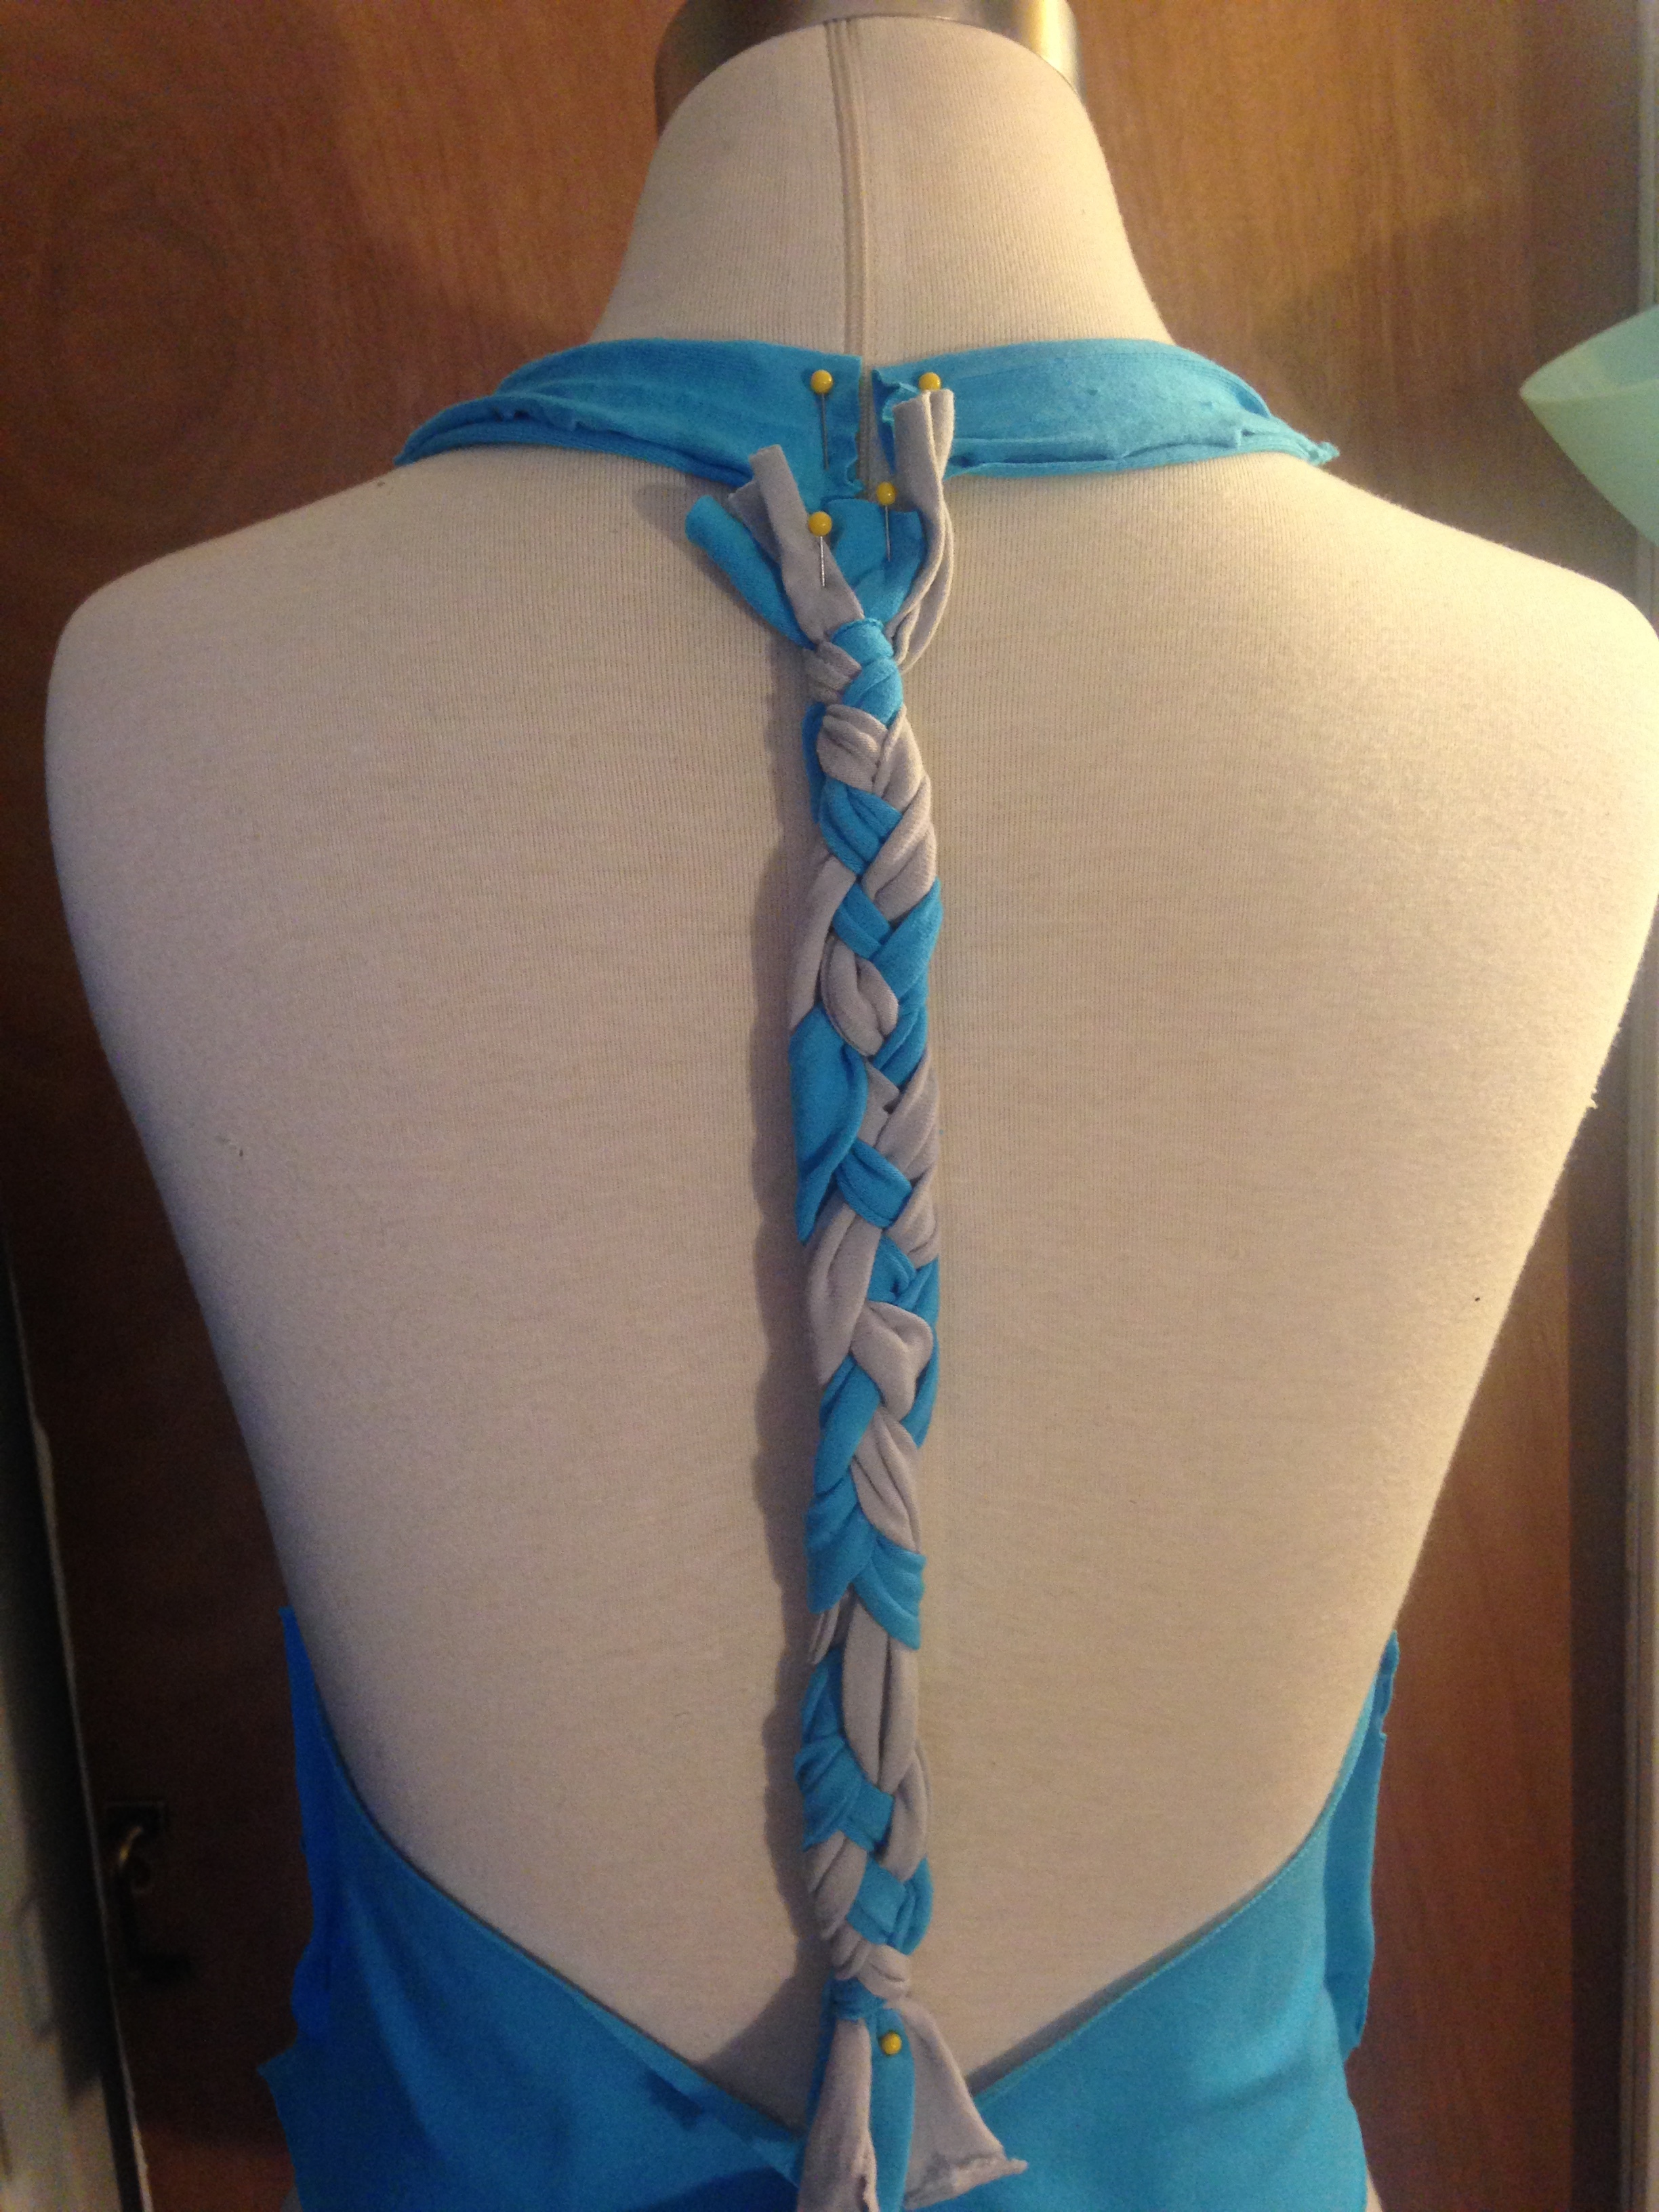
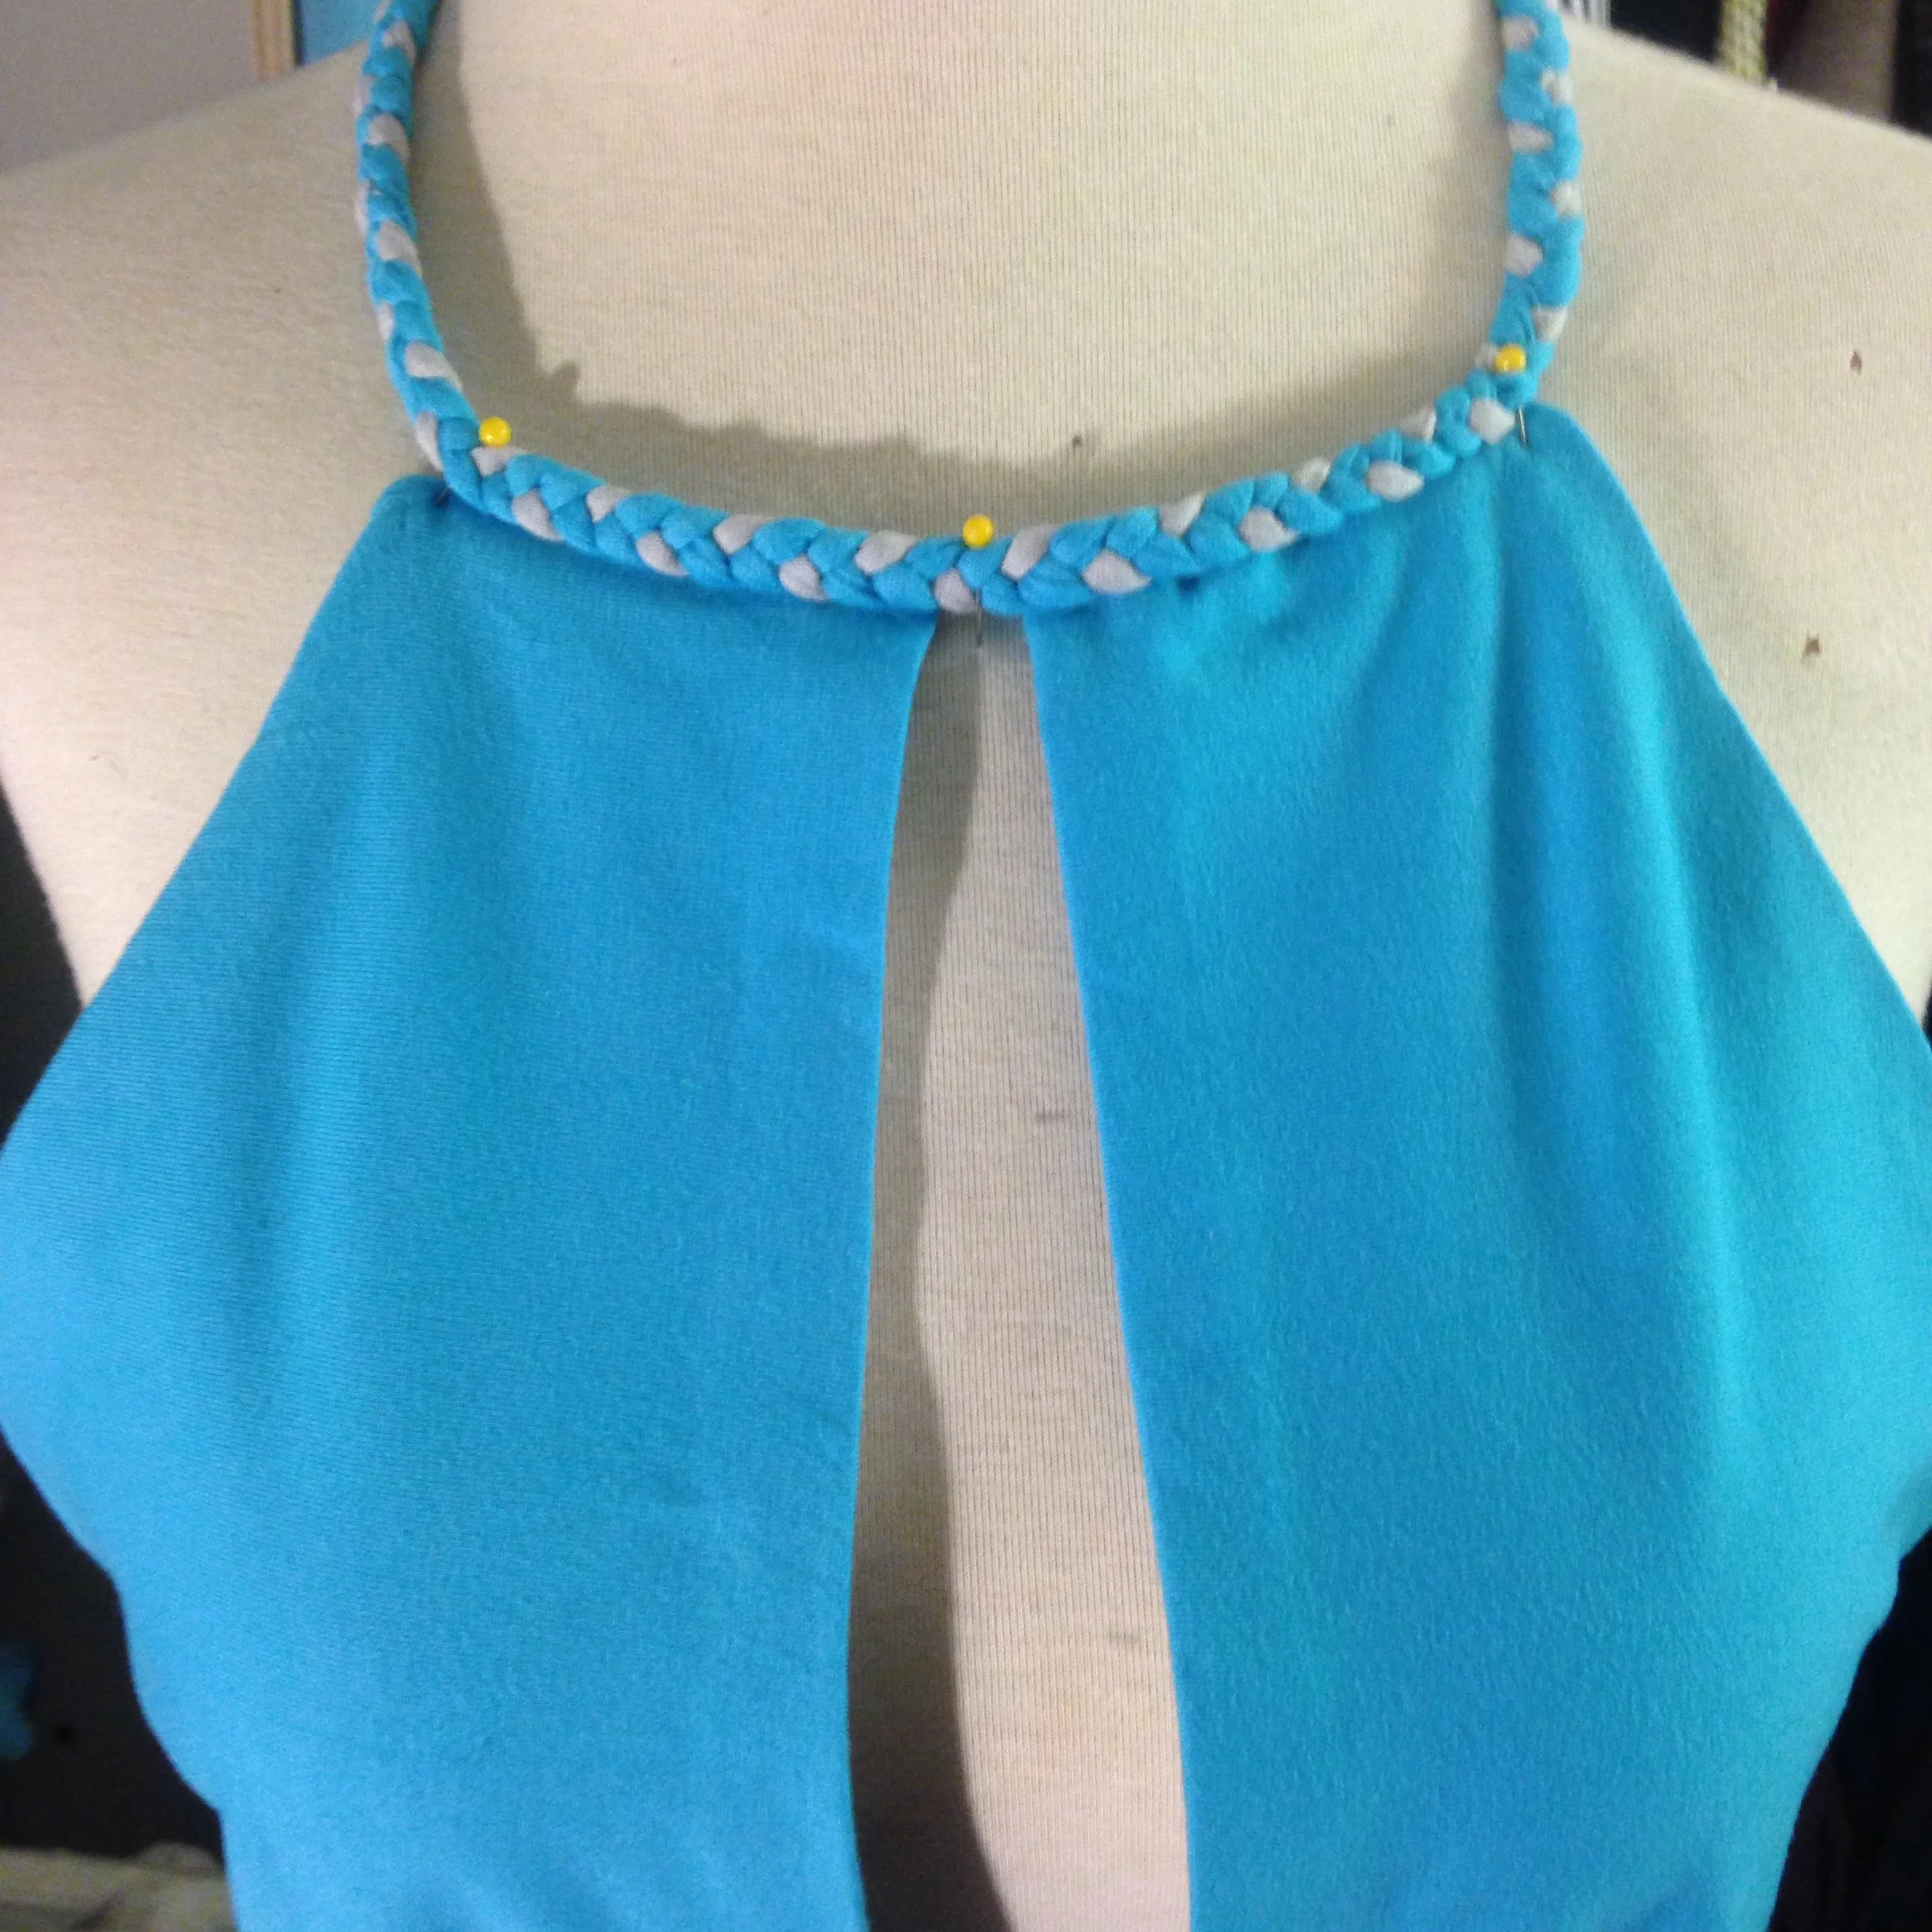
It's a snow day. It's cold. And despite spending it drinking hot coffee and staring at the snow covered sidewalks from the comfort of my warm room, it's inevitable to still feel those winter blues. But feeling the blues isn't always a bad thing. My interpretation has actually been quite literal as I find myself attracted to shades of blue lately. I've also felt the urge to challenge myself with new projects; one being creating a gown. As my style has always been a bit on the bohemian side rather than full scale glamour, my vision of a gown involved a soft and flowing jersey knit and weaving detail. Now, this is still in it's early stages, but I have to say I'm excited about my progress so far. I chose a calming turquoise jersey that I combined with a not-so-bright grey. So far, I incorporated a braided weave trim to the neck line and plan on adding a looser weave as an accent to the center back. Stay tuned!

Another new challenge I've taken on is textile design. I discovered a website, Spoonflower.com, which allows you to upload your own illustration to have printed on a fabric of your choice. Below is a swatch of a print I did as a trail. This is an illustration I created of the beautiful blue eyes of my Alaskan Husky, Buster. I'm so thrilled with how the print came out, that I will definitely be ordering yards of this fabric! I haven't decided what it will be used to make just yet, but the ideas are cultivating. Suggestions for designs are welcome!!
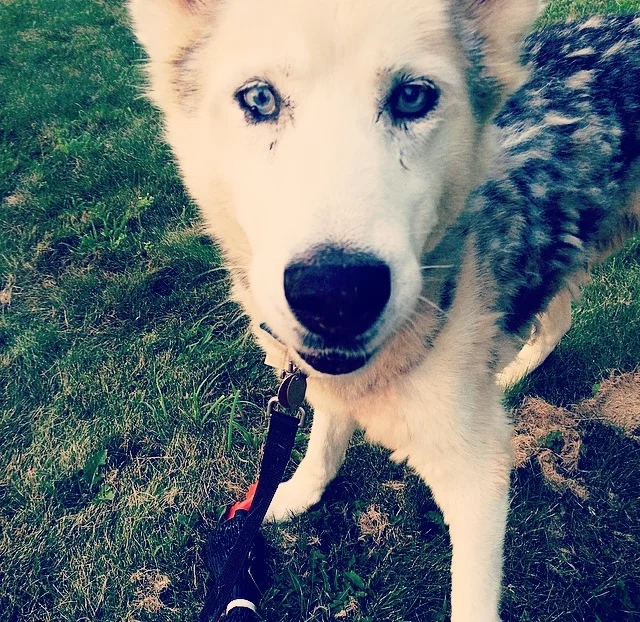
My muse- Buster Blue Eyes
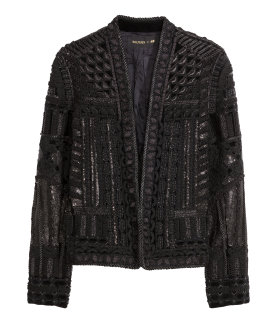
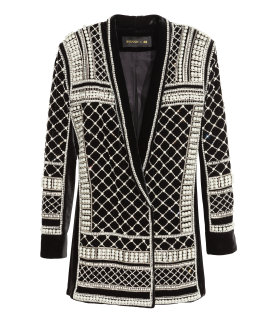
"Thinking in Textures"
Like many designers, I am an extremely visual person. Unlike many designers, my design process does not start with a sketch. It begins with the fabric and a major aspect that influences my fabric choice is texture.
Of my five senses, sight is the most engaging. The only other sense that plays a huge role in my design process is touch. When browsing through rolls of fabrics, my eyes are immediately drawn to two aspects: color and texture. I'm talking boucle, embroidery, tweeds, jacquards and so on. The way I see it, an interesting texture can elevate even the most basic garment. For those with a minimalist style, like myself, texture adds that extra flair that is far from basic. What I also love about a texture is that it draws visual curiosity leading to the desire to feel that fabric. This supports a saying that I am quite fond of (which also happens to be from Transformers): "more than meets the eye".
Below I have found some great textured garments made from a variety of fabrics to give you an idea of what a difference texture can make.

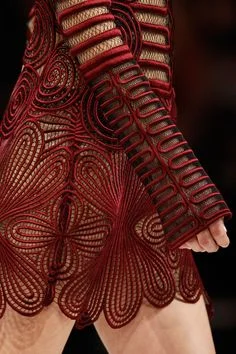
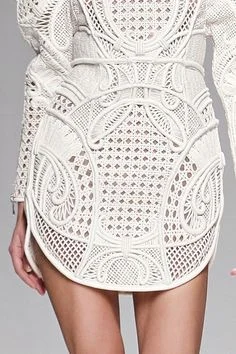
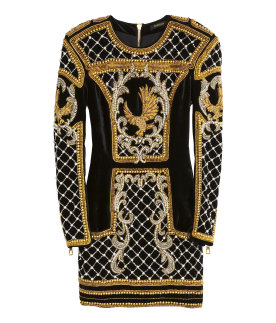
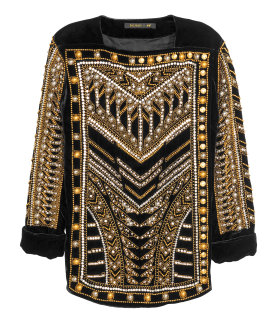
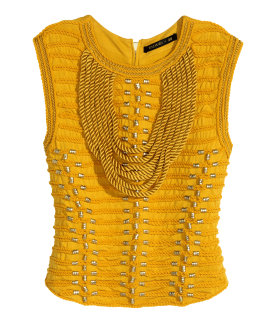
When thinking of textures in fashion, one brand immediately comes to my mind- Balmain. creative director, Olivier Rousteing has delivered a number of collections over the years showing intricate and visually stimulating textures. With the Parisian company's fairly recent collaboration with Swedish mega shop H&M, what better time to highlight how they incorporated their high fashion flair onto the racks of a fast fashion retailer. Check out some of the textured looks from the Balmain x H&M collection below:
The title of this post pays homage to one of my favorite alternative artists, Chet Faker's, debut album "Thinking in Textures". This Australian artist brings all the right elements of R&B and electronic fusion to create ultimate mellow vibes. If you haven't heard him, go listen.
Complete: Sleek Fall/Winter Coat
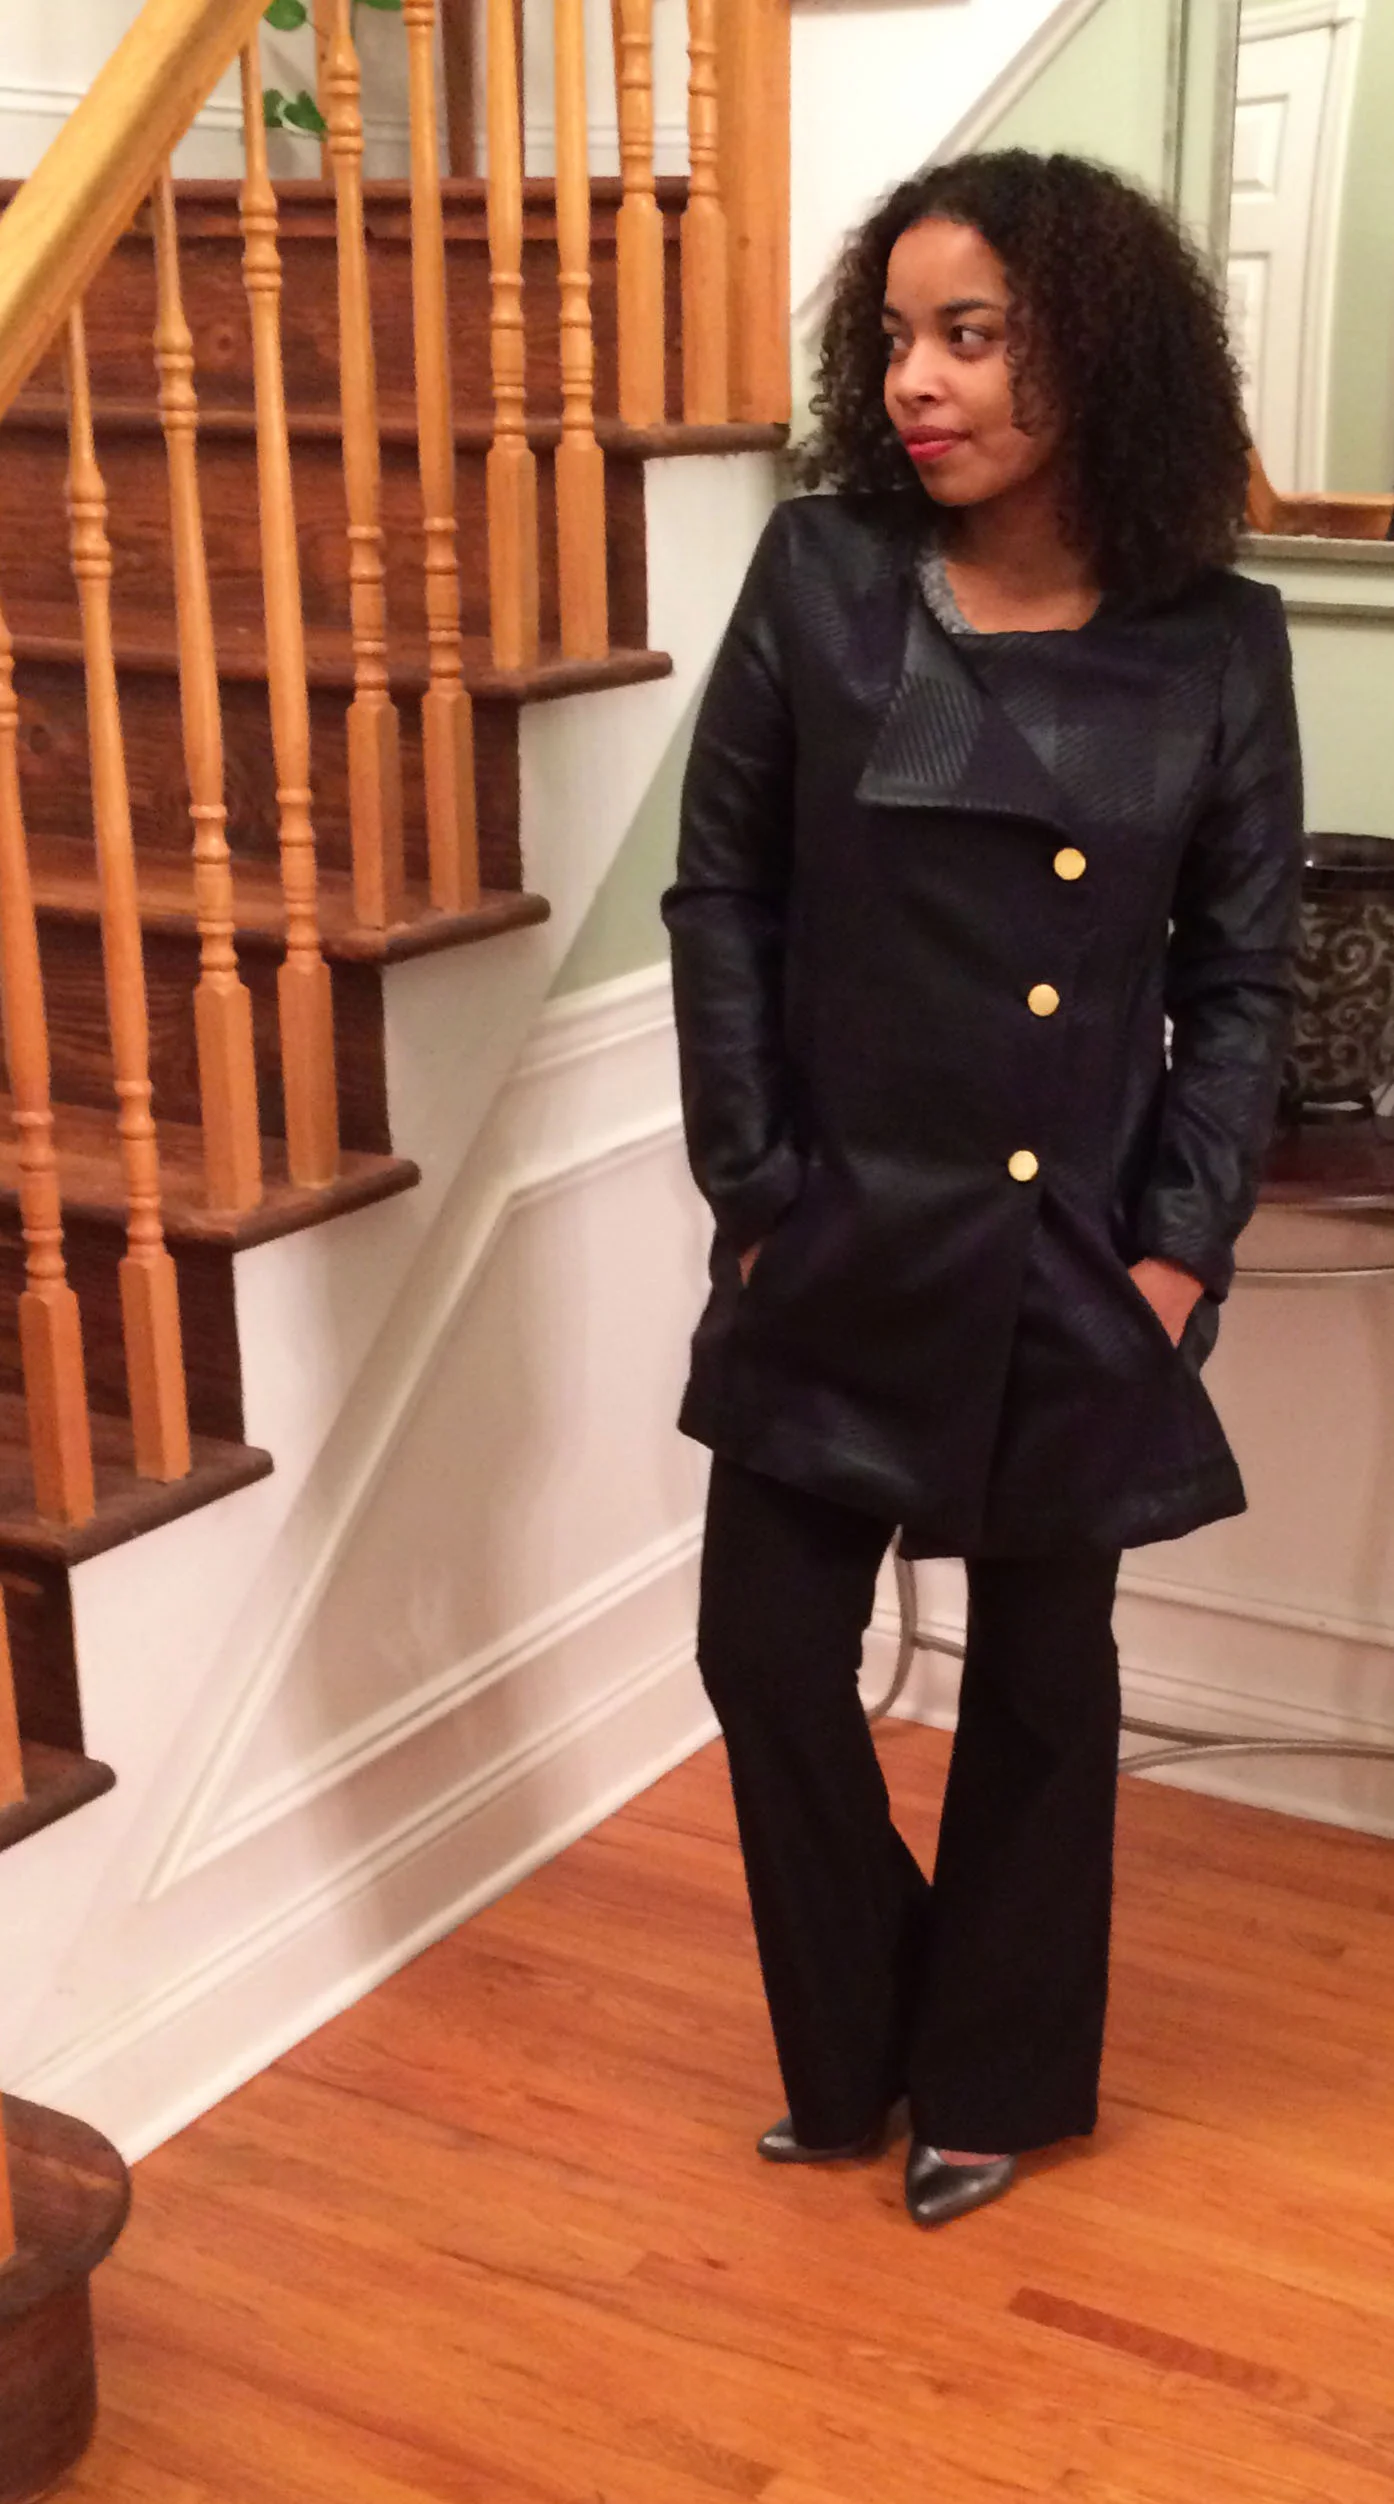
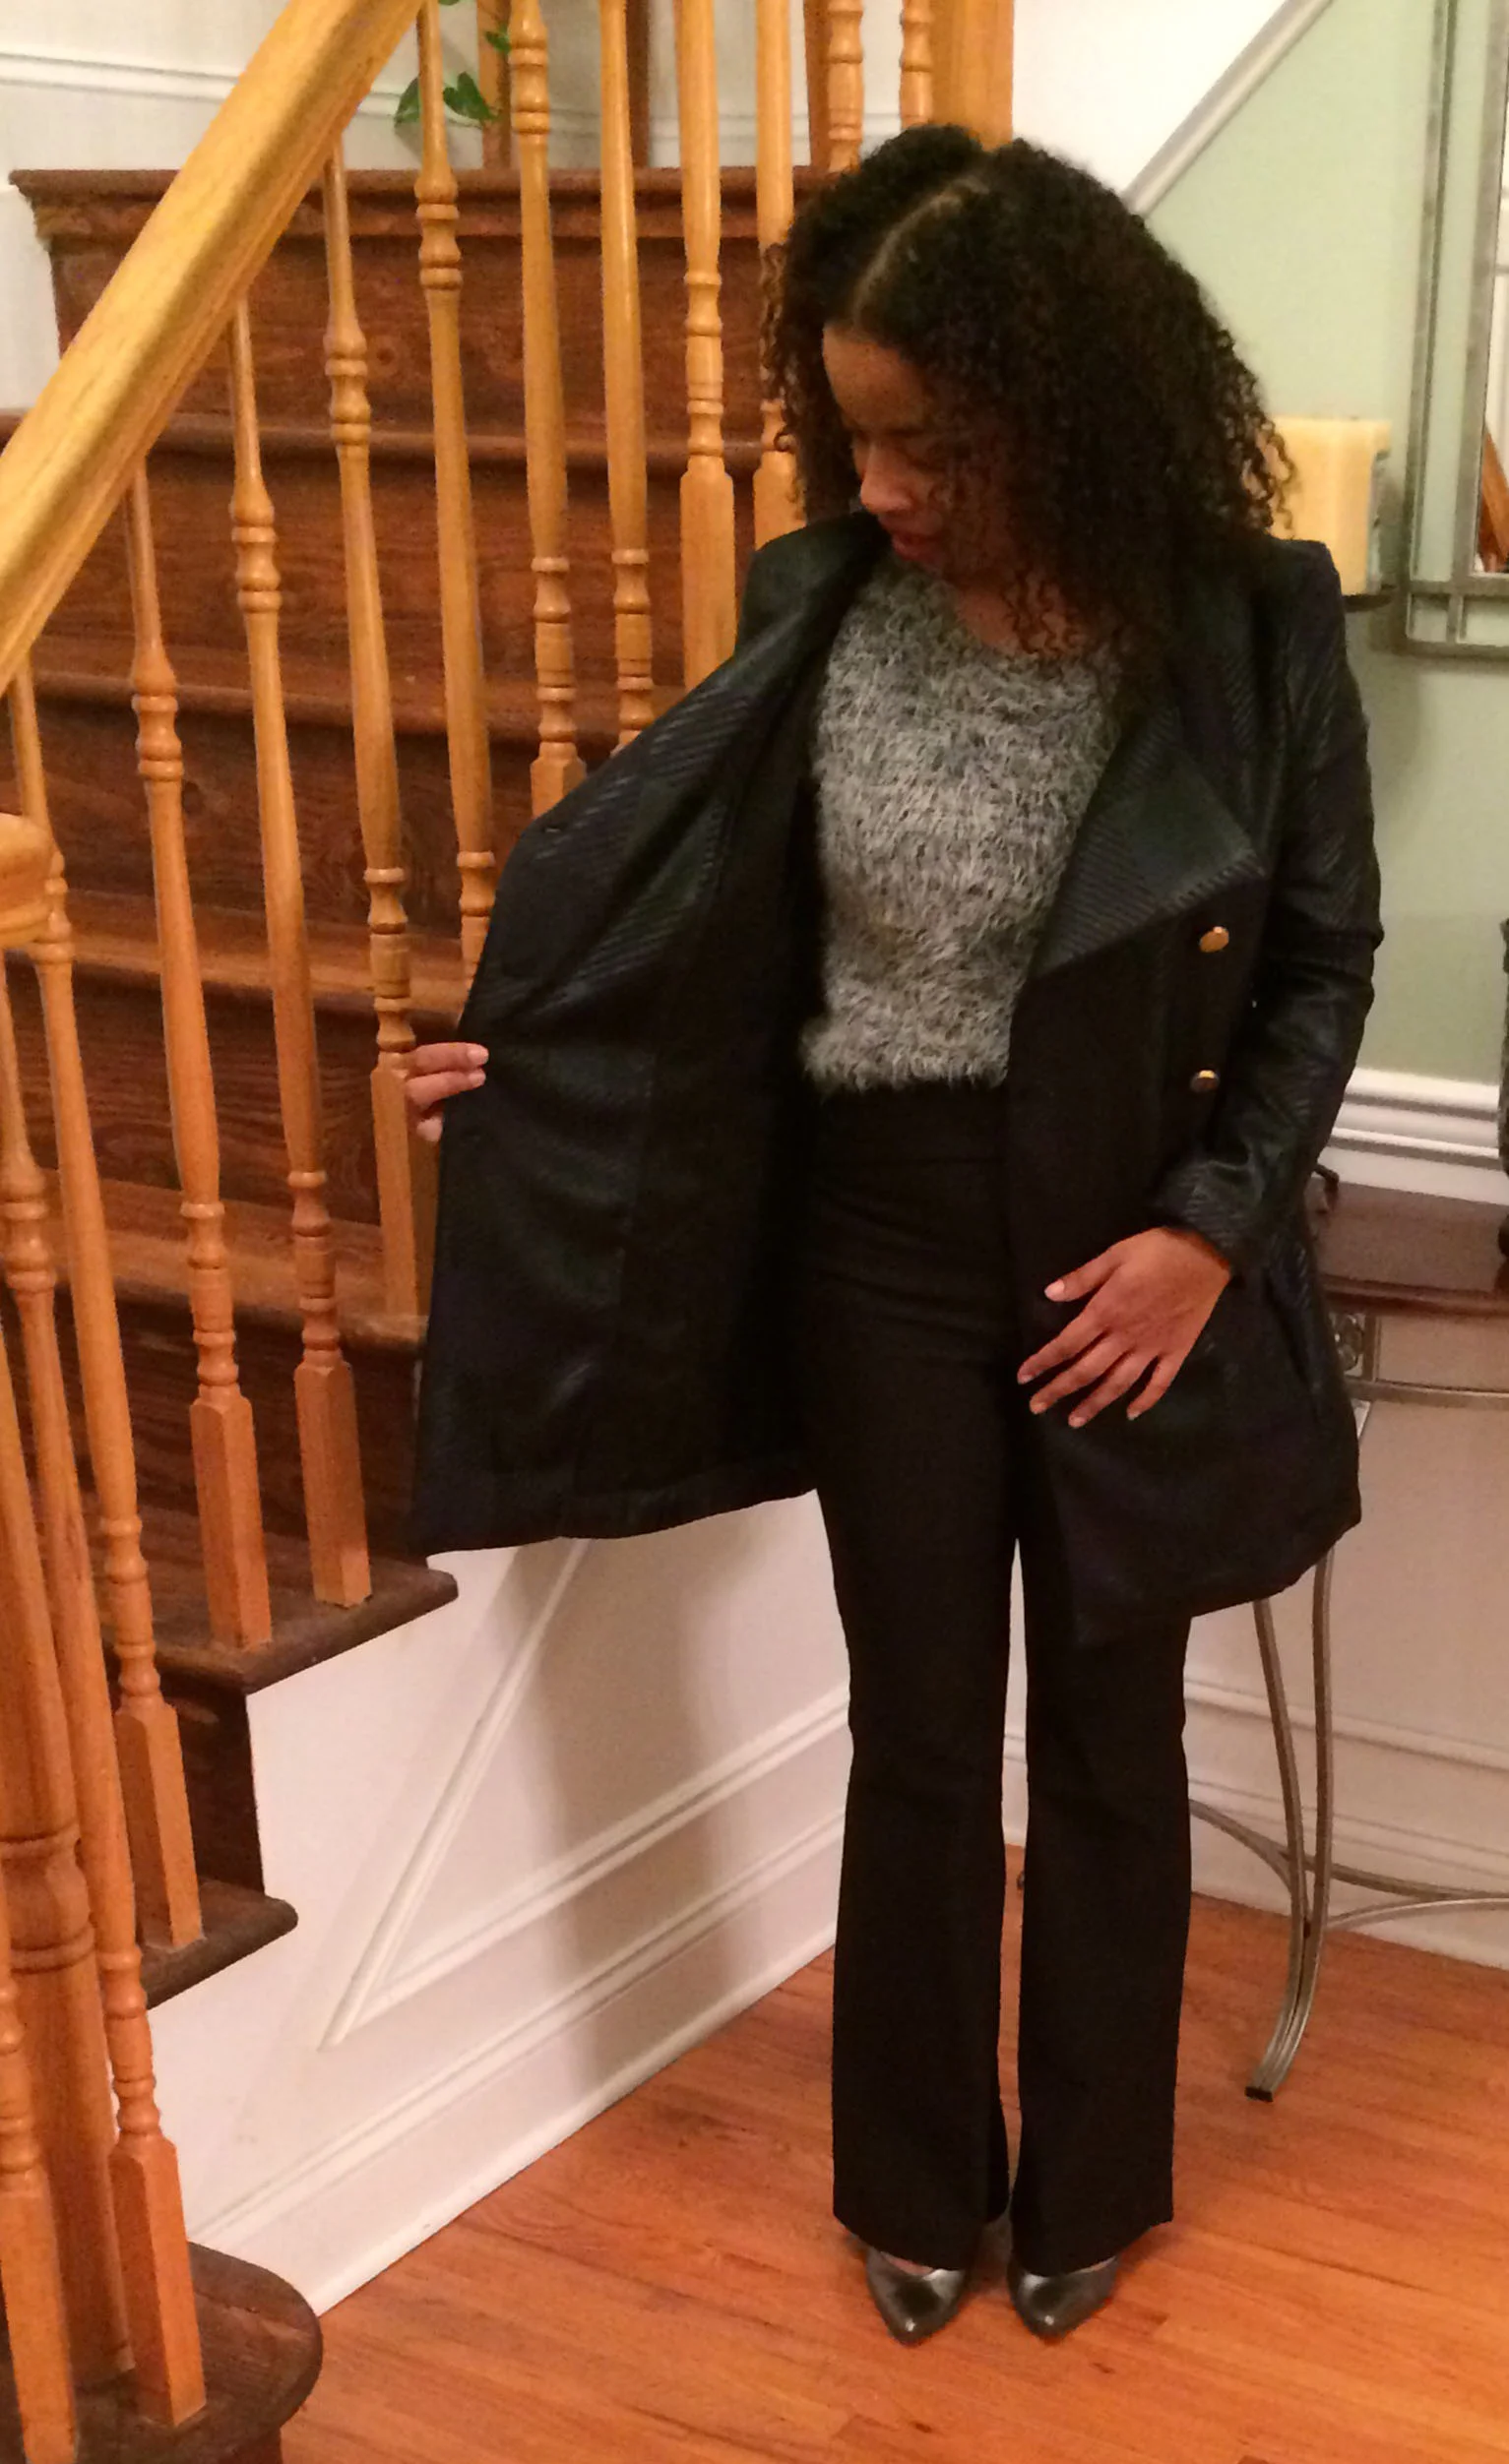
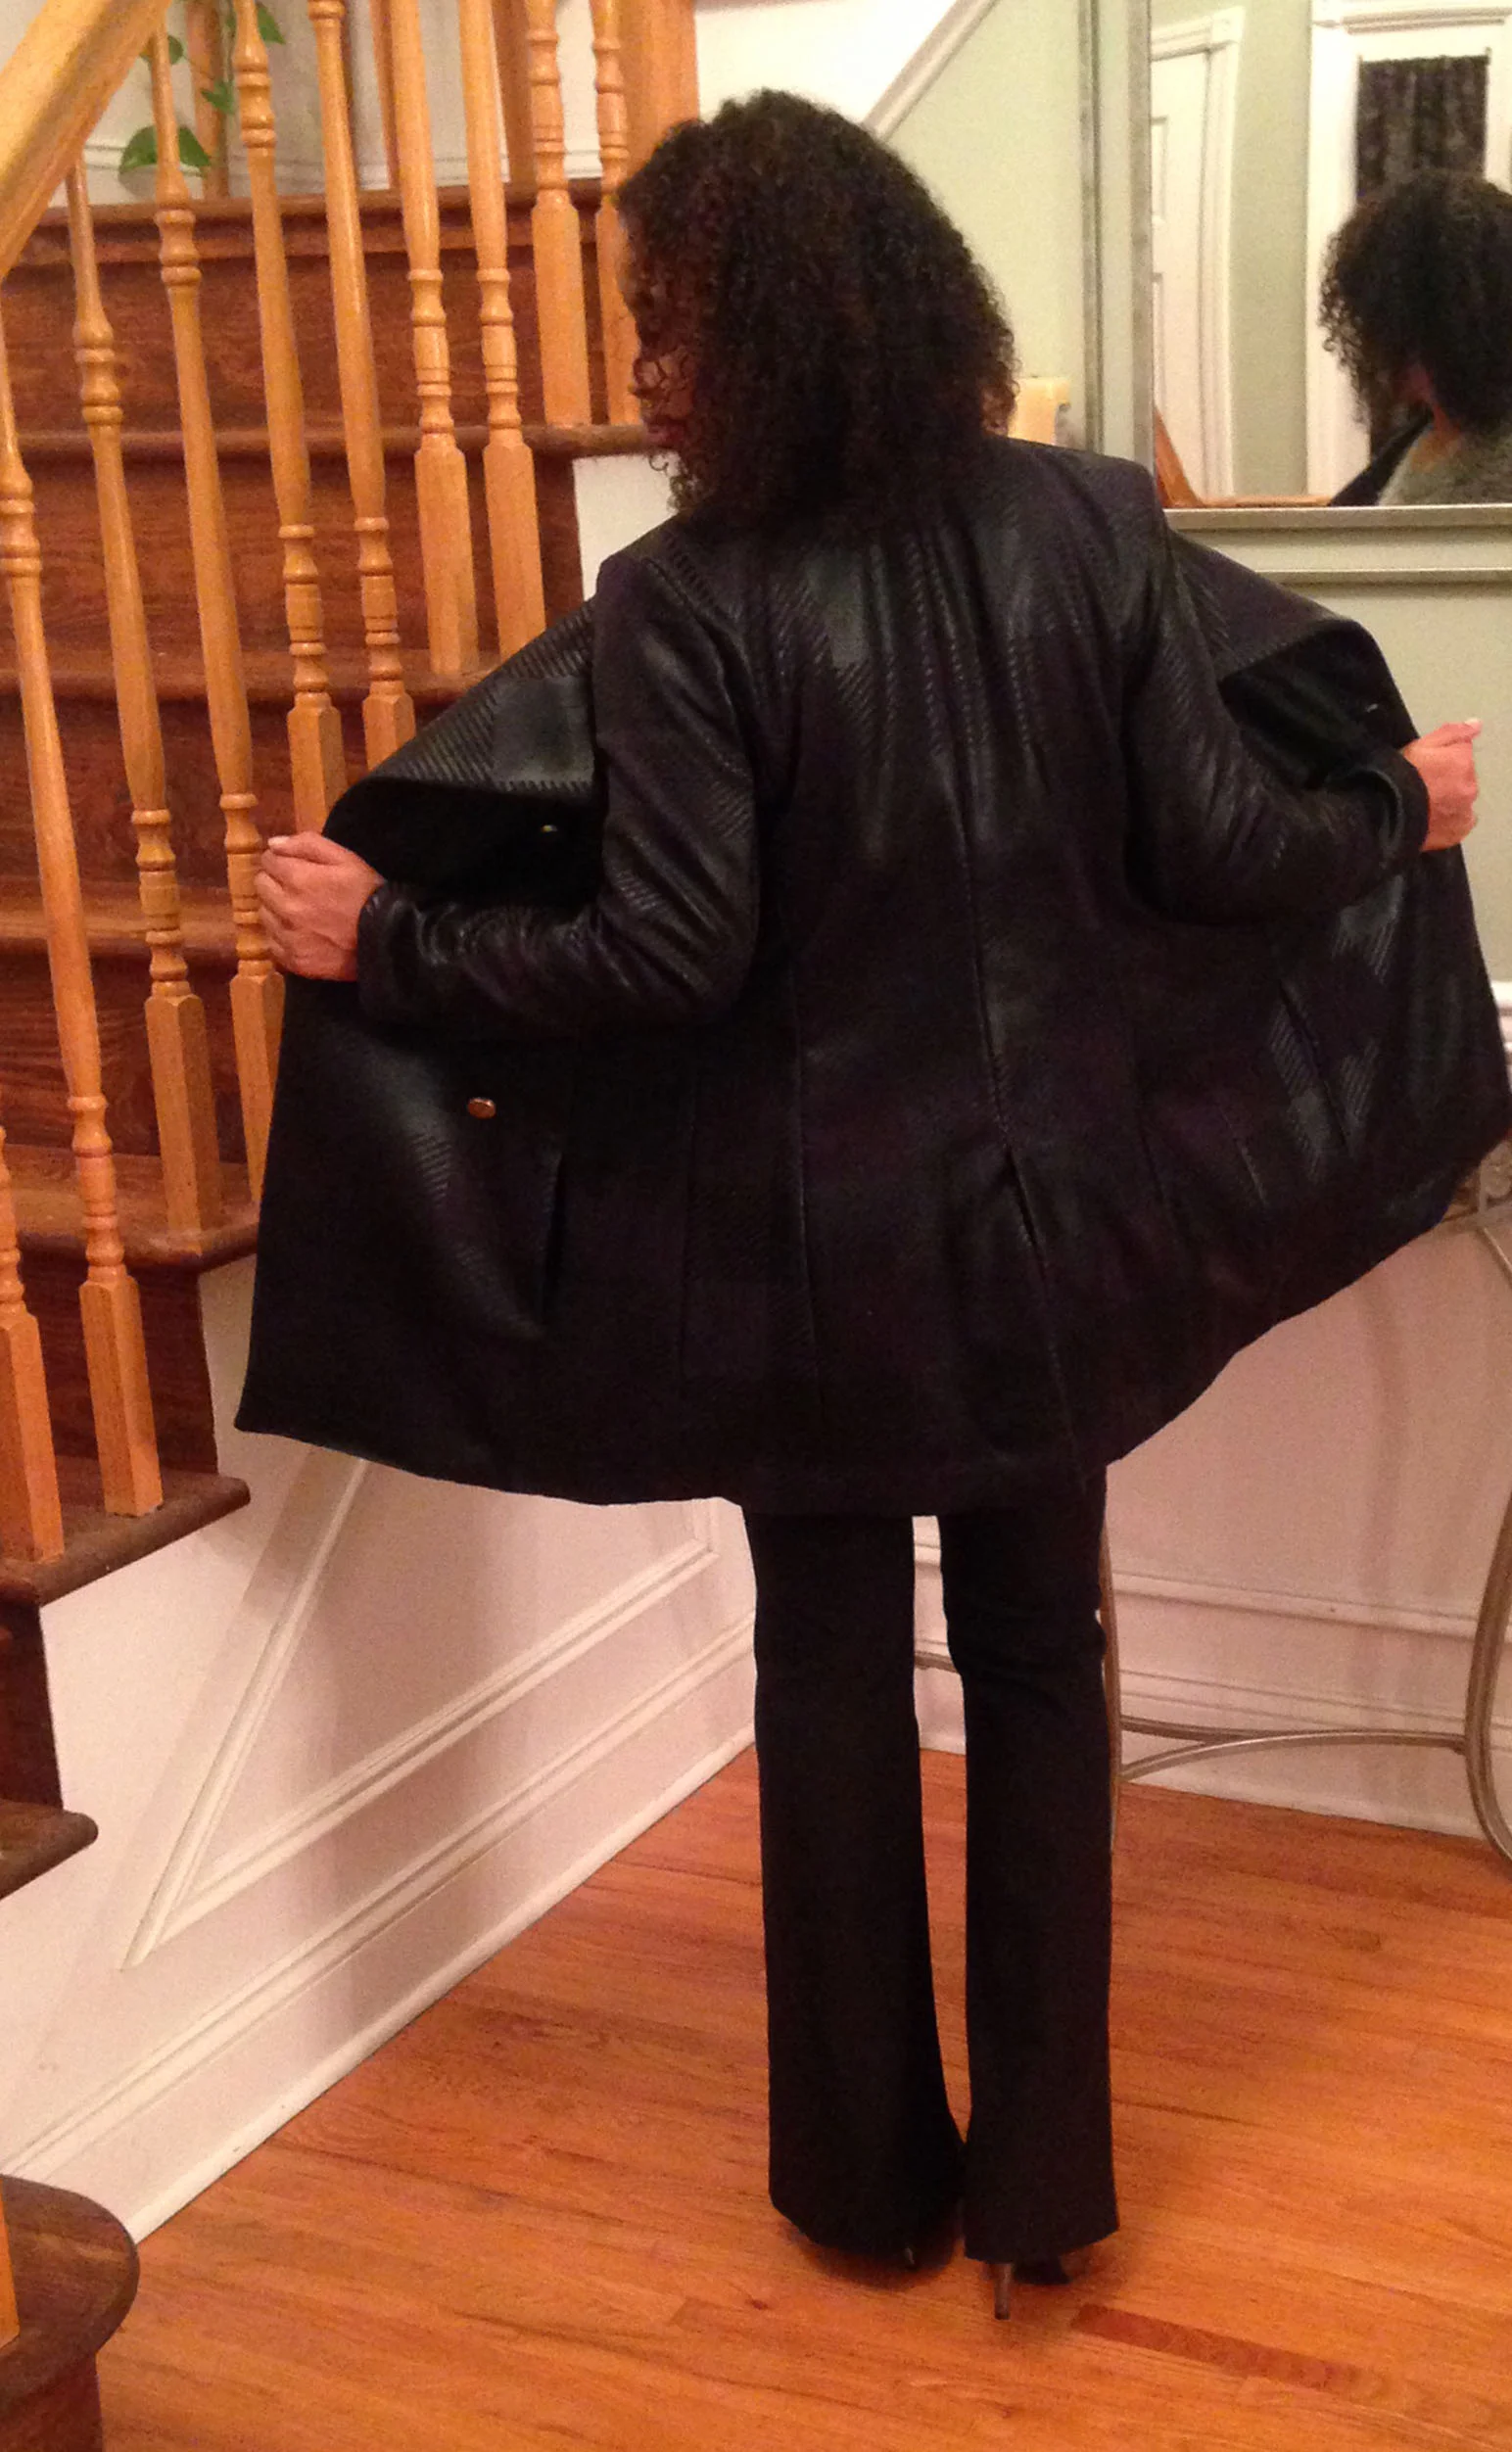
After hours of intricate pattern cutting, precise stitching, and tedious hand sewing, my fall/winter coat is finally complete! I tailored this checkered print medium weight wool blend fabric (from Mood Fabrics) into a sleek coat with a modern and edgy feel. I originally used a pattern for a floor length ("duster") trench coat from Burdastyle, but I made a few changes including: shortening it to mid thigh length, removing the collar, tapering the lapels, and adding a black silk blend lining. Adorned with gold buttons that have a similar checked print, this coat is sure to make a subtle, yet cool statement. One aspect I love about this fabric is the "leather look" it gives from a distance. I look forward to sporting this piece as the temperature continues to drop.


![IMG_3806[1].JPG](https://images.squarespace-cdn.com/content/v1/55c38456e4b0b4301daa5832/1446435046745-XEFLLDTENO0WN6CZPFWI/IMG_3806%5B1%5D.JPG)

In the Works: Creating a Sleek Fall/Winter Coat
This Fall/Winter season, an important mantra to live by is "you're always well dressed, with a good coat." After all, as the chilly weather slowly makes its way into our everyday routines, we will essentially be living in that coat. While organizing my closet for this transitional east coast weather, I realized that I do not have a staple, neutral coat. To elaborate, this is comparable to the “little black dress” which should be in every young woman’s closet. So, what better opportunity do I have then now to start my next project: a modern and sleek staple fall/winter coat.
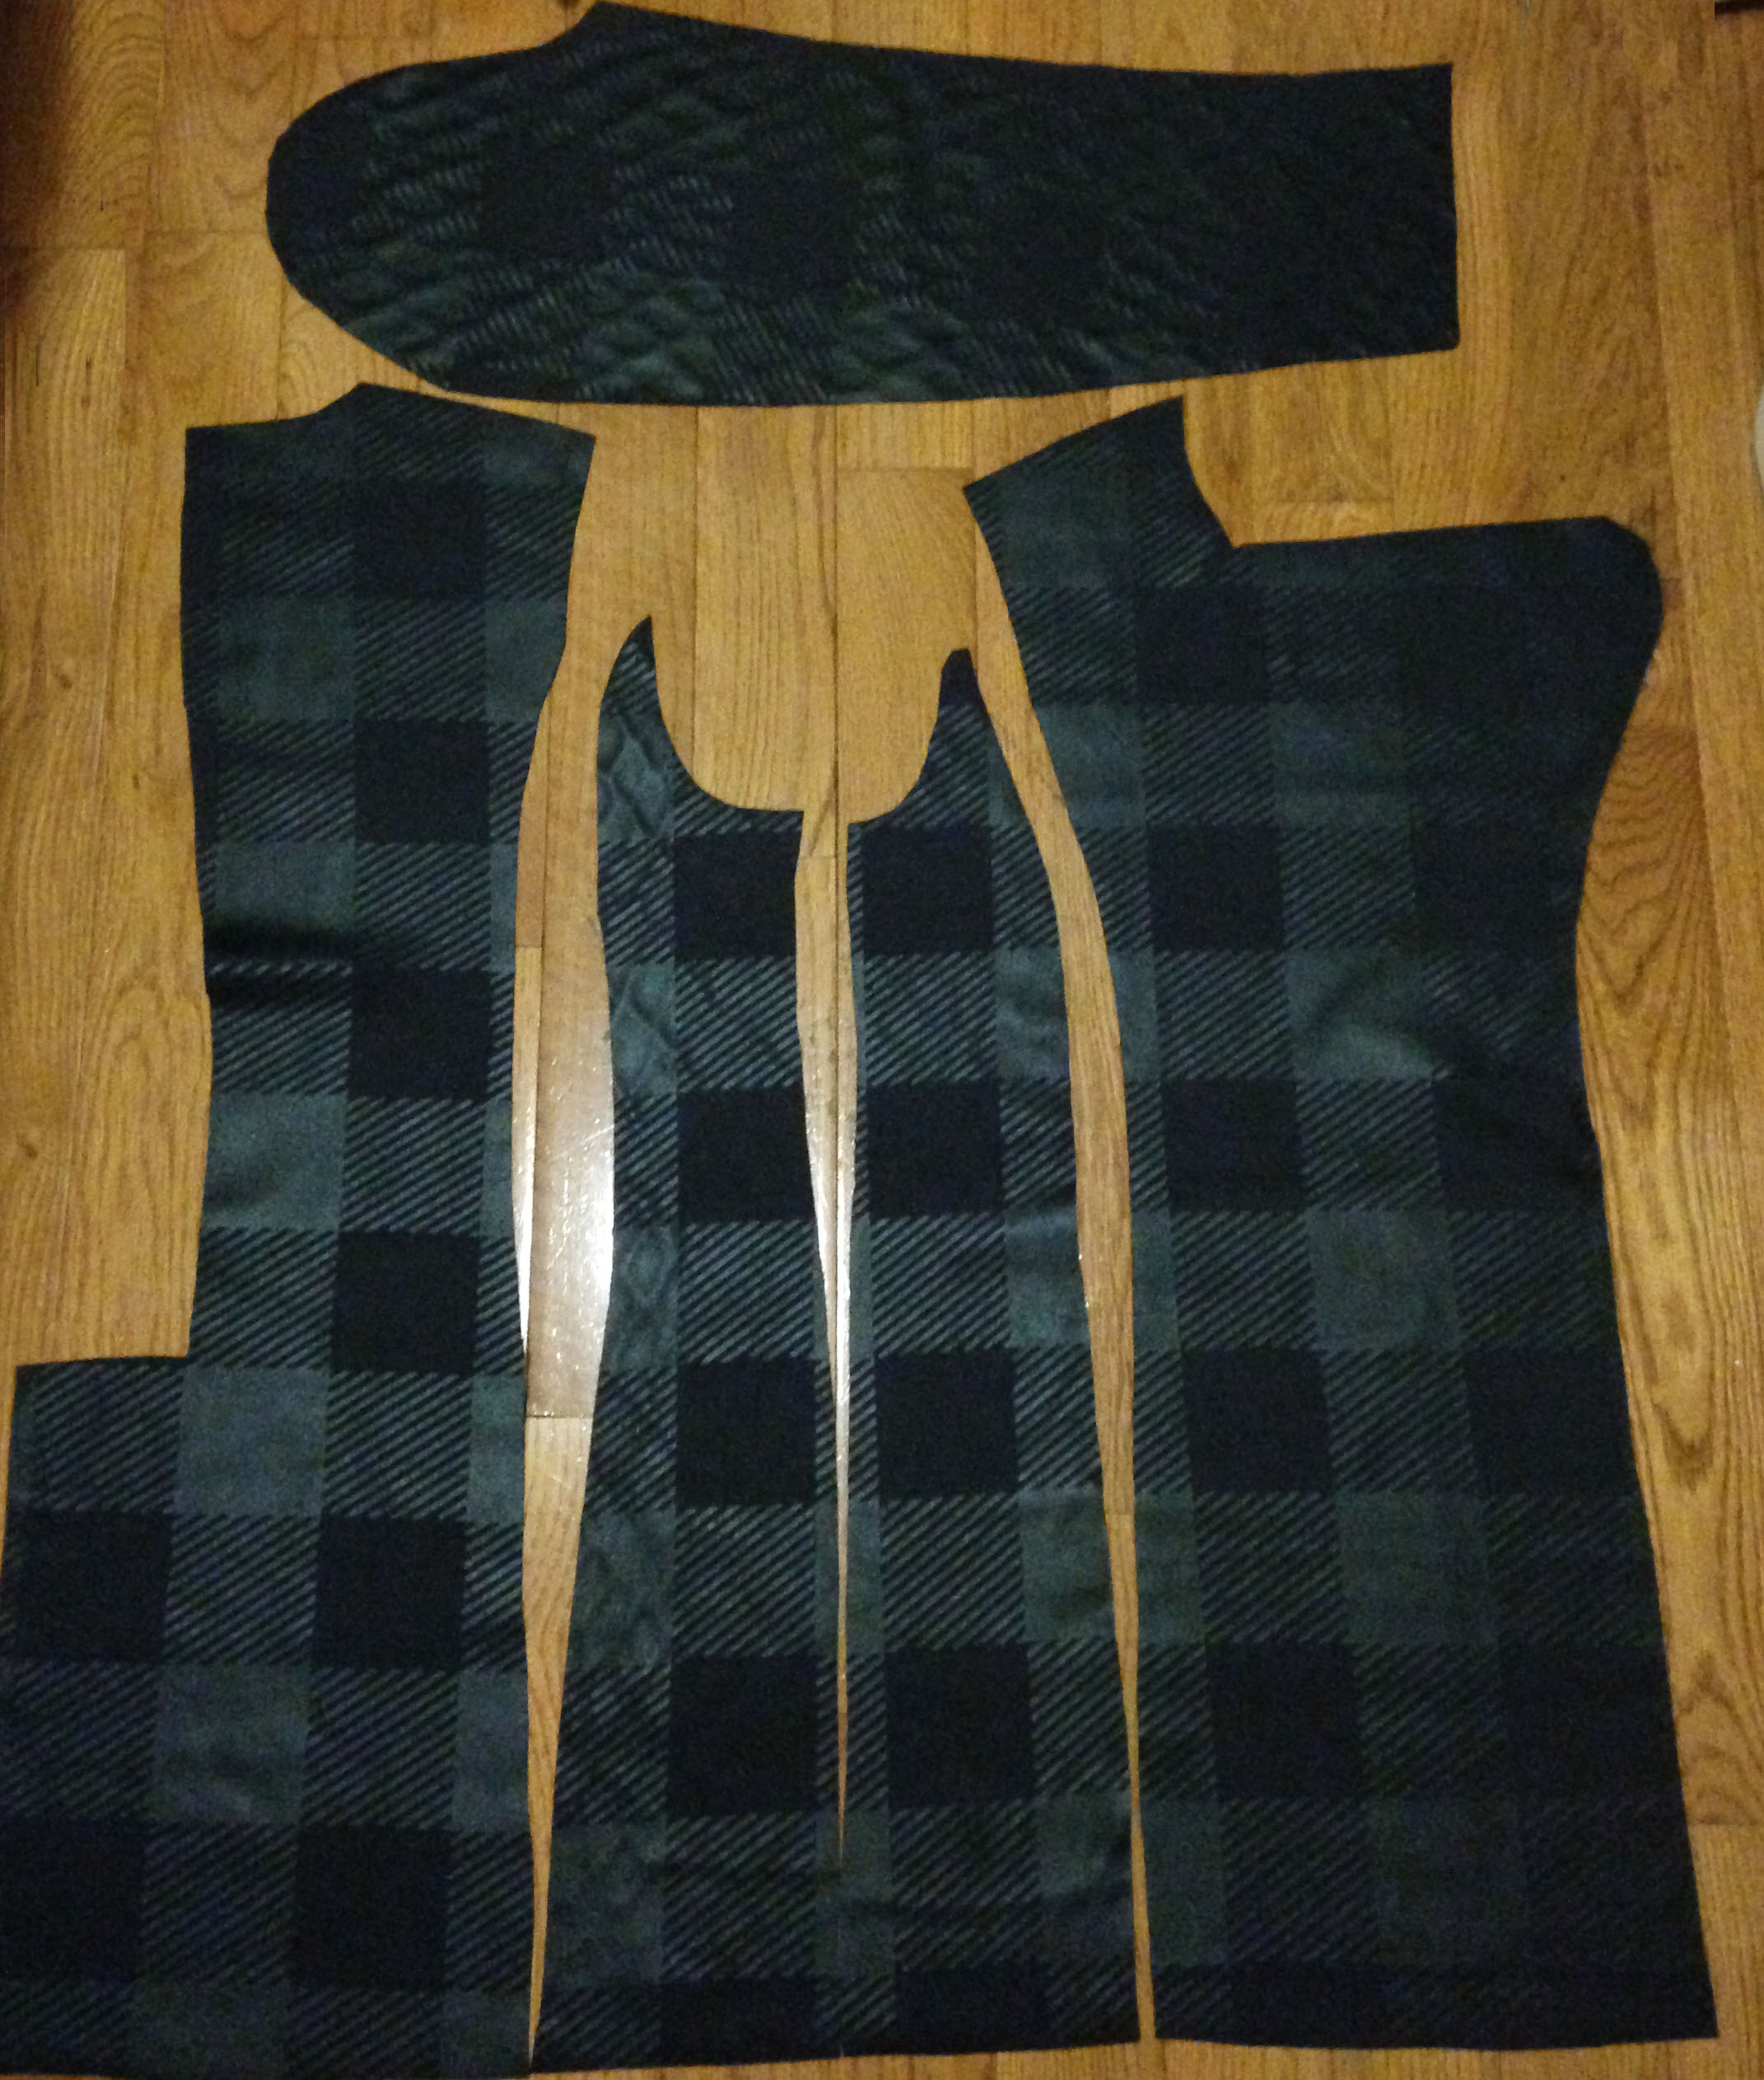
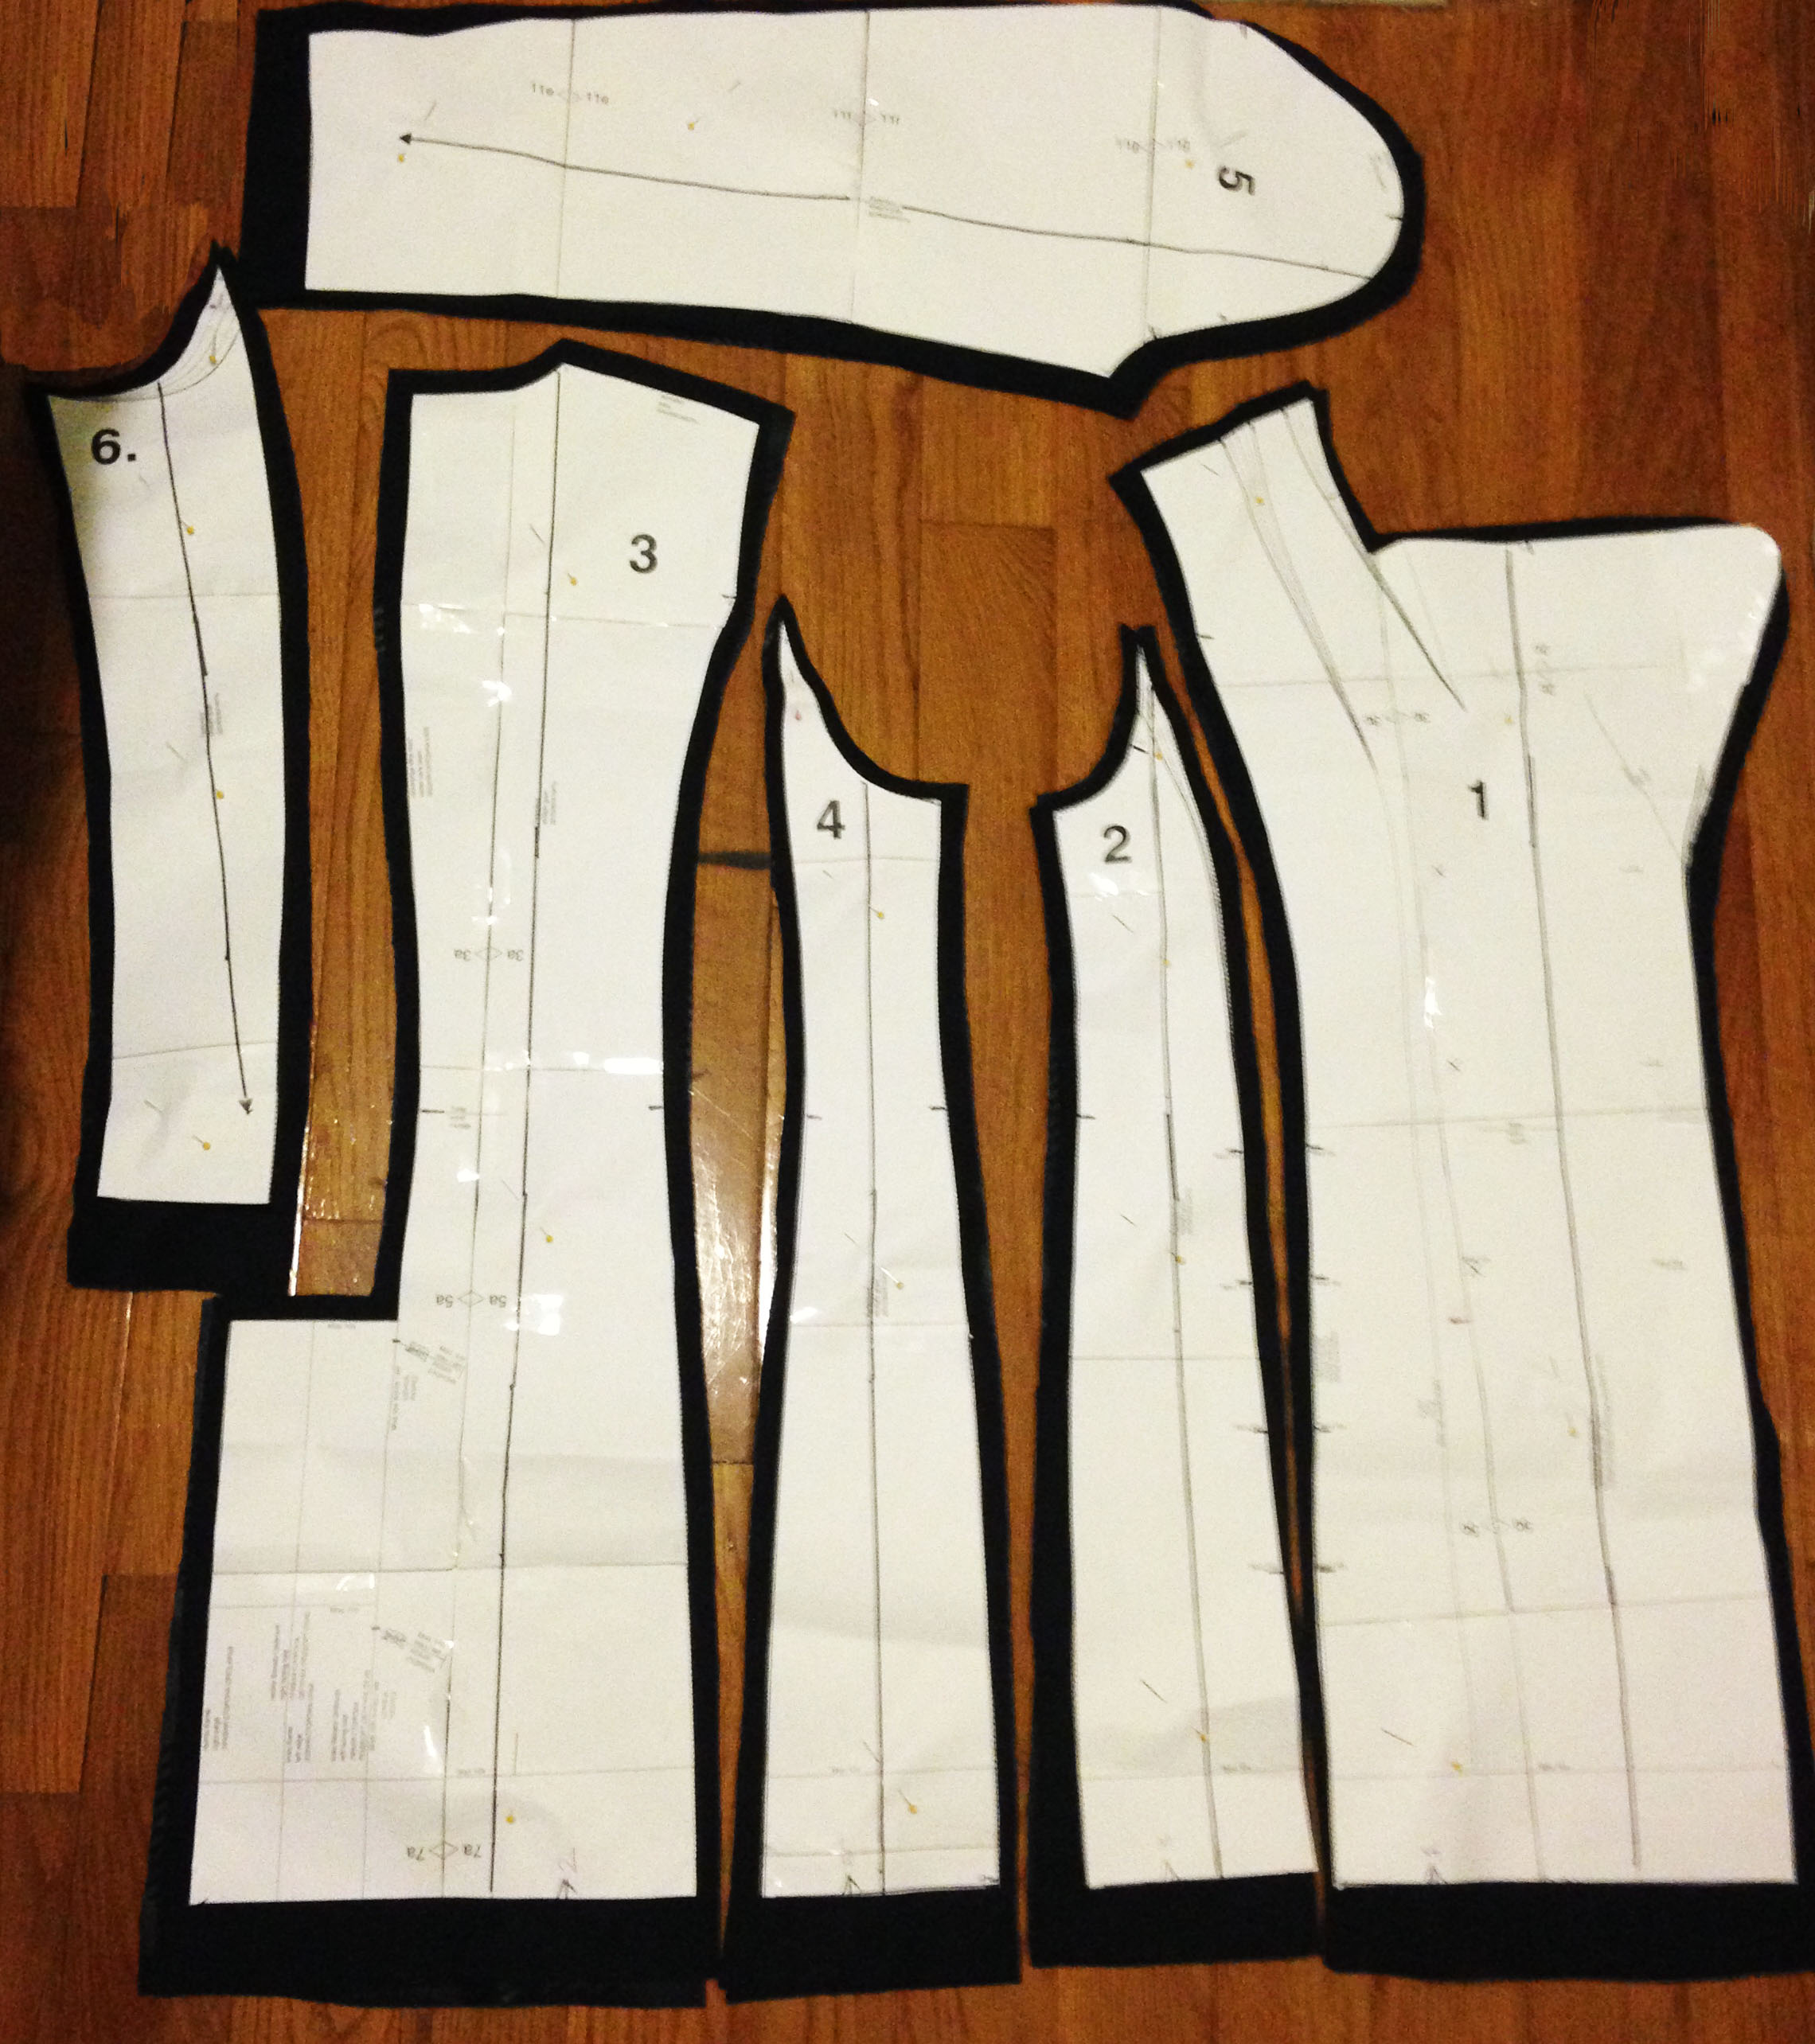
I first purchased a coat pattern, from BurdaStyle, that has a basic and simple silhouette, but could definitely be elevated with an interesting and bold fabric. So, I headed to Mood Fabric Store in search of the perfect double-faced wool. I decided on a dark navy/black playfully checkered print wool from designer, Rag & Bone. I did not want to create a typical black coat, so this printed added a little extra flair.
I was initially delighted with this decision, until I realized that it’s directional checkered print will require hours of pattern placement and cutting (5 hours to be exact) in order to ensure that the print is lined up accurately and matches on each side of the coat. Despite the extra work and an eventful Saturday night spent bonding with pins, scissors, and Pandora radio to keep me going, I am looking forward to piecing together this modern looking coat.
My progress as of now is a collection of cut pattern pieces and fabric, as shown below. In the second photo, you can see how the directional checkered print lines up on all of the main body panels, as well as the sleeves, which are laid out at the top.
Stay tuned for the stitching and final product!
To any sewers out there: what techniques do you use when using directional prints?
Let's talk Outerwear
Fall is slowly, but surely creeping it's way into our lives, making me very enthusiastic about the variety of outerwear that will soon be a main component of my daily wardrobe. In order for you to get the full scope of just how enthusiastic I am, the other day I spent the majority of my lunch break strolling the floors of Bergdorf Goodman's Women's Store analyzing (obsessing) over designer jackets, coats, and blazers. Something about the intricate construction, level of detail, and design concept behind a well made outerwear piece fascinates me. Perhaps this is due to my time as an apprentice at a small, but successful men's tailor shop, where majority of workload were tailored men's suits and sport coats, and jackets. I have developed a rare appreciation for these kinds of garments and this upcoming season is the perfect time to flaunt it.
To start, let's talk about outerwear. The technical definition of outerwear is "clothing worn over other clothes, especially for the outdoors". For those of us who love layering, this is definition can include a lot of pieces. I find that I am specially drawn to the intricate construction of coats, jackets, and the occasional, very special, blazer. Within these categories, are subtypes as well. To spare a excessively long list, I will stick to the subtypes that are my favorites. (for more on the varying types of outerwear, check out this article on PopSugar.com)
An existing piece of my wardrobe; a loose tweed Moto jacket, vaguely reminiscent of the classic Chanel suit but with an edgy feel.
MY FAVORITES:
Coats: Trench, Camel, Duster, Chesterfield, and of course, Peacoat
Jackets: Blazer, Tuxedo, Bolero, Bomber, Varsity, Field, and of course Moto jacket
**I would like to also include the addition of Vests, as they are pretty cool too.
So, as fall makes it's way in, I strive to embark on my journey to create each of my favorite outwear pieces to fully understand the construction and detailing that is required.
I will be inspired by existing pieces of my wardrobe (as pictured to the left) as well current and past trends.
Stay tuned!
A classic closing to NYFW
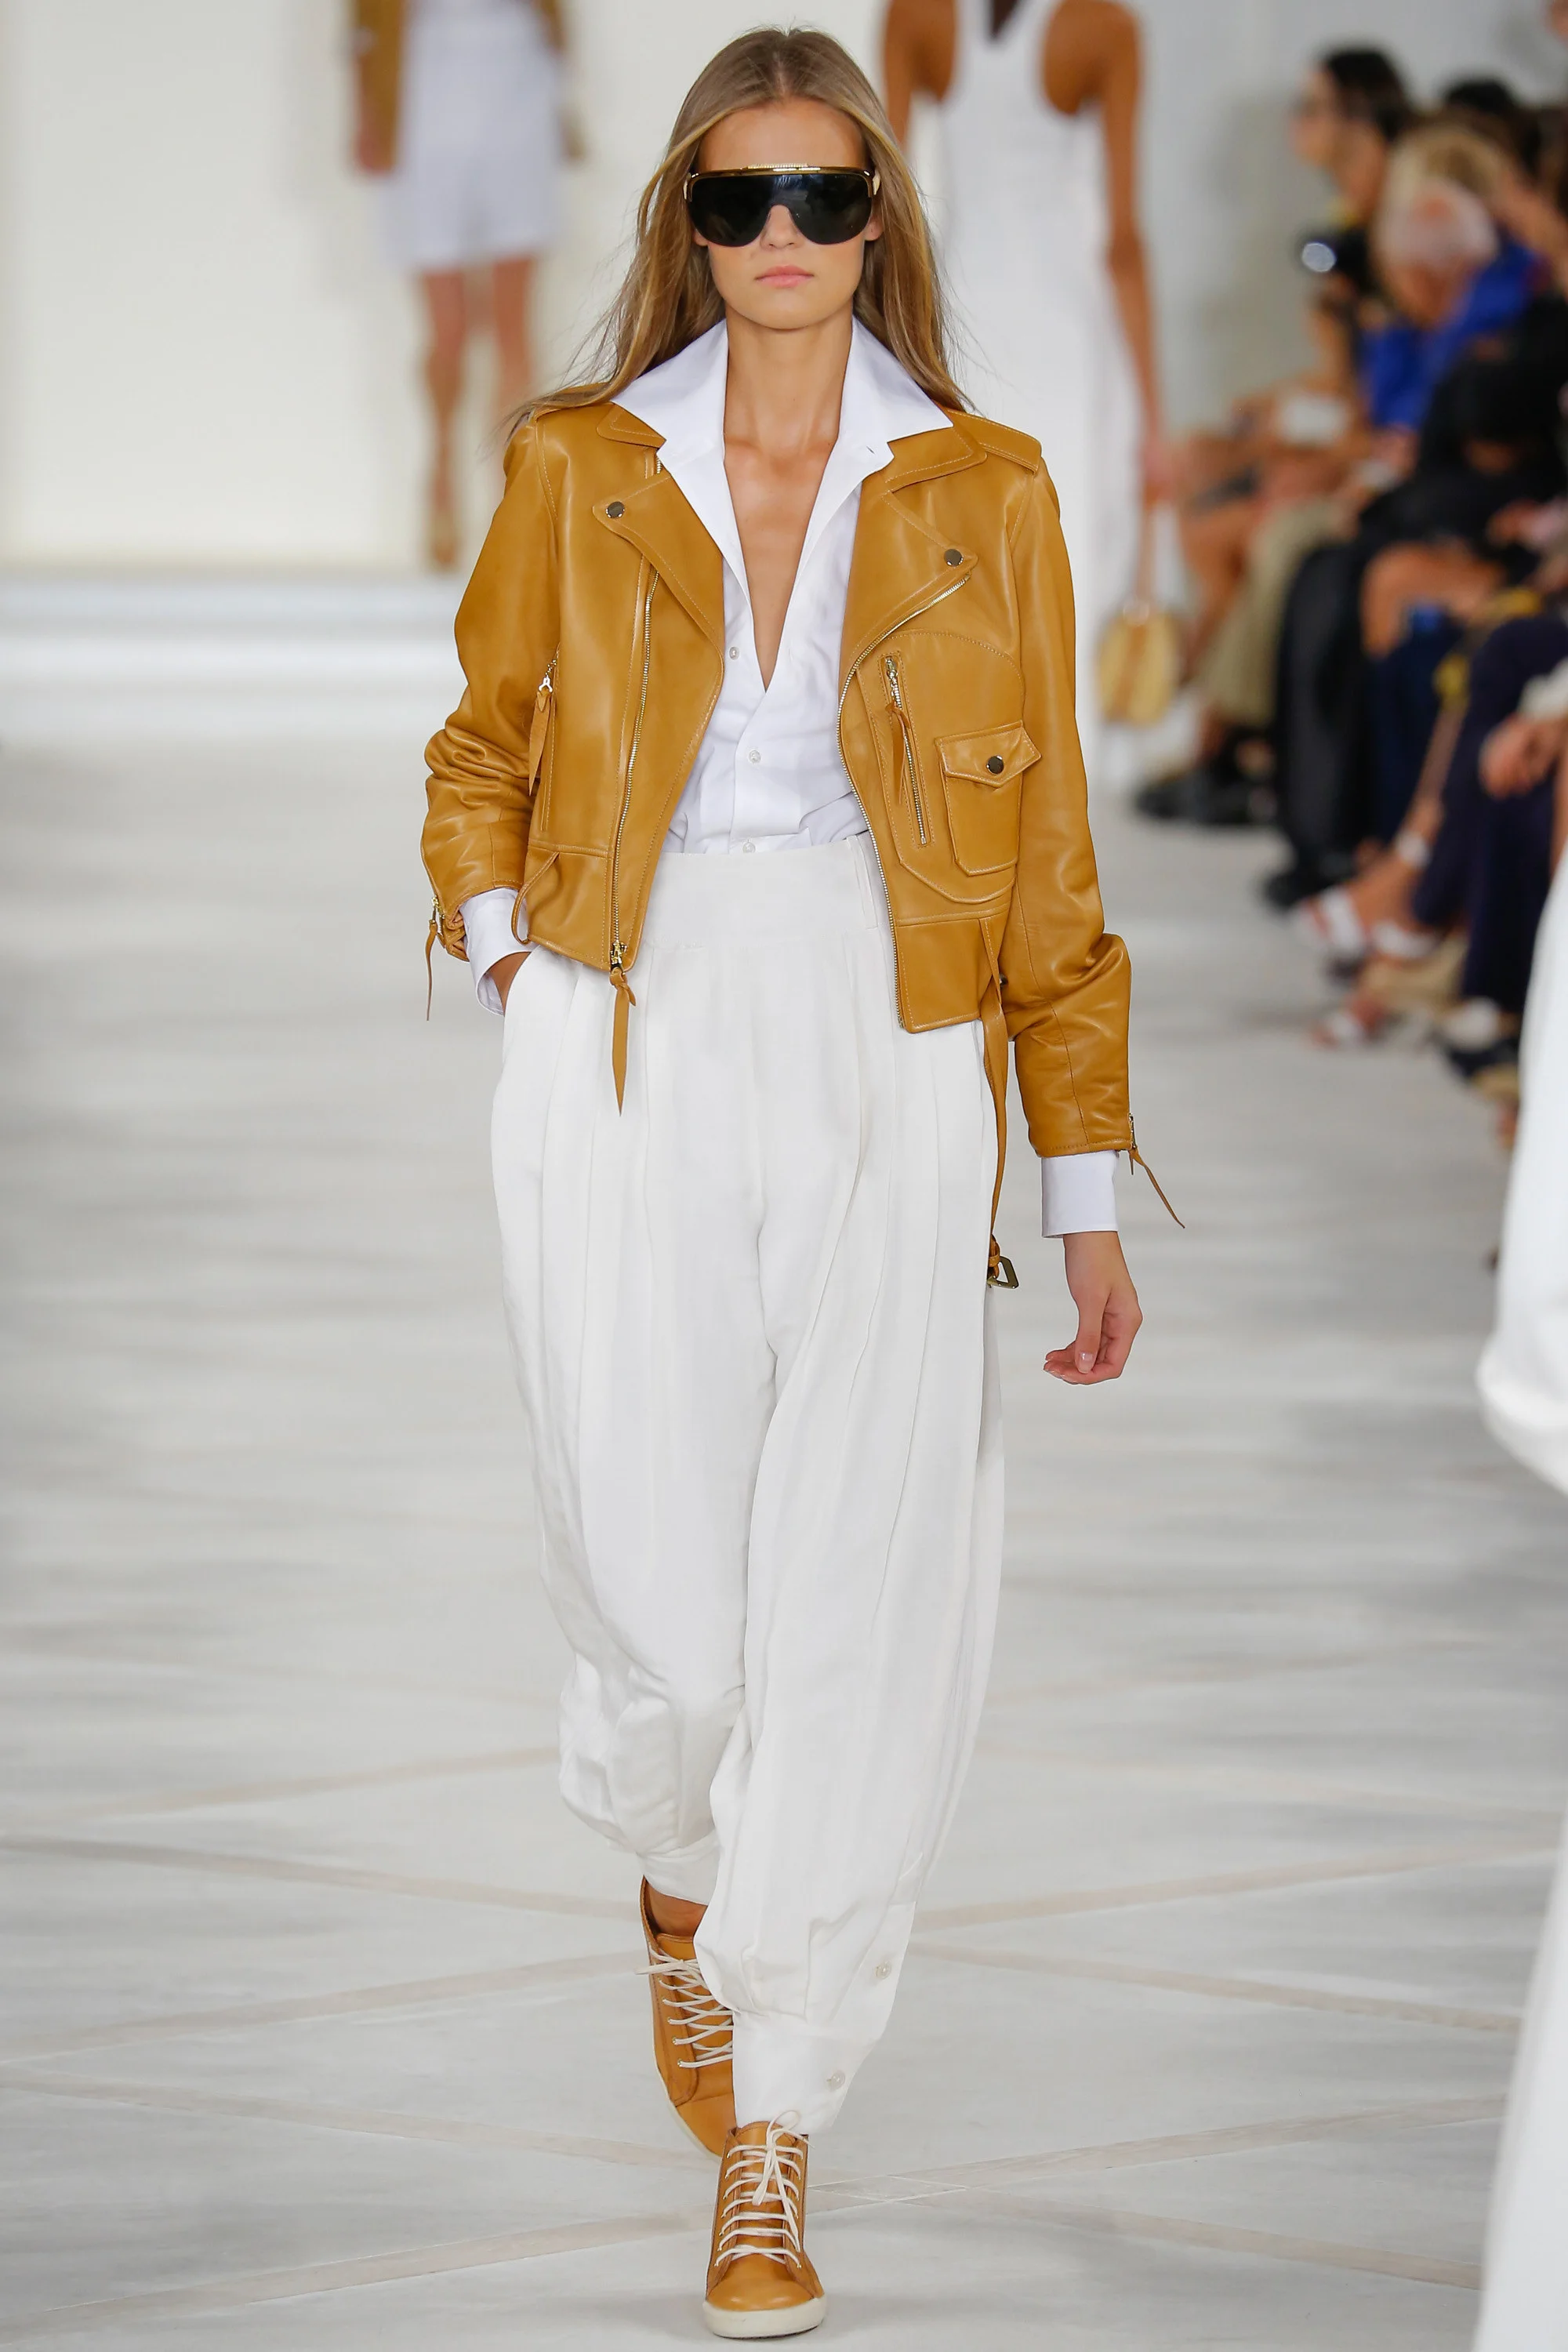
I'm proud to say that the last day of New Fashion Week began with and designer that is near and dear to my heart (and resume): the king of classic American style, Ralph Lauren. Being a current employee at the corporate offices, I may be somewhat bias, however I believe the Spring collection was just another example of how this is such an iconic brand. Timeless, classic, simple elegance are some phrases that come to mind when seeing the this interestingly simplistic collection. The flow of strapless gown in a staple blue and white stripe print, the silhouette of the bold red and white ensemble, or the muted camel leather jacket paired with classic white button down shirt and some really cool footwear were some of my favorites. (I must add that my personal collection of button down shirts has increased a considerable amount since joining the RL family). I am a huge fan of how functionally and style are always top priorities for every brand under the Ralph Lauren name. This is especially apparent in the striped pantsuit that featured a crossed halter that extends to form a train effect as it walks the runway.
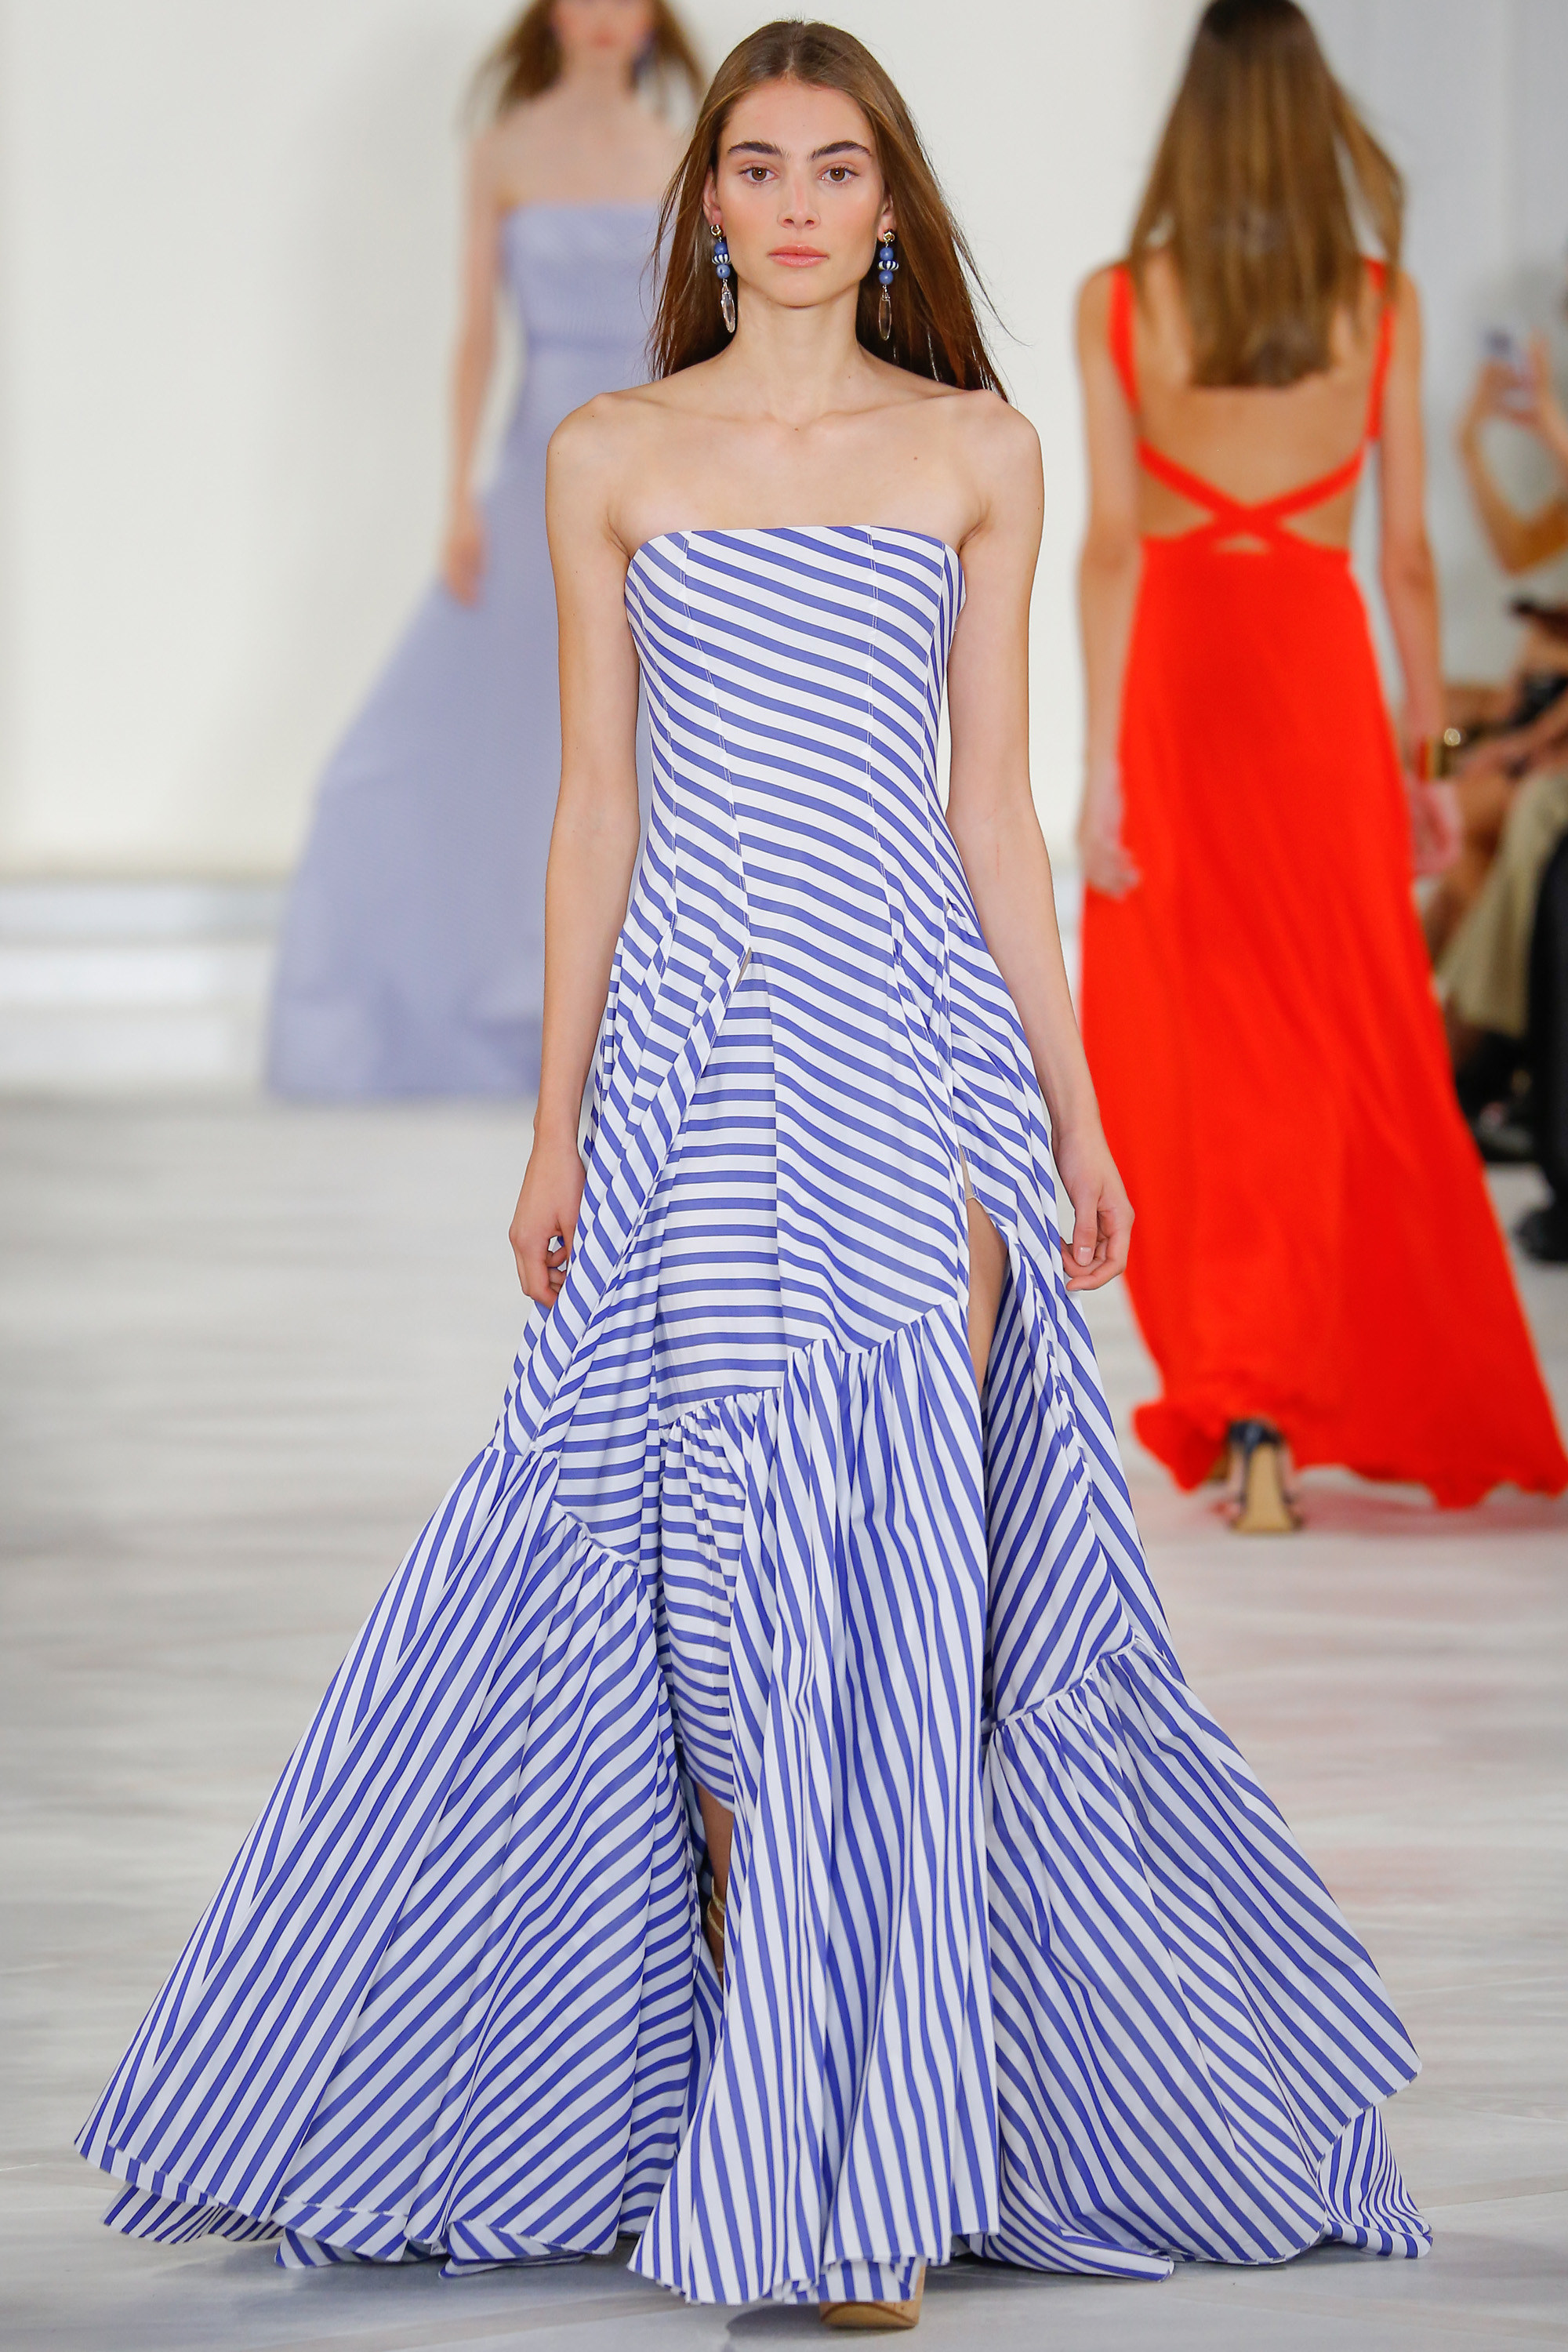
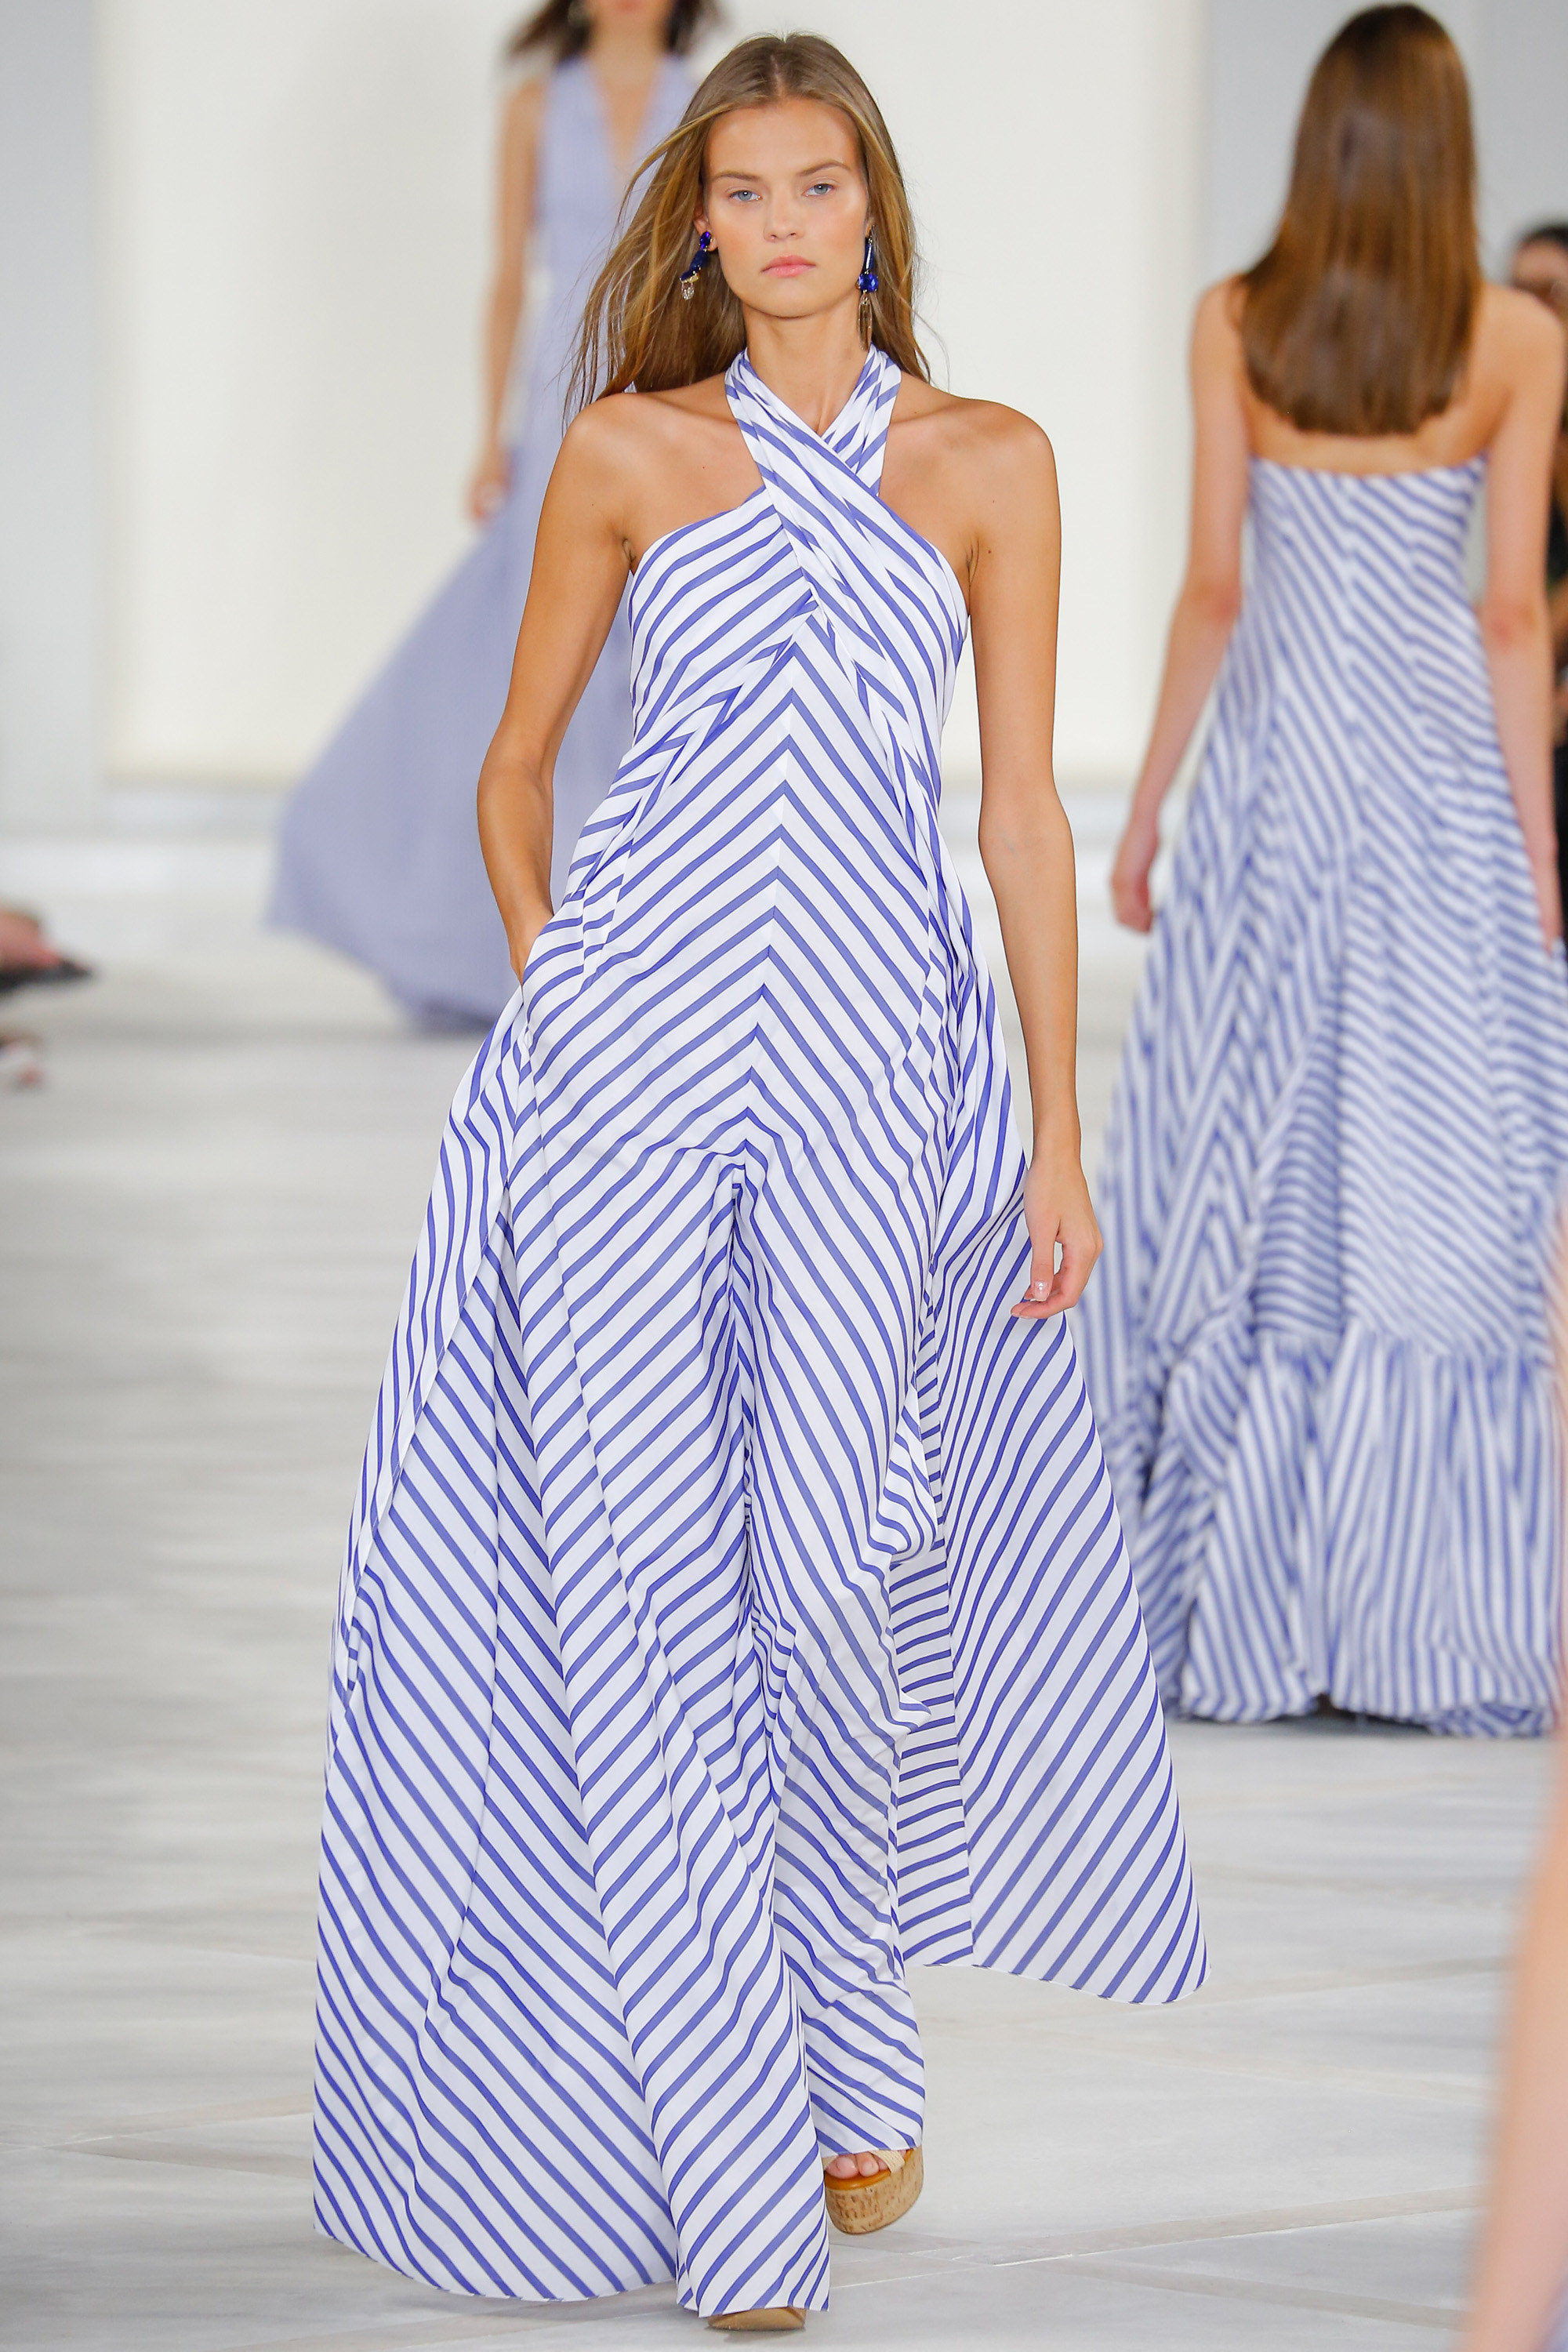
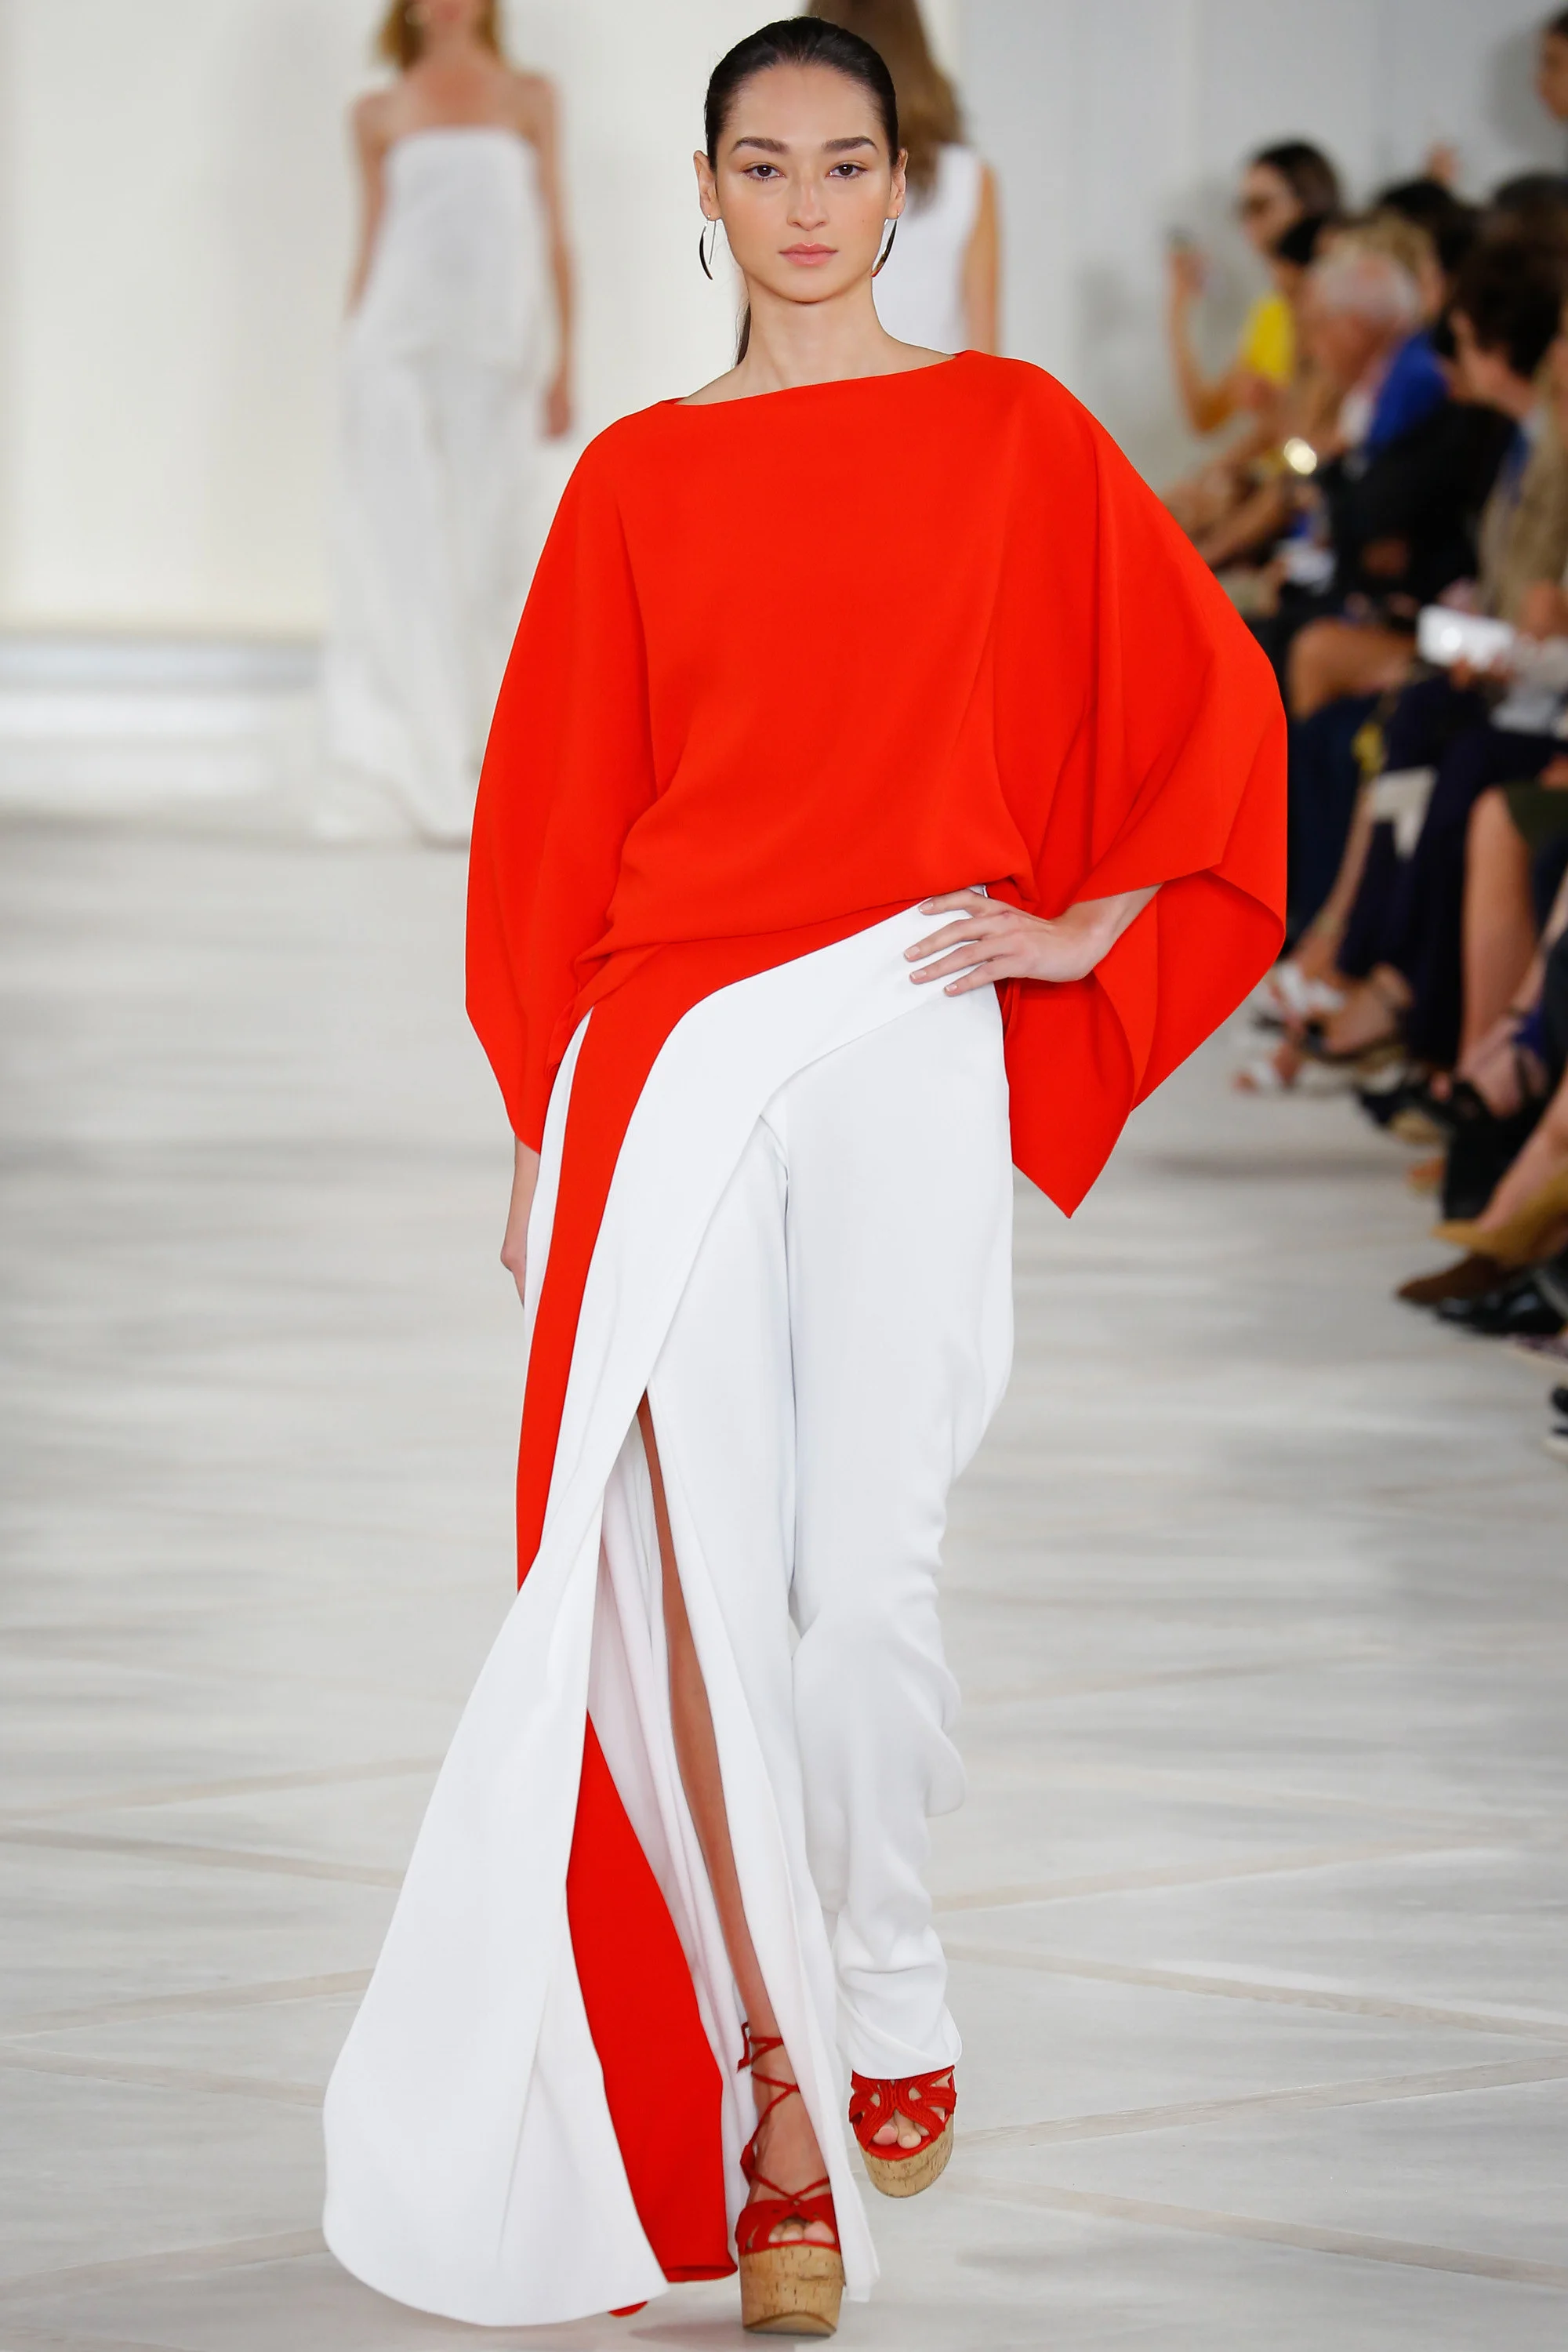
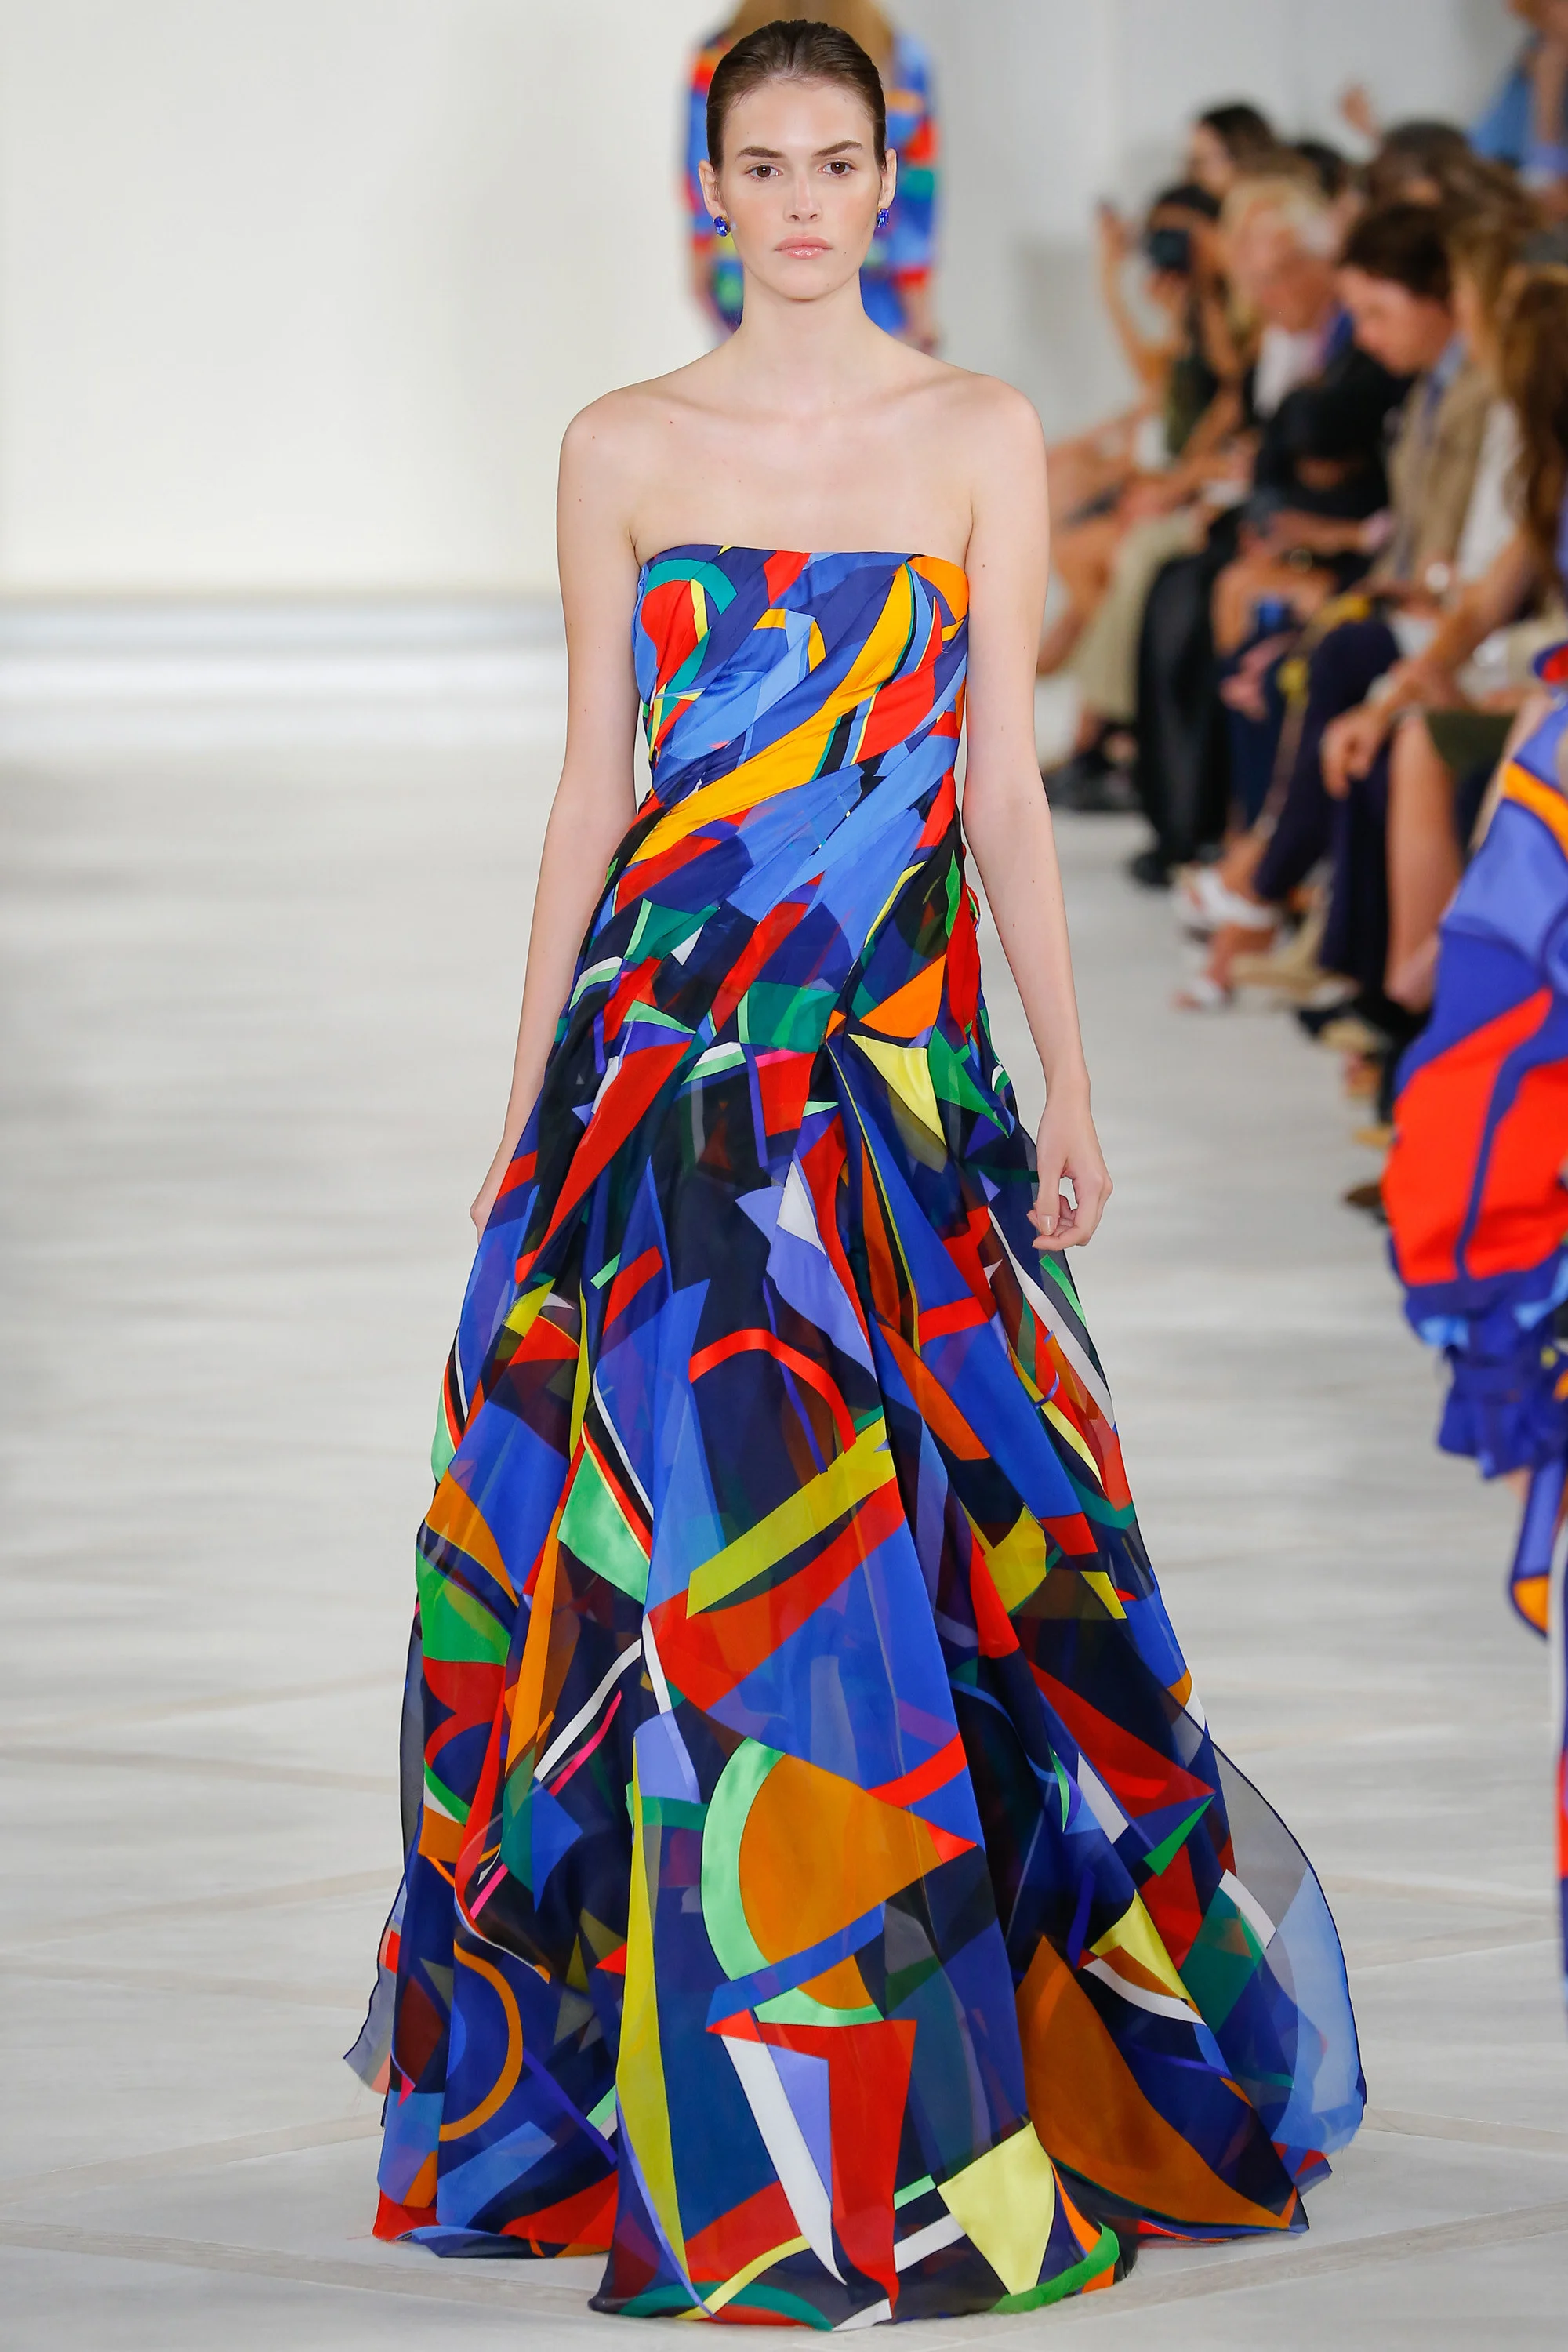
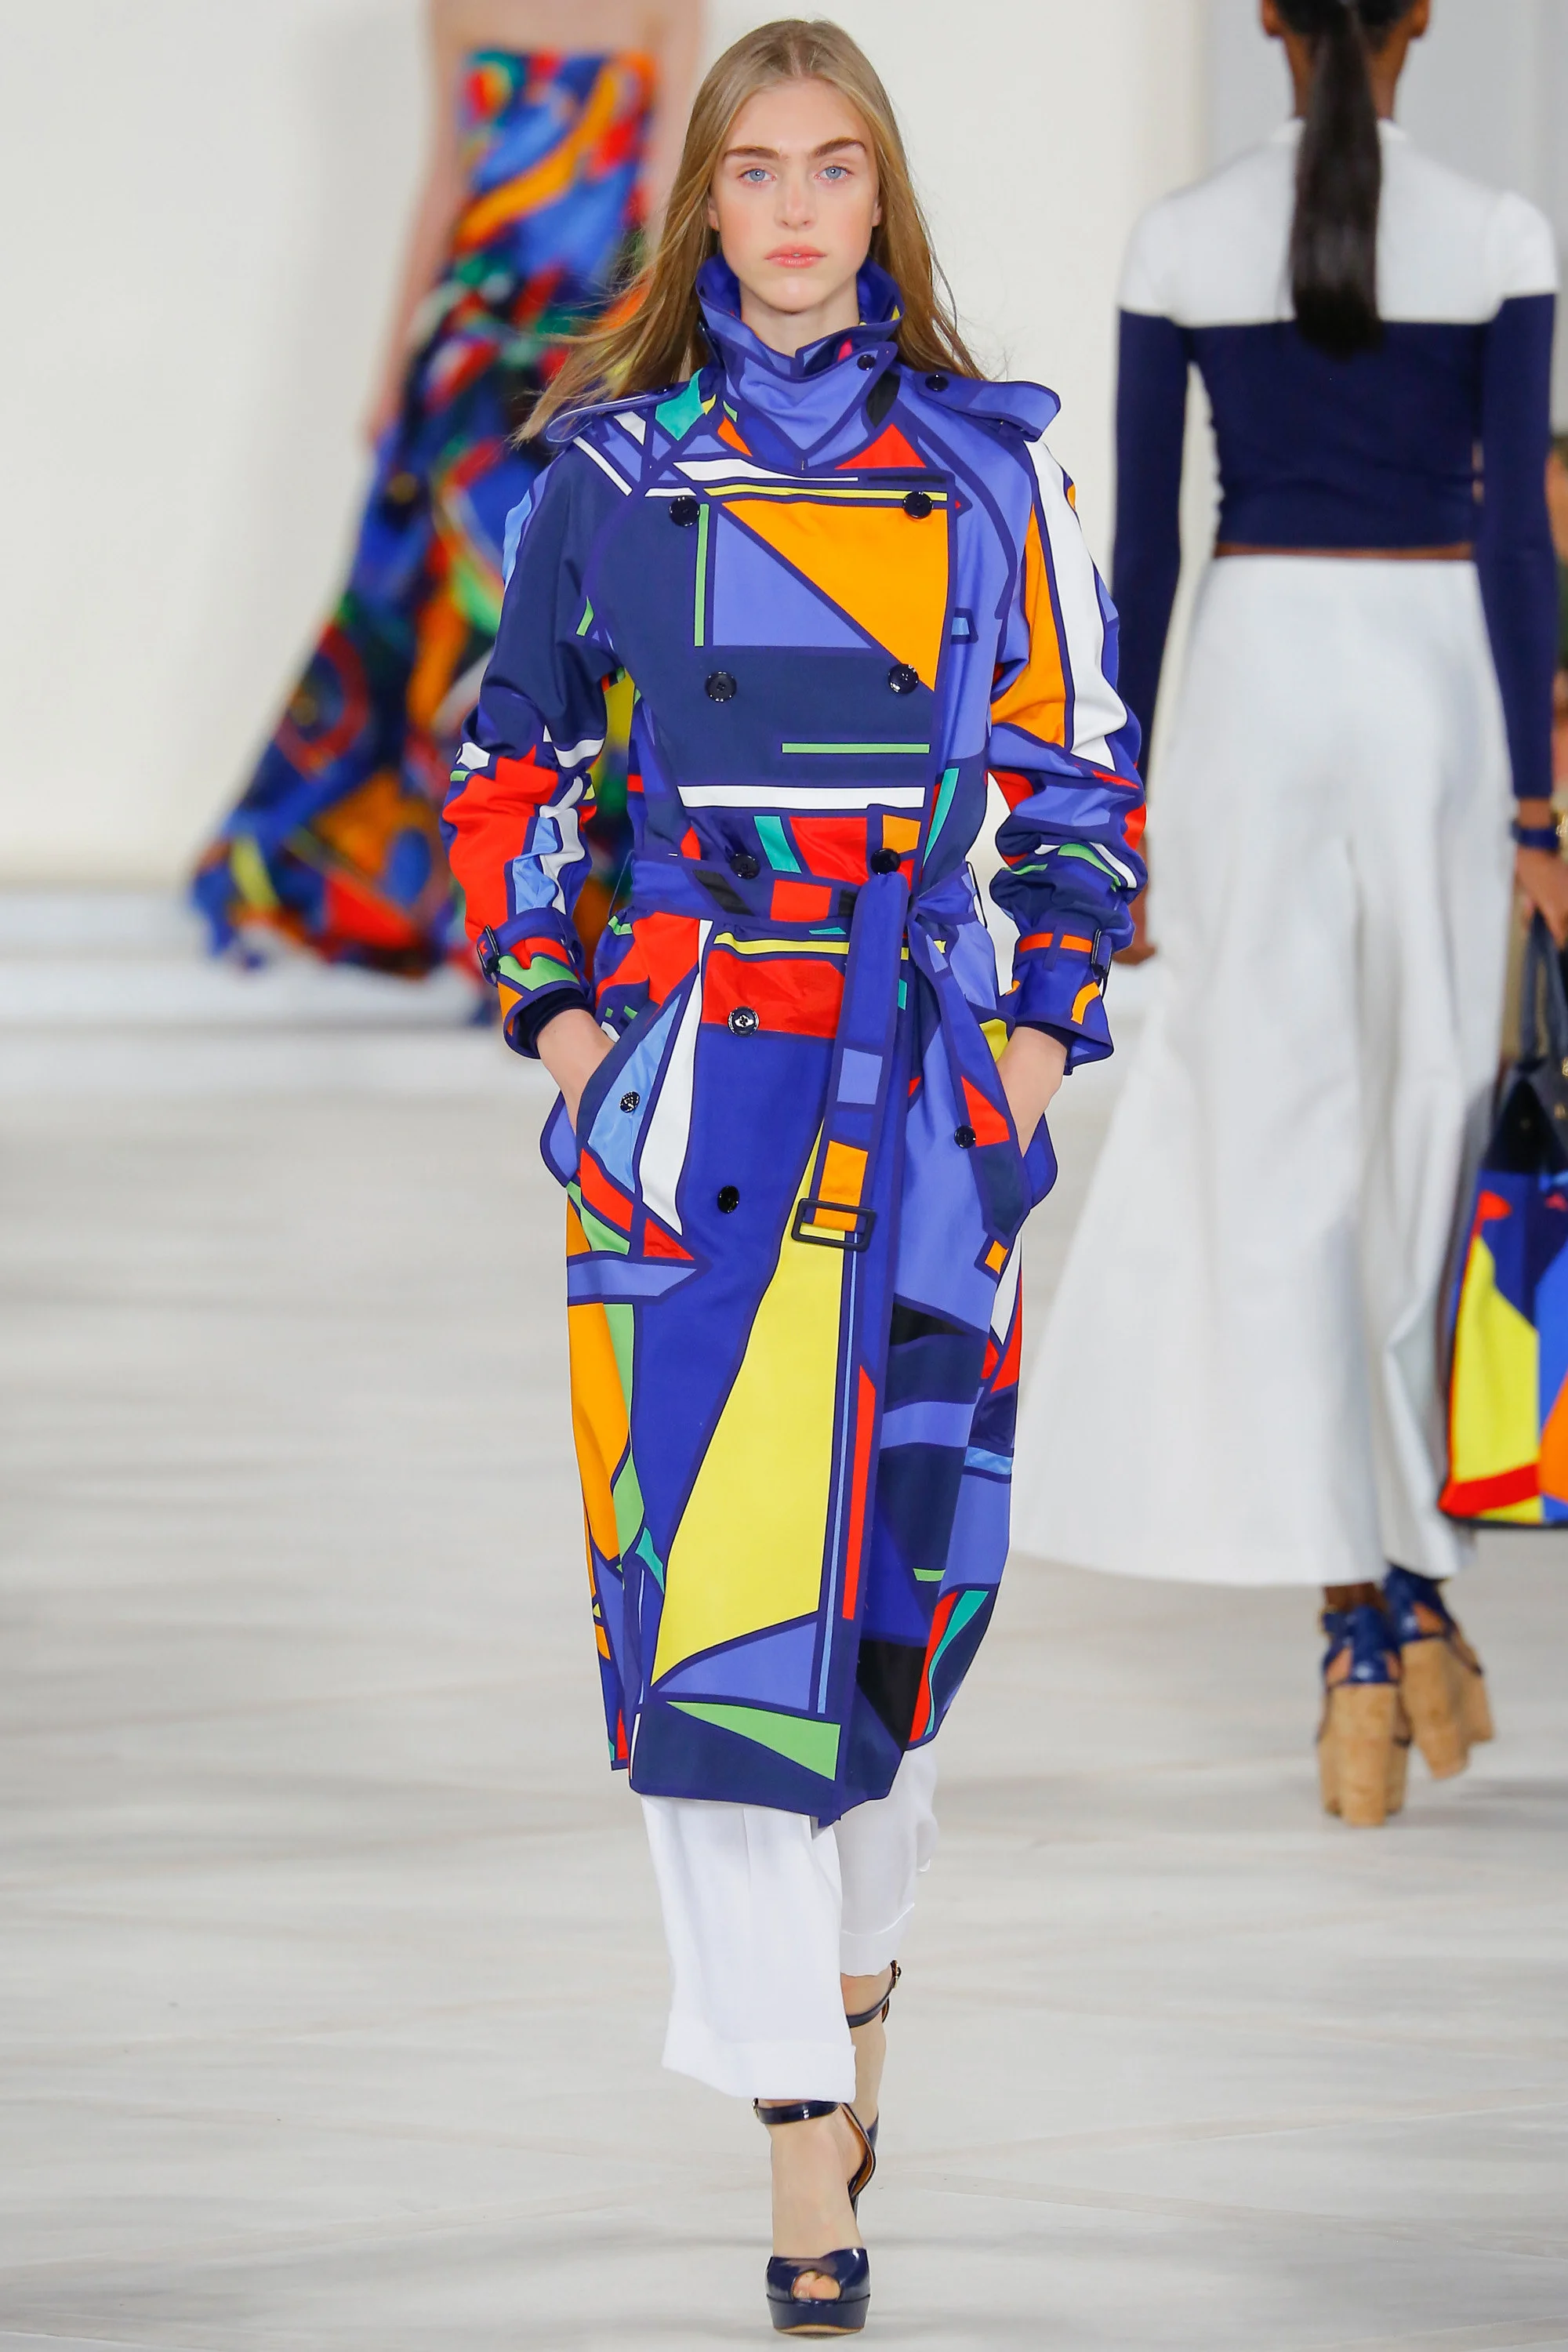
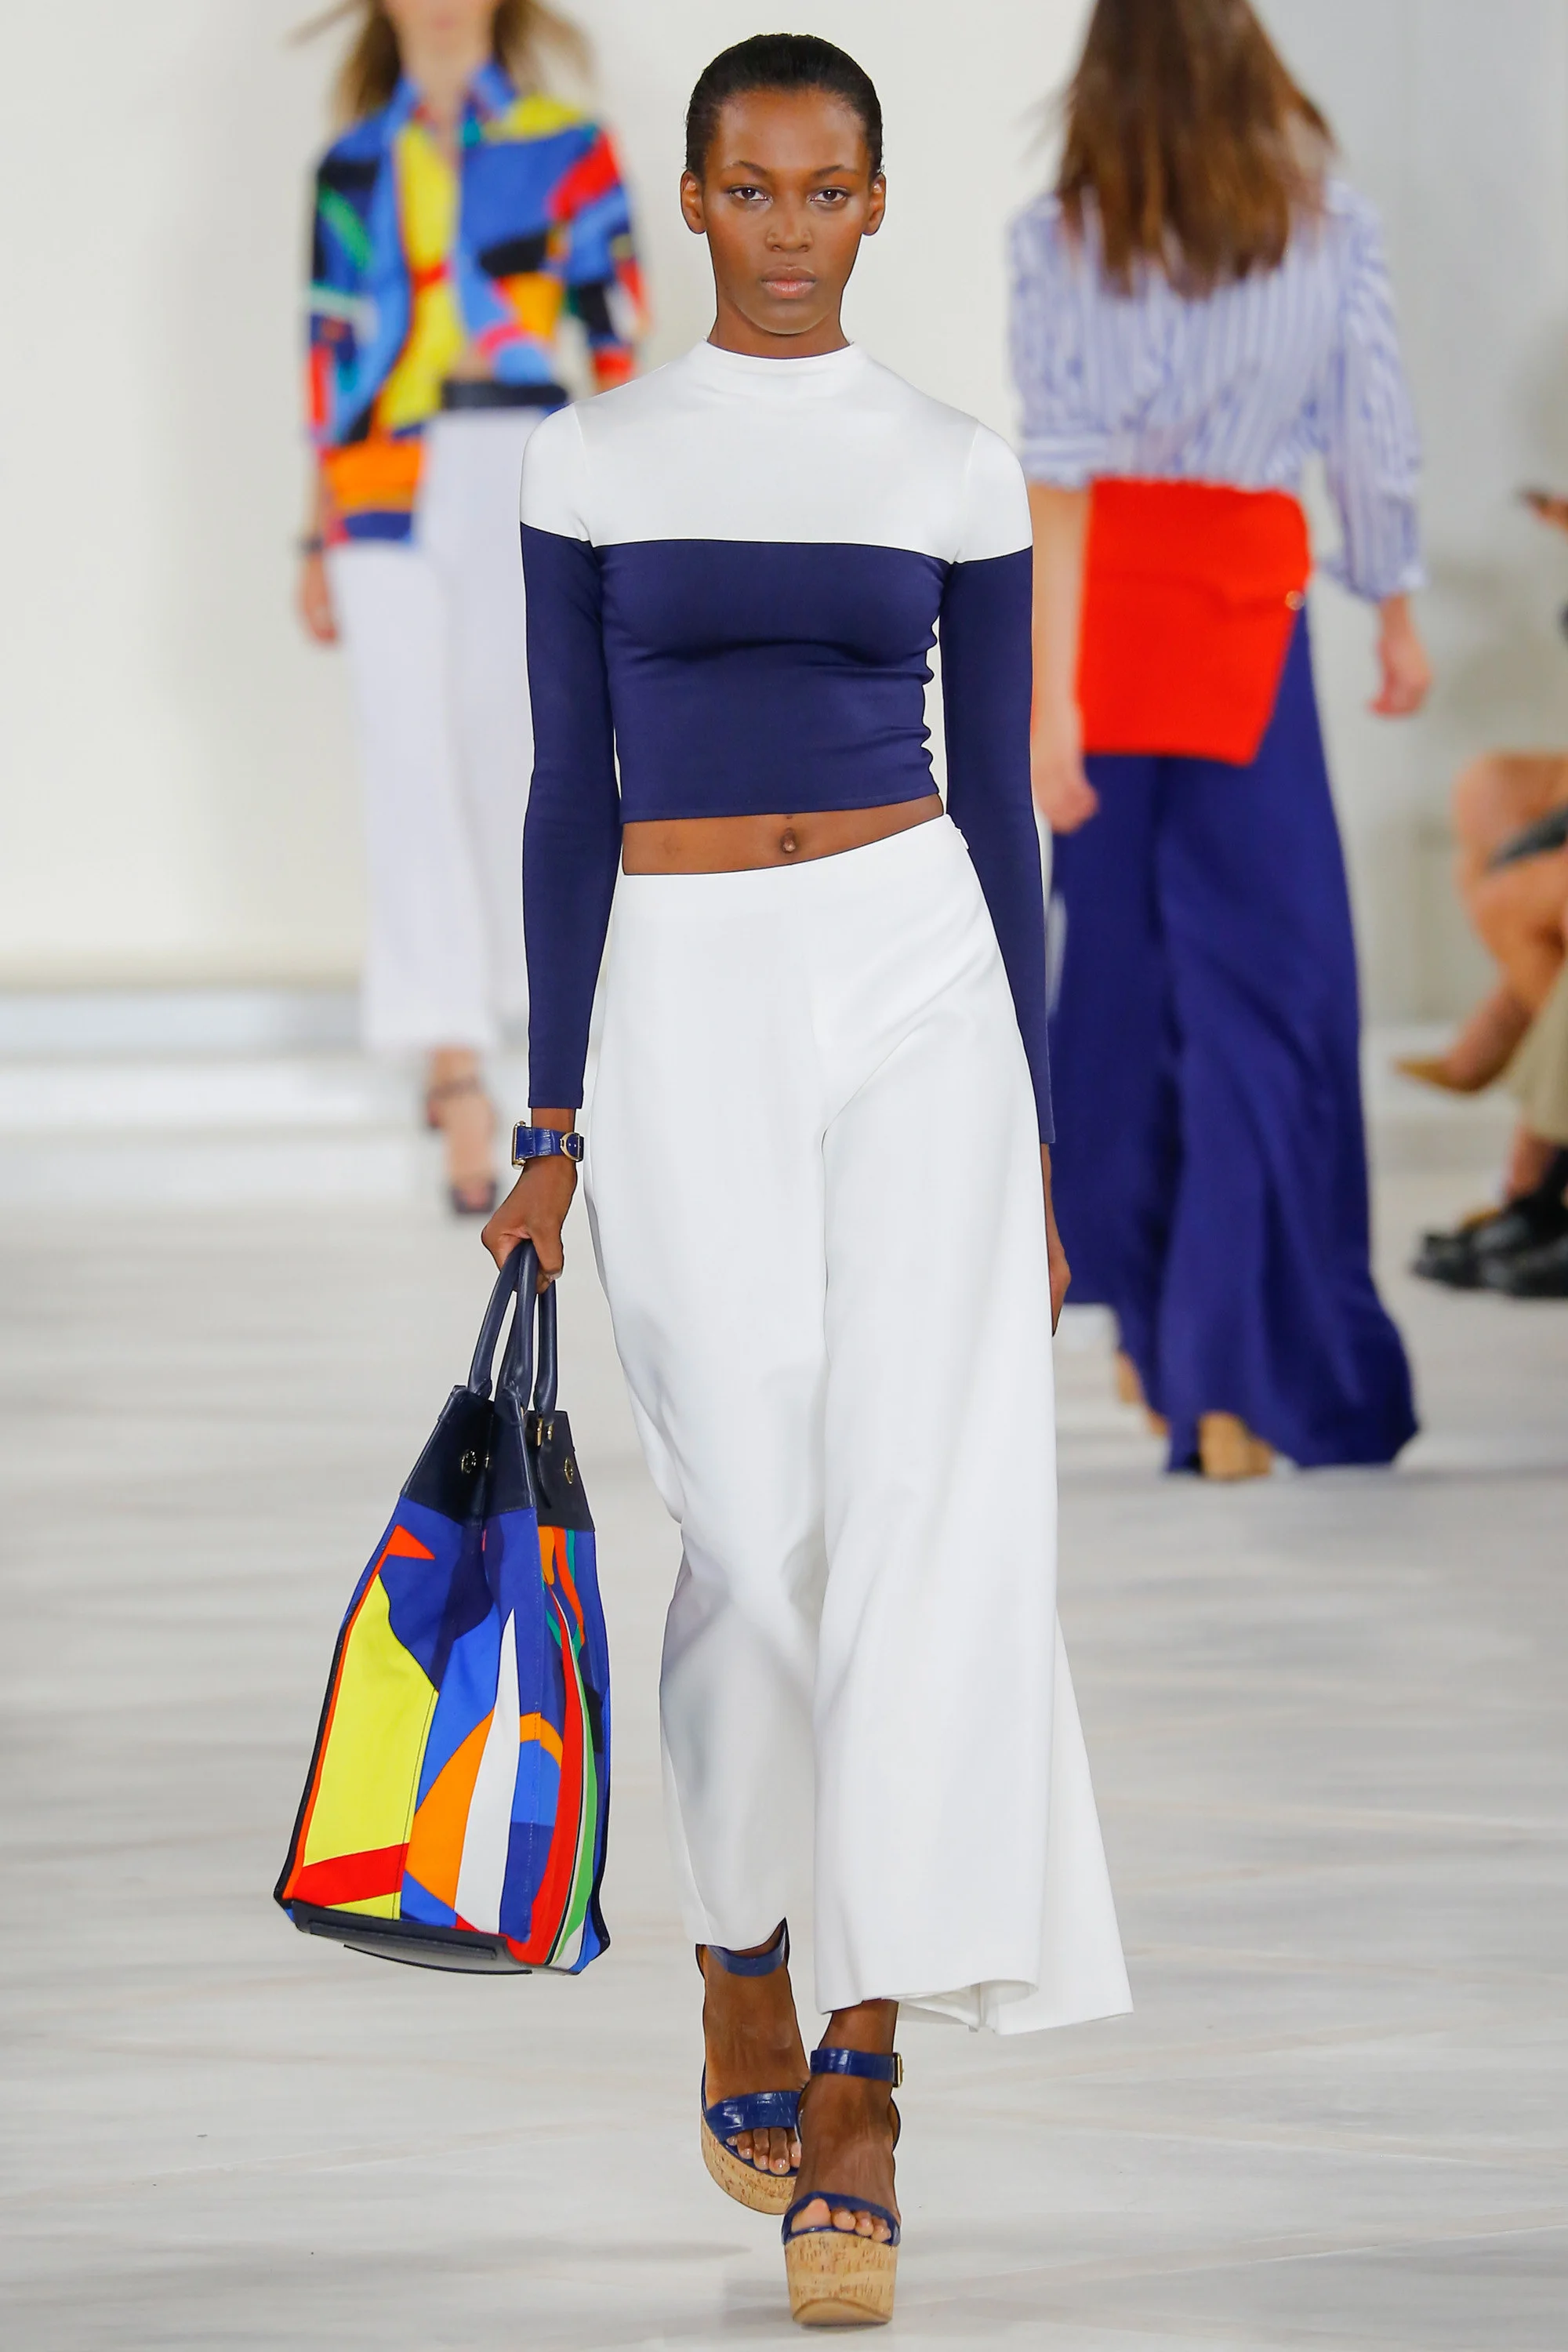
A pleasant (and eye popping) surprise to the collection was the colorful strapless gown which featured the side gathering of a playful geometric printed fabric. This "Mondrian" reminiscent print was also featured on trench, button down shirt, and an adorable double handled purse.
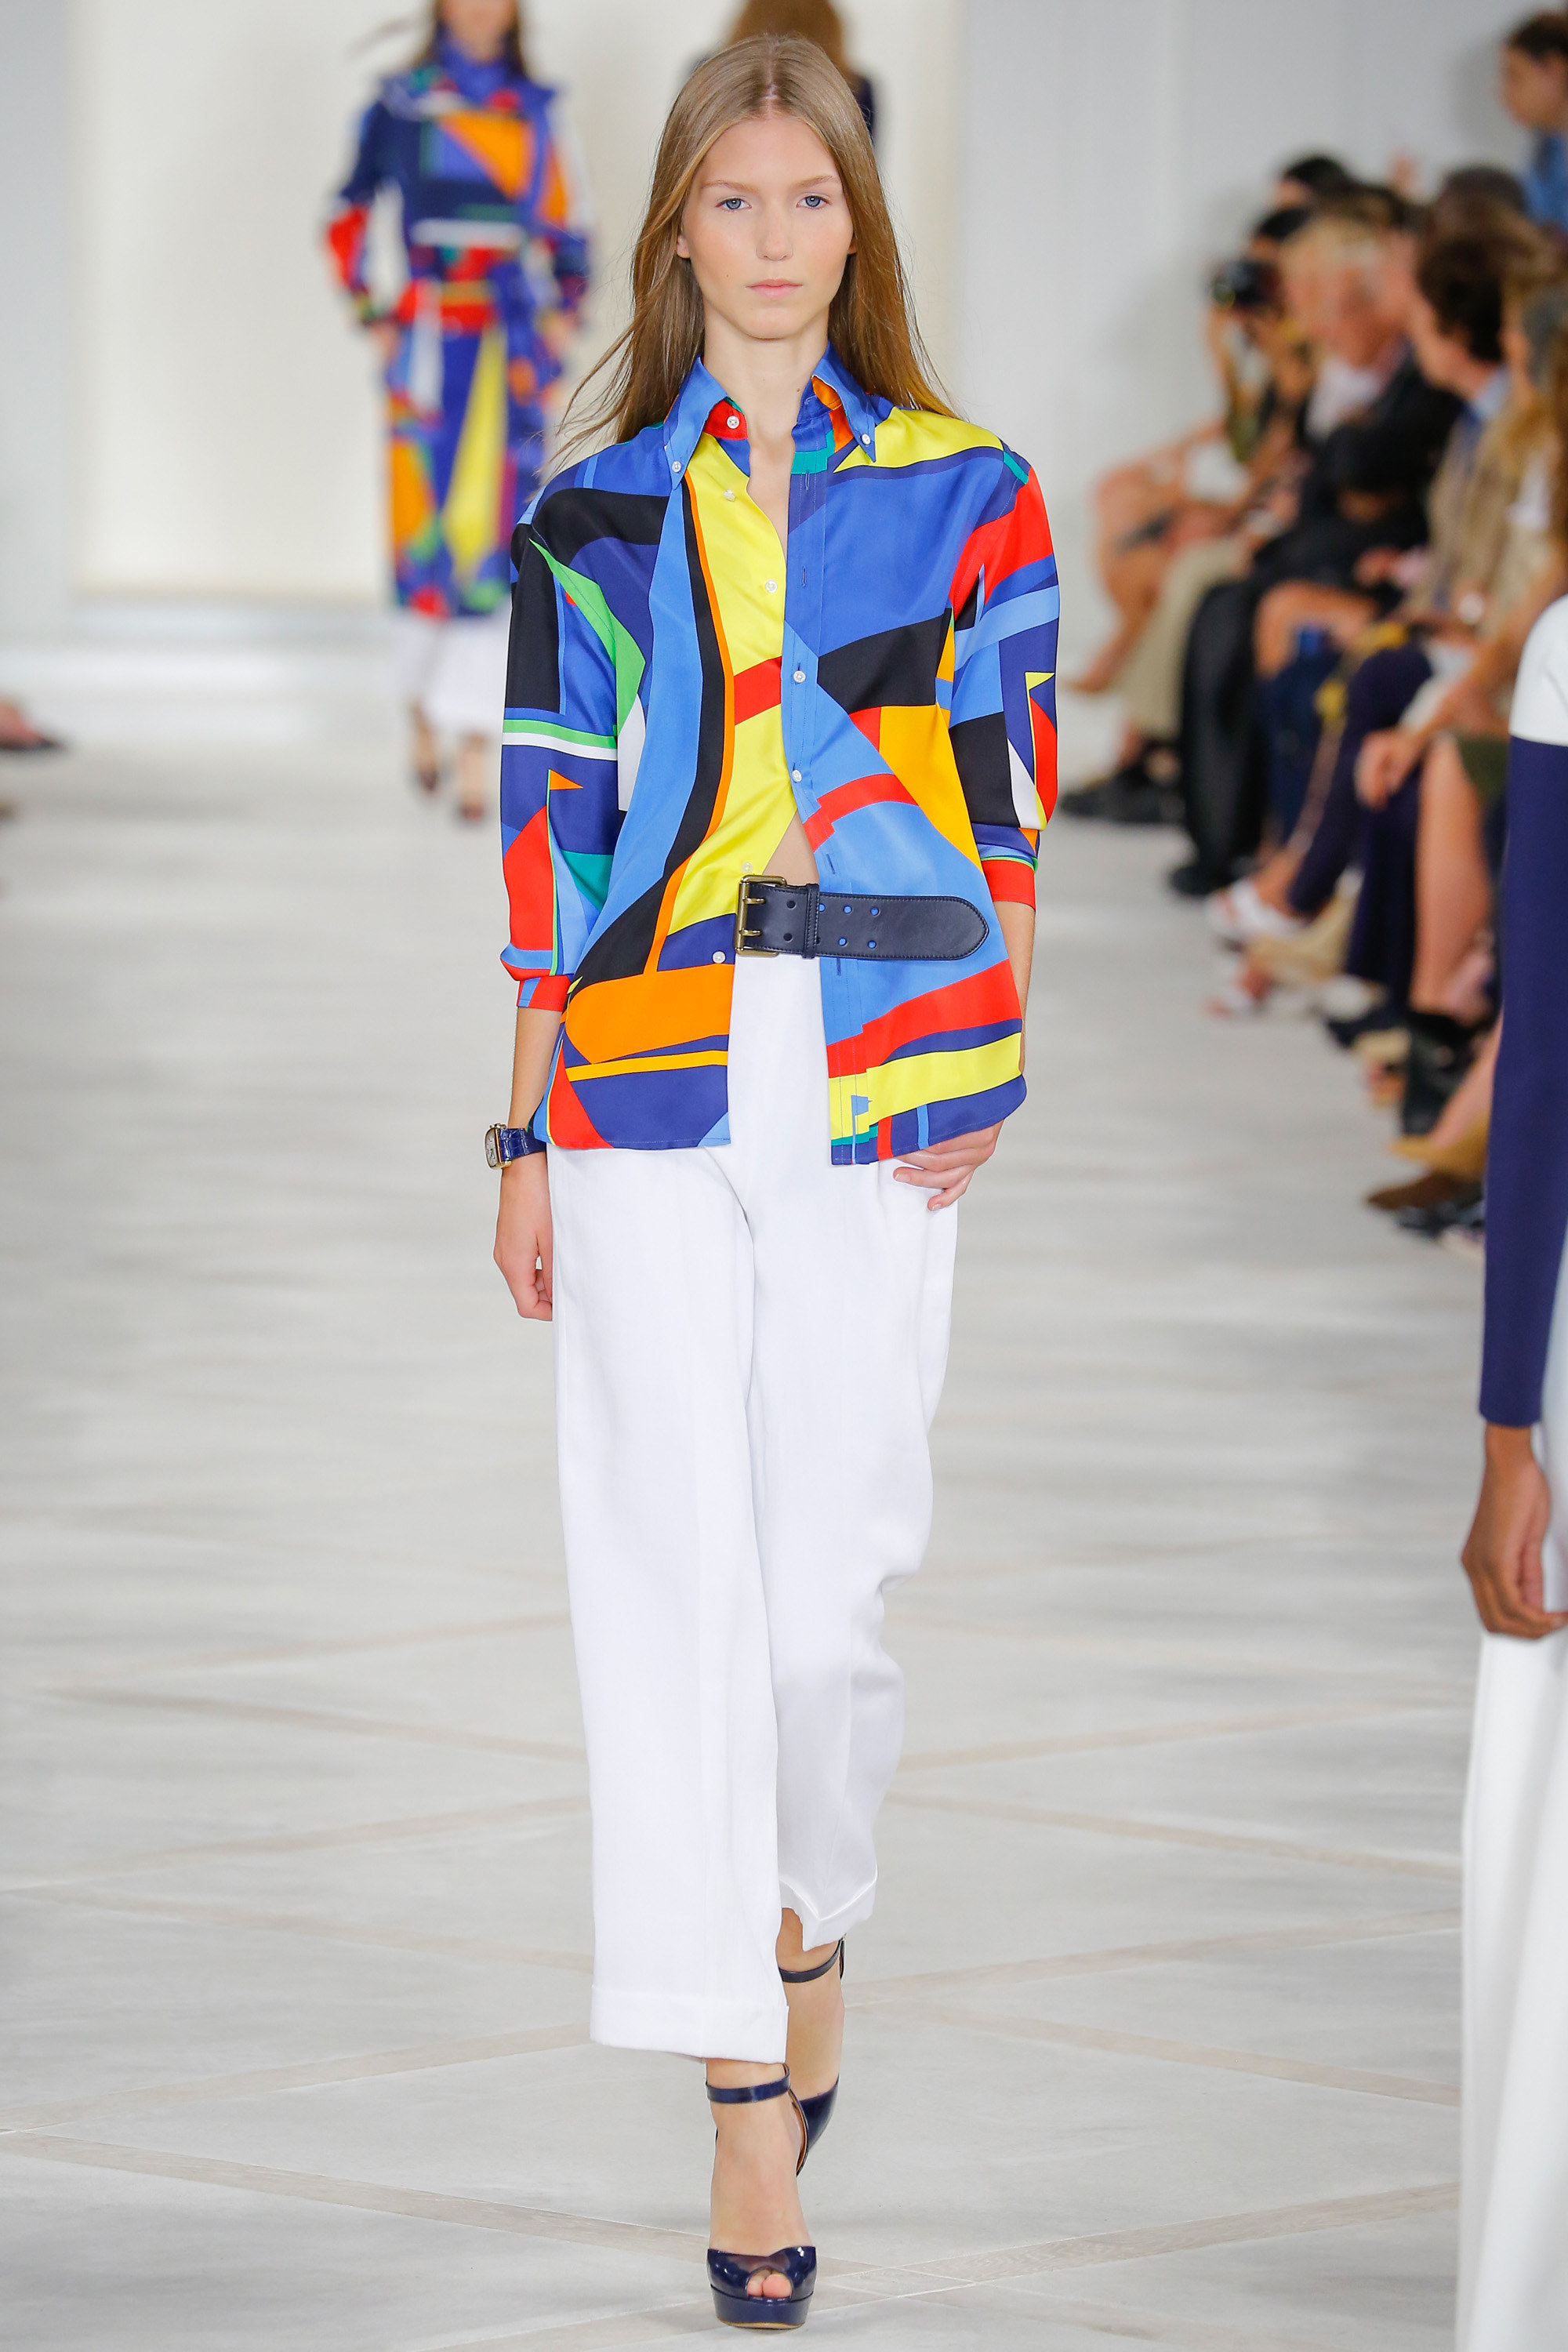
In describing the overall collection, I believe Nicole Phelps of Vogue.com said it best in her official review: "haute silhouettes in a humble fabric".
A job well done Mr. Lauren! :)
Mid-NYFW: My Top Looks
One of the reasons why I love September is New York Fashion Week. Even if you are not directly involved in the backstage action, get a chance to sit front row, or get invited to some exclusive parties, the energy felt in the city during this time is just exciting. The debut of the Spring 2016 collections of notable designers, adds to the concept and anticipation of "new beginnings" that accompanies this month.
In the midst of this stylish week, I have noted a few looks that have caught my eye from two of my favorite designers. The 1970's influence was definitely apparent in multiple shows, but in contrasting ways that I found interesting and especially apparent between Mara Hoffman and Escada. Some looks could have been taken straight from a glamorous night at Studio 54, while others were reminiscent of embodies that classic summer bohemian style. Of the latter, Mara Hoffman depicted the effortless look flawlessly with a cool, laid back feel that I love.


In contrast, the simplistic clean lines and long silhouettes found in Escada's collection also drew a little from the decade, but in the sleek, elegant, and mildly funky style that was reminiscent of looks of the ever-so-stylish Bianca Jagger.


Each collection encompasses two key aspects of my personal style: laid back ease (with a pop of interesting prints) and simple silhouettes with bold colors.
Can't wait to see what the rest of this week has in store!
Be Fall Ready, But Still Bright
Calendar wise, Fall (the ultimate style season) is here. But weather wise, not so much. I'm excited to layer up, but my love of bright color combinations (inspired by the ever shining sun) is not yet ready to transition into muted neutrals and of course, black. My latest creation incorporates elements of the summer into a fall piece. Read more below:
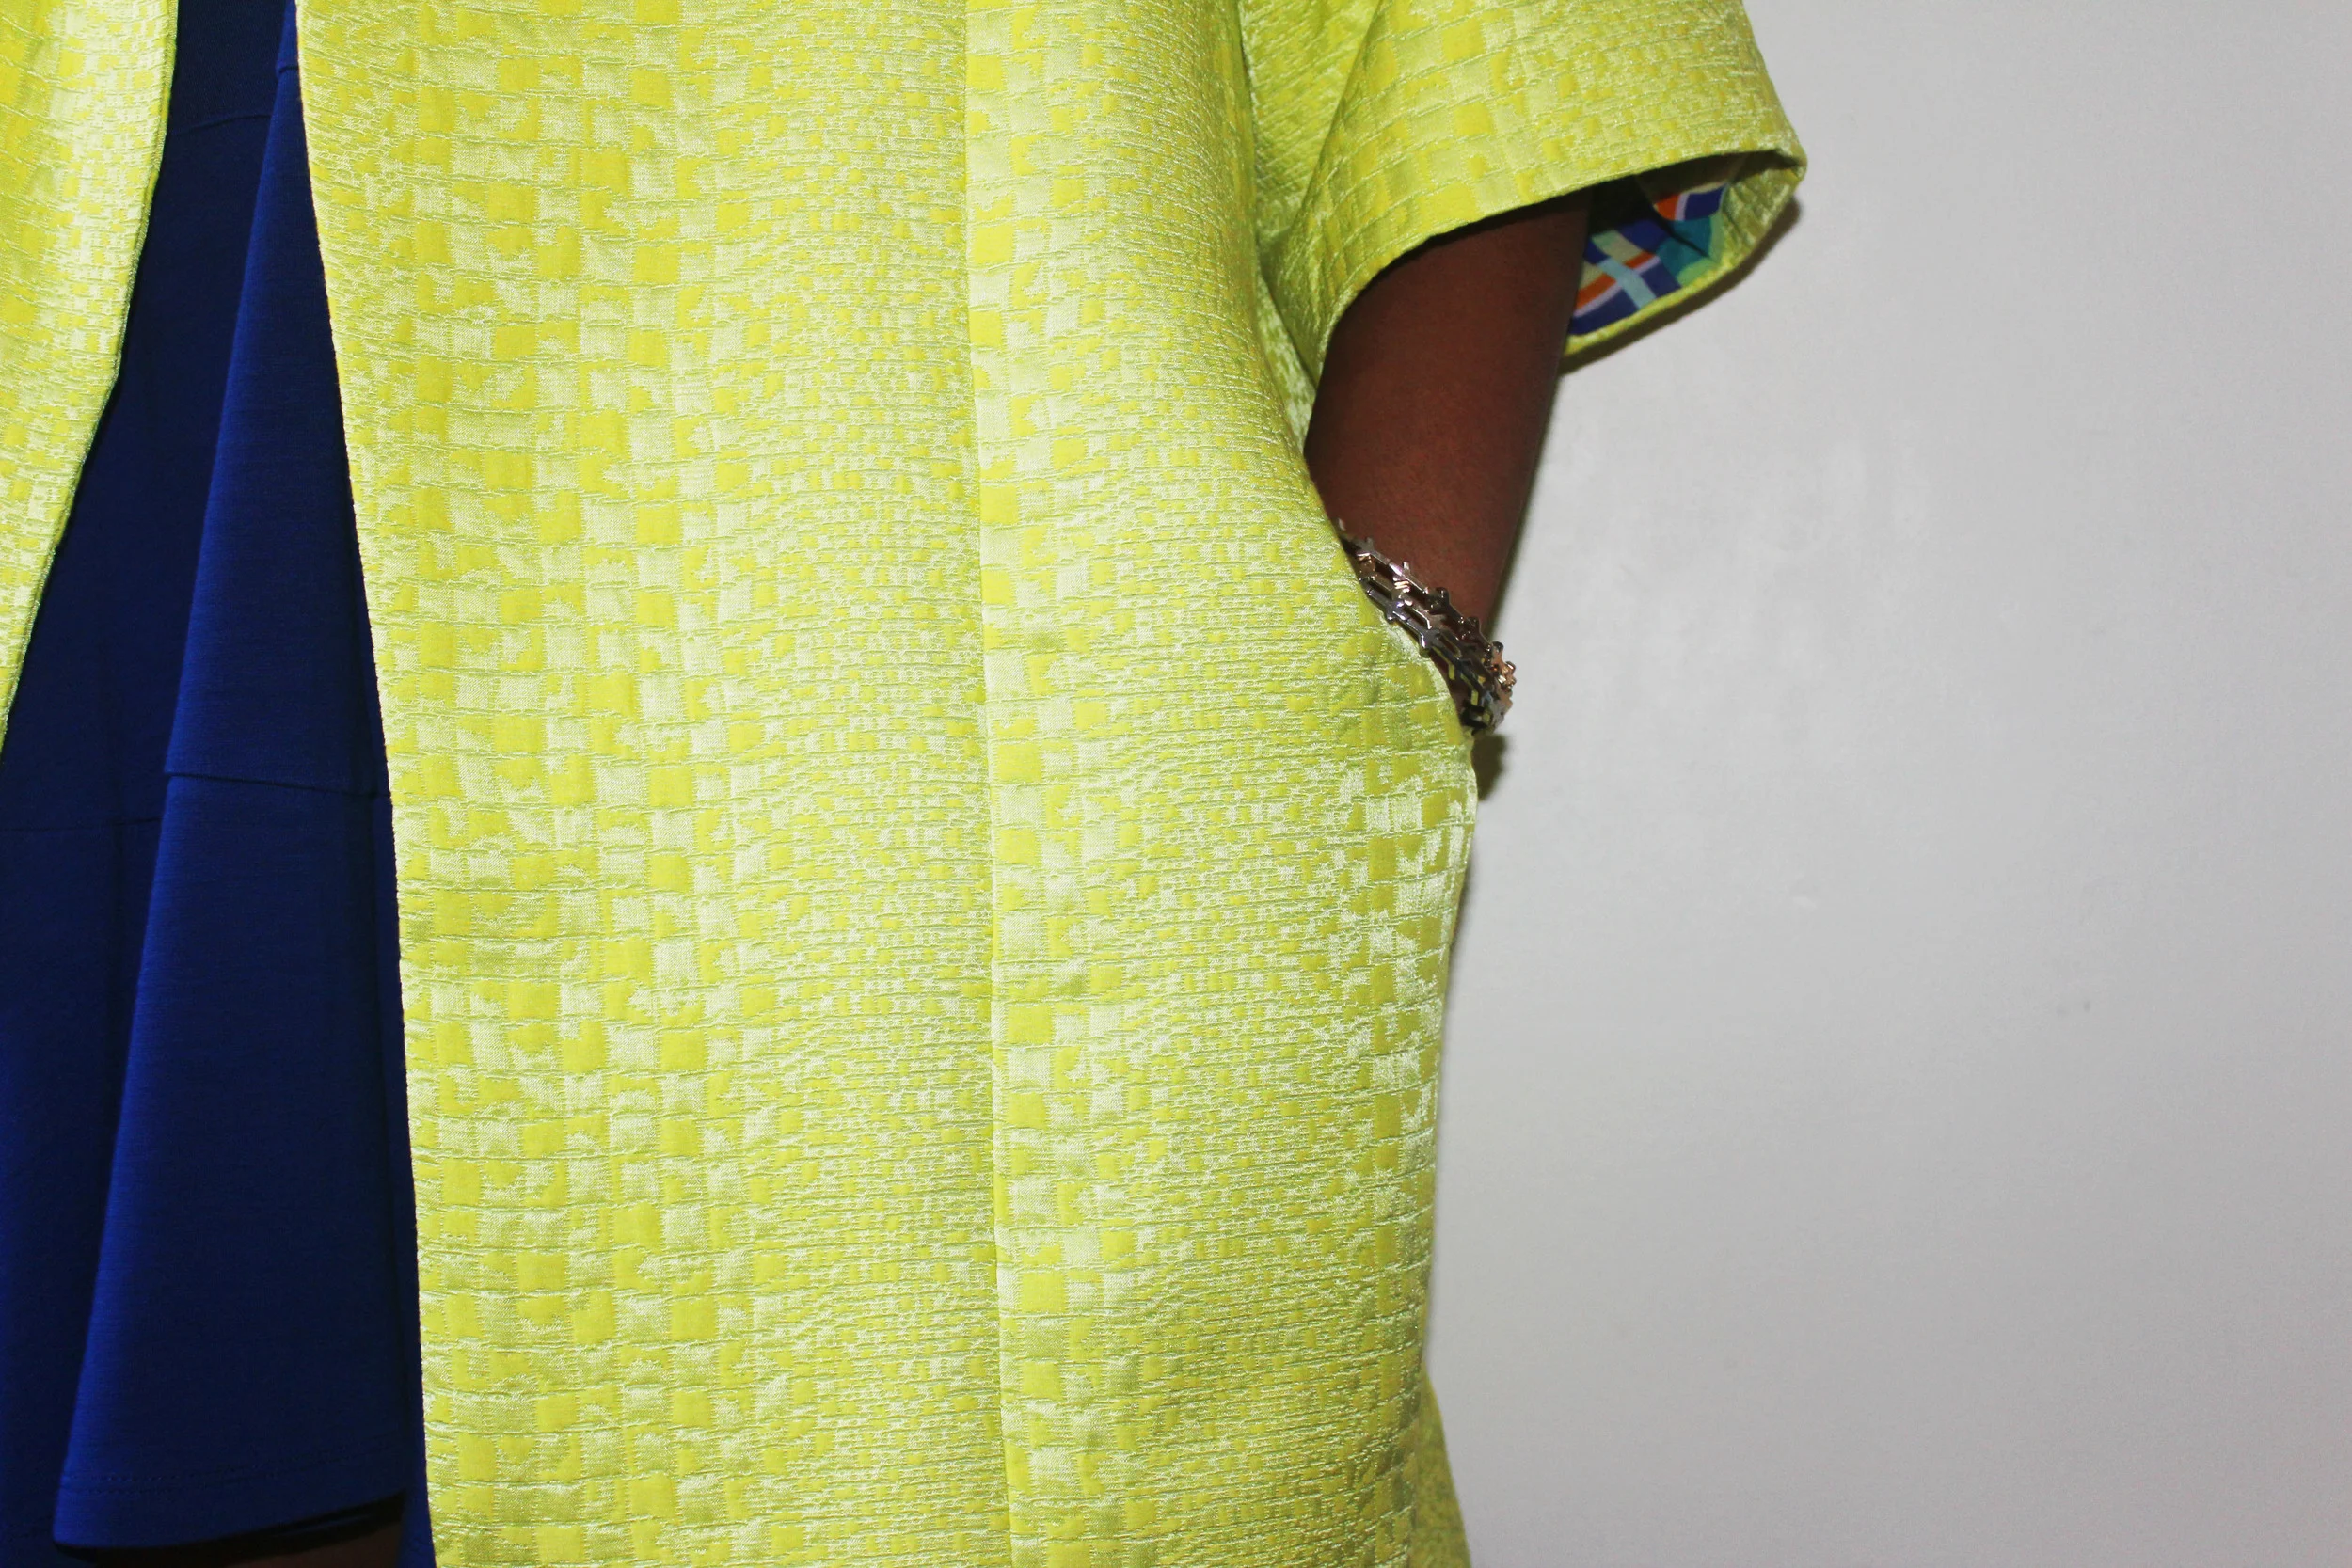
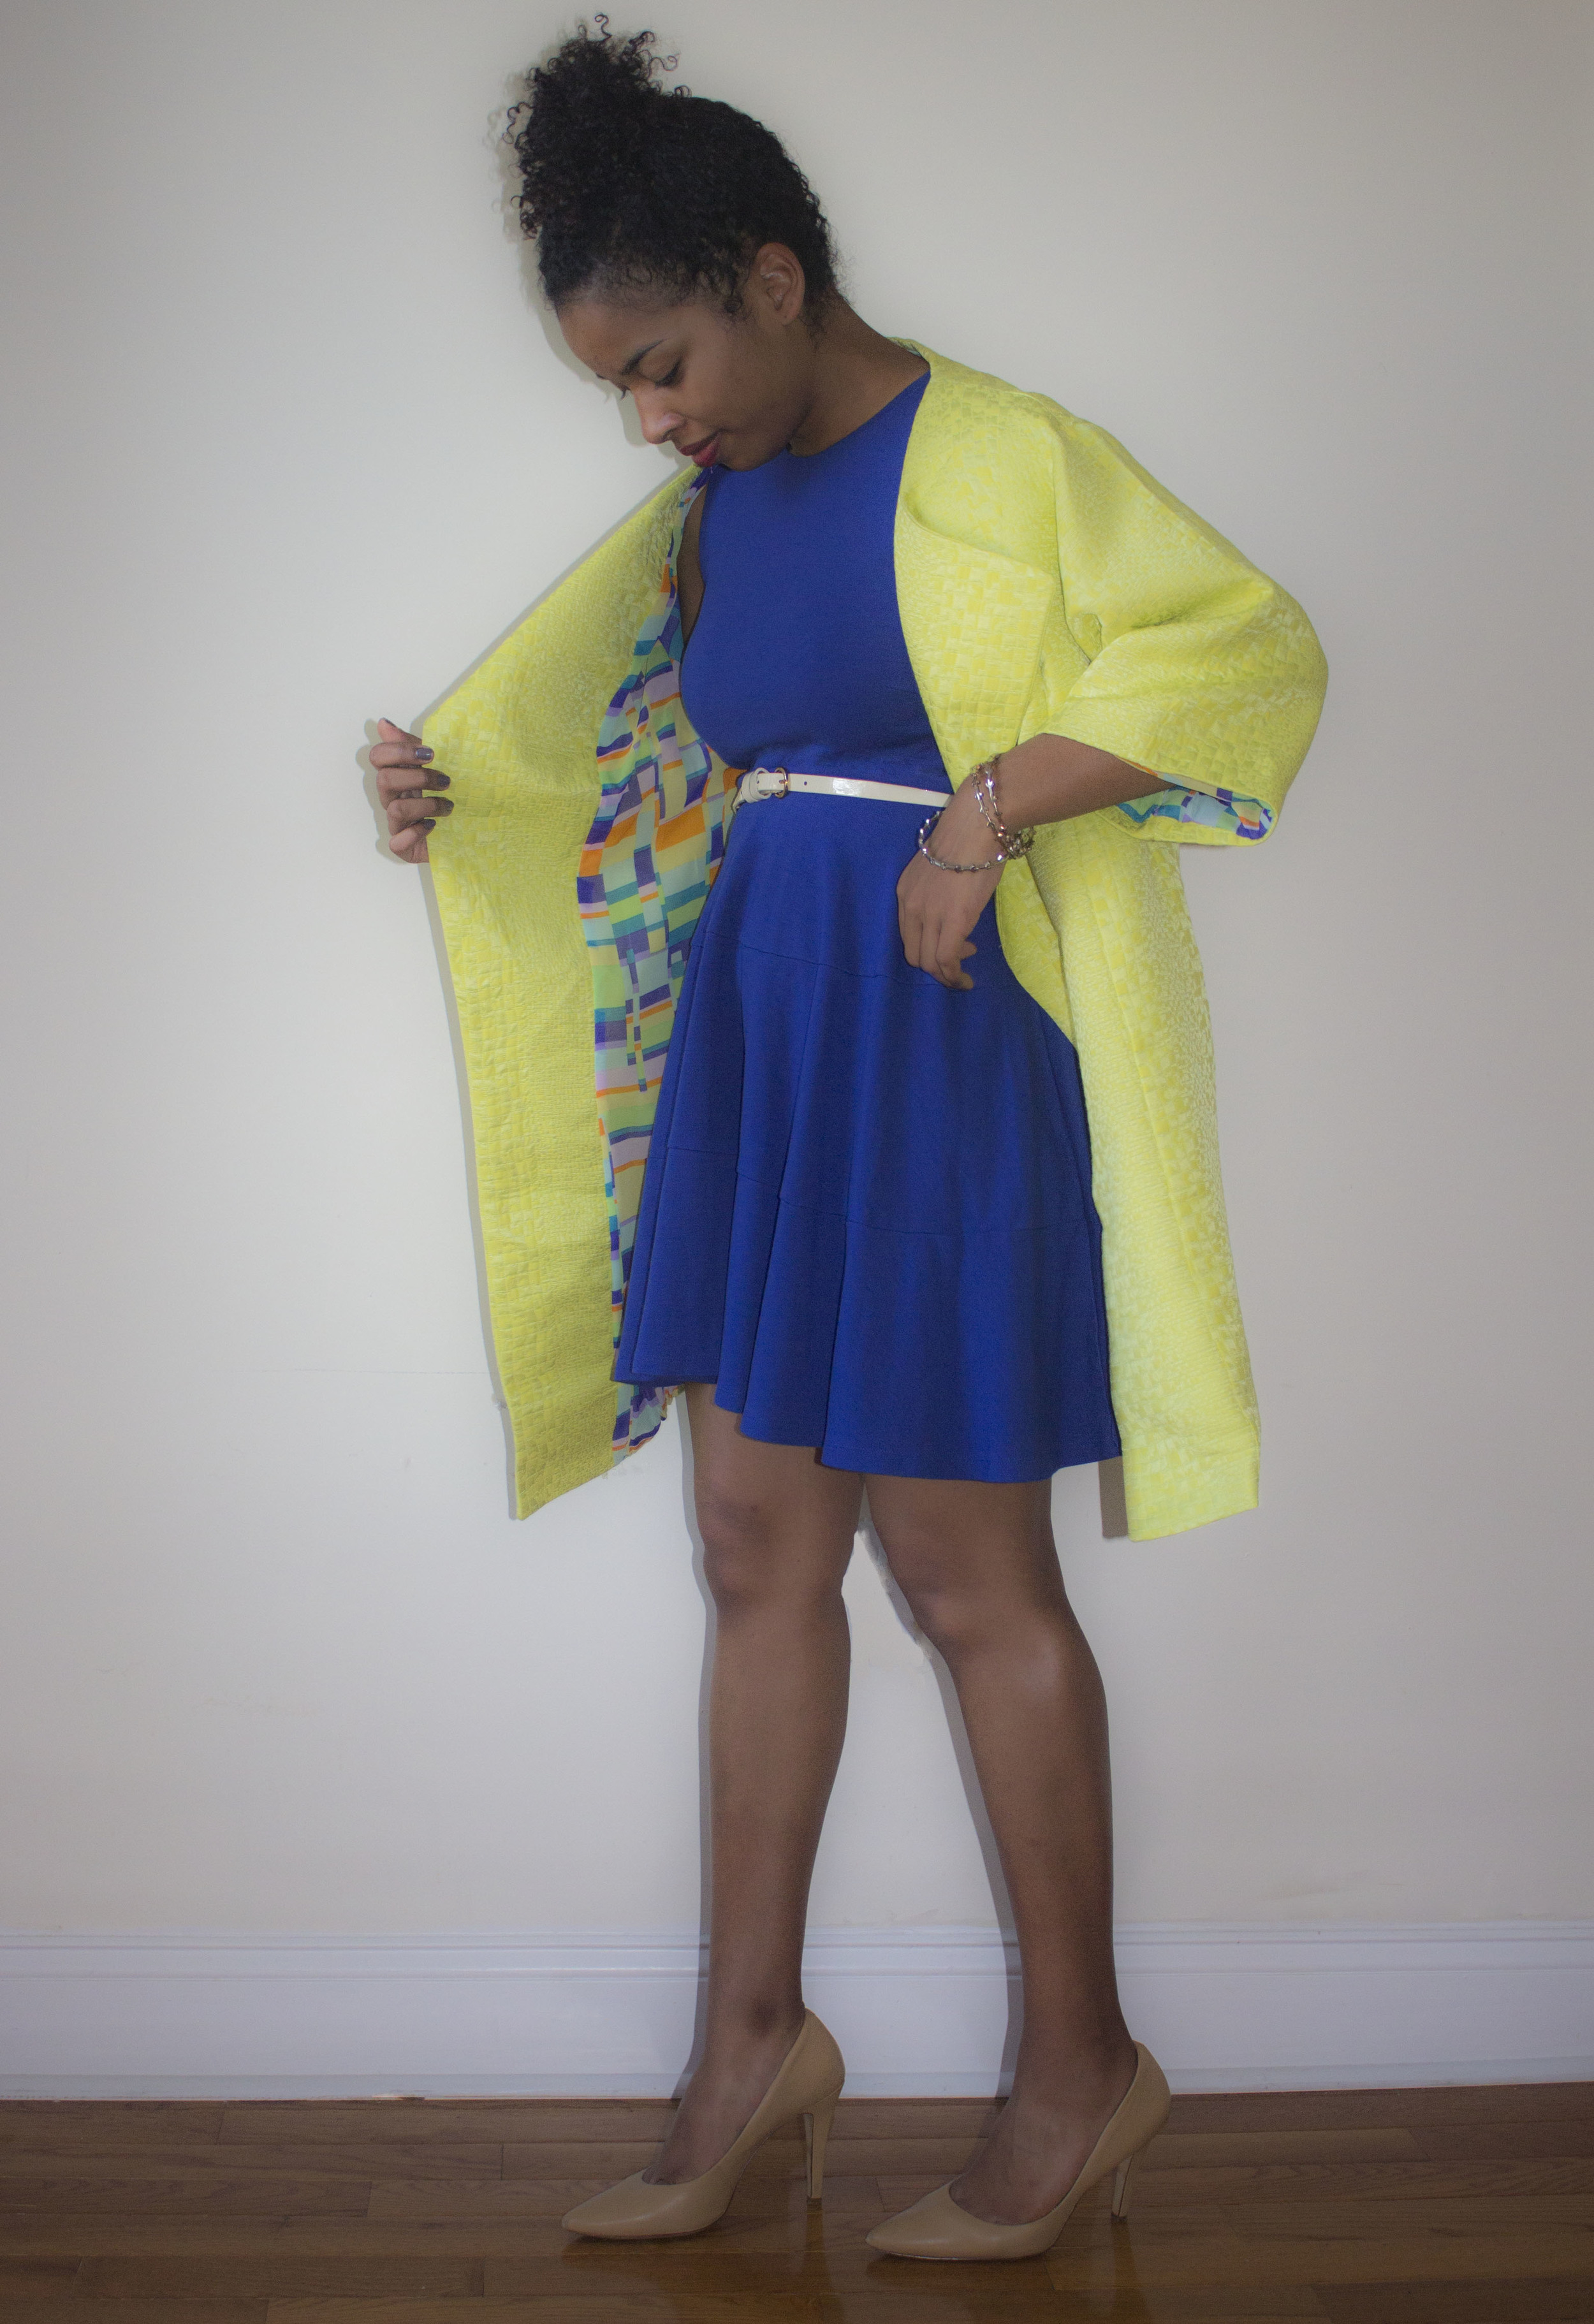
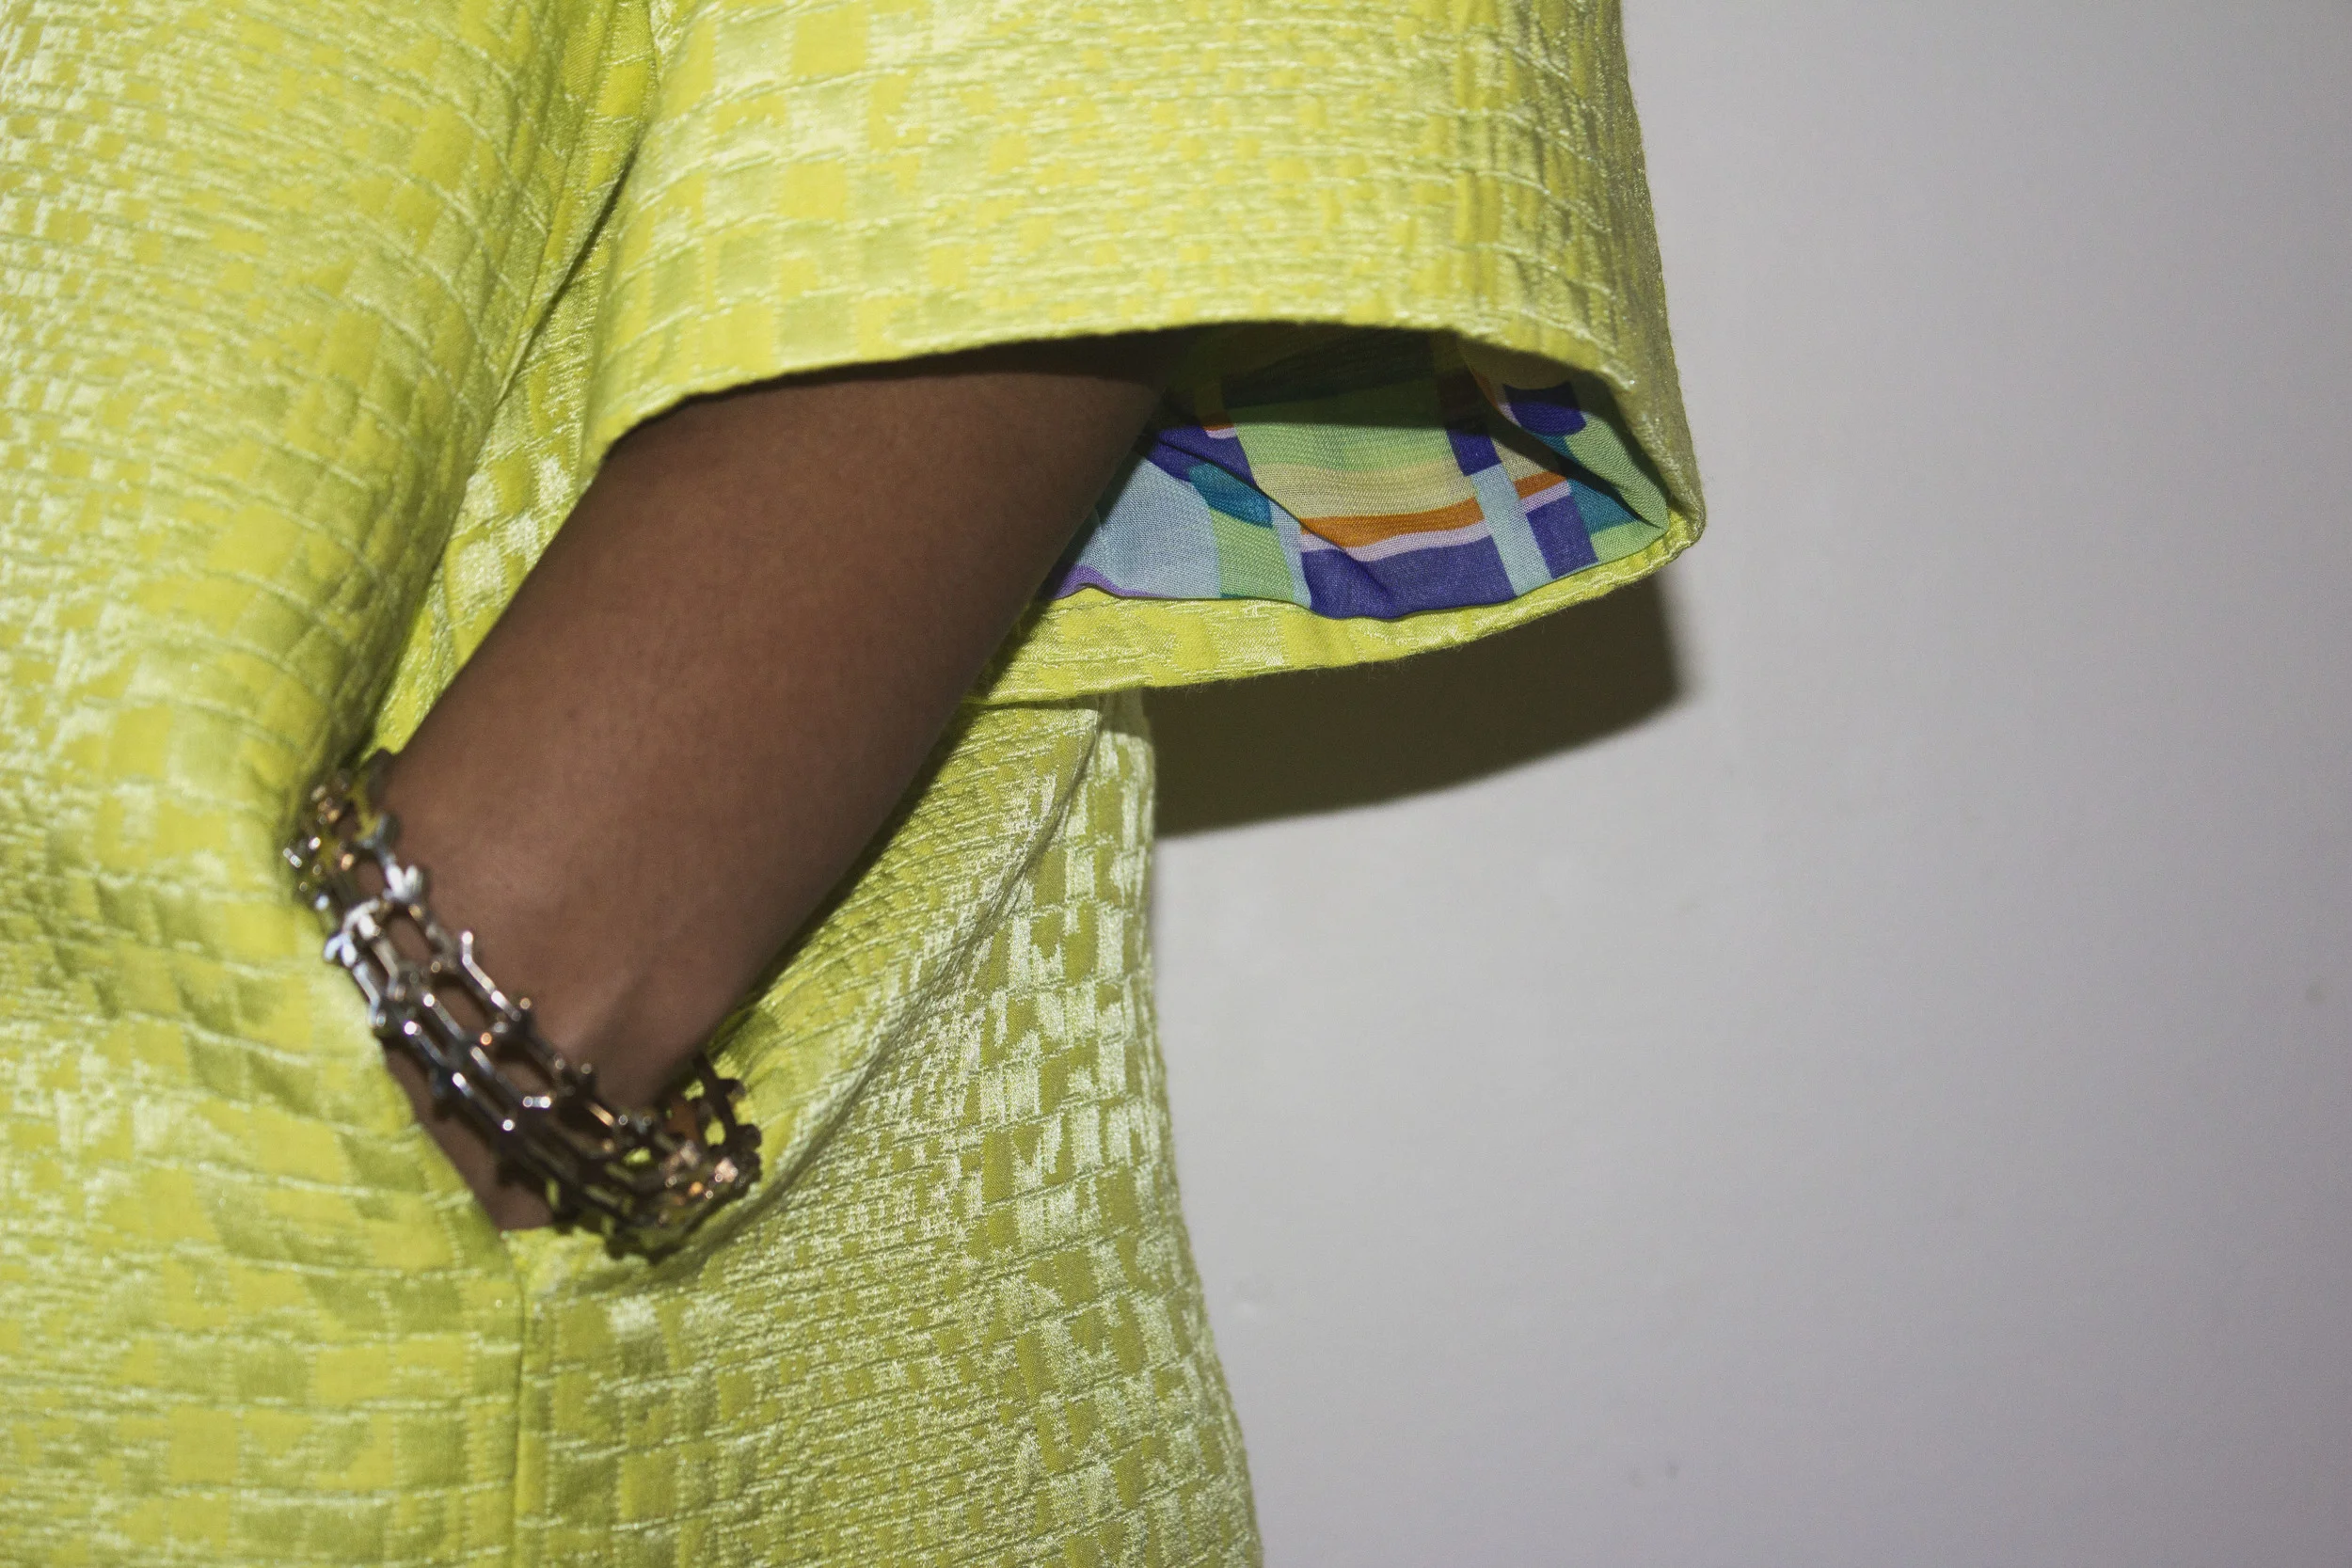
My latest creation: a bright & oversized coat
This eye catching outerwear piece was created based off a pattern from BurdaStyle, a site that sells a wide range of great pattens (that can be downloaded and printed at home). Titled "Classic Notched Collar Coat", I made a few alterations to this intricate pattern including the addition of dart seams along the front and back panels and removal of the collar, which makes for a laid back and less formal look. I chose a lime green/yellow textured silk jacquard fabric (from none other than Mood Fabrics) which caught my eye with it's subtly detailed tonal print, that can be truly appreciated upon close examination. To keep things interesting (and bright), I added a bold and playful fabric of a similar geometric print pattern to line the inside of this oversized coat.
Overall, I managed to complete this coat periodically over the course of a week, and I look forward to sporting it during this "transitioning" fall.